
Upgrade Your Drupal Skills
We trained 1,000+ Drupal Developers over the last decade.
See Advanced Courses NAH, I know EnoughWYSIWYG Module + CKEditor the Third: Ultimate End
Almost a year ago I wrote a couple of posts about customizing CKEditor when implementing it with the WYSIWYG module. In the second post I showed how to integrate a custom button and dialog window into the editor. The method I used to insert the button, however, was a bit of a hack. At the end of the post I alluded to integrating our dialog as a CKEditor plugin. Today we're going to do just that. We'll start by writing a plugin for CKEditor using it's own API. Then, we'll integrate it into the CKEditor toolbar using module hooks from the WYSIWYG module as well as the CKEditor module. By the time you're done this tutorial you'll be controlling CKEditor with the power of a level 99 Final Fantasy Summoner.
Getting Started
To start, it will help if you have read the first two posts of this series. We'll be using the module that we worked on in those posts as a starting point so it would be good to know what's going on there. Otherwise, knowing your way around php and javascript will come in handy, especially if you want to customize beyond this tutorial.
This tutorial should work for either Drupal 6 or Drupal 7. If you want to skip the tutorial and just browse the module code (there's lots of comments), I've attached a zipped copy of the finished module at the bottom of the post.
1. Creating the CKEditor plugin
The first step is to create the CKEditor plugin. This is going to be a native CKEditor plugin that will work with both the WYSIWYG module as well as the CKEditor module. CKEditor plugins are actually pretty simple to implement. There's a nice tutorial on the CKEditor site that has everything you need to get started. That combined with what we learned in part two of this tutorial series is all we need to get this plugin working.
Alright so we'll start by creating a new folder "plugins" in our ckeditor_custom module. Then, we'll create a folder for our plugin. We'll be using the same dialog from before which inserts a youtube video iframe into the content area, so we'll call our plugin "youtube". Create a file called "plugin.js" in the youtube folder as well as a folder called "images" for any images the plugin might need (in our case it's just a toolbar icon that we pulled from google images and resized to 16x16 pixels). When you're done your folder heirarchy should look like this:
- ckeditor_custom
- plugins
- youtube
- images
- icon.png
- plugin.js
- images
- youtube
- plugins
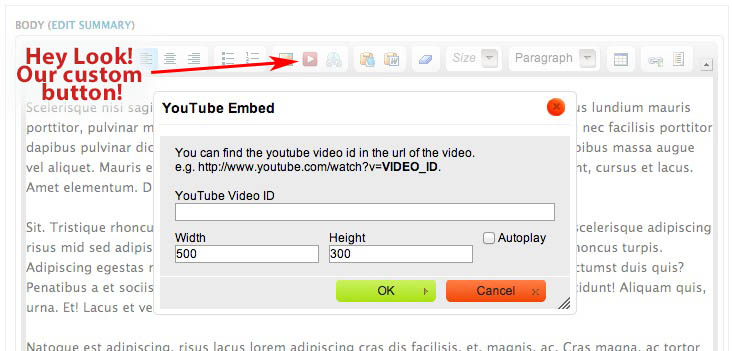
/**
 * @file Plugin for inserting Drupal embeded media
 */
( function($) {

  // All CKEditor plugins are created by using the CKEDITOR.plugins.add function
  // The plugin name here needs to be the same as in hook_ckeditor_plugin()
  // or hook_wysiwyg_plugin()
  CKEDITOR.plugins.add( 'youtube',
  {
    // the init() function is called upon the initialization of the editor instance
    init: function (editor) {

      // Register the dialog. The actual dialog definition is below.
      CKEDITOR.dialog.add('youtubeDialog', ytDialogDefinition);

      // Now that CKEditor knows about our dialog, we can create a
      // command that will open it
      editor.addCommand('youtubeDialogCmd', new CKEDITOR.dialogCommand( 'youtubeDialog' ));

      // Finally we can assign the command to a new button that we'll call youtube
      // Don't forget, the button needs to be assigned to the toolbar. Note that
      // we're CamelCasing the button name (YouTube). This is just because other
      // CKEditor buttons are done this way (JustifyLeft, NumberedList etc.)
      editor.ui.addButton( 'YouTube',
        {
          label : 'You Tube',
          command : 'youtubeDialogCmd',
          icon: this.path + 'images/icon.png'
        }
      );

    }
  });

  /*
    Our dialog definition. Here, we define which fields we want, we add buttons
    to the dialog, and supply a "submit" handler to process the user input
    and output our youtube iframe to the editor text area.
  */
  var ytDialogDefinition = function (editor) {

    var dialogDefinition =
    {
      title : 'YouTube Embed',
      minWidth : 390,
      minHeight : 130,
      contents : [
        {
          // To make things simple, we're just going to have one tab
          id : 'tab1',
          label : 'Settings',
          title : 'Settings',
          expand : true,
          padding : 0,
          elements :
          [
            {
              // http://docs.cksource.com/ckeditor_api/symbols/CKEDITOR.dialog.definition.vbox.html
              type: 'vbox',
              widths : [ null, null ],
              styles : [ 'vertical-align:top' ],
              padding: '5px',
              children: [
                {
                  // http://docs.cksource.com/ckeditor_api/symbols/CKEDITOR.dialog.definition.html.html
                  type : 'html',
                  padding: '5px',
                  html : 'You can find the youtube video id in the url of the video. <br/> e.g. http://www.youtube.com/watch?v=<strong>VIDEO_ID</strong>.'
                },
                {
                  // http://docs.cksource.com/ckeditor_api/symbols/CKEDITOR.dialog.definition.textInput.html
                  type : 'text',
                  id : 'txtVideoId',
                  label: 'YouTube Video ID',
                  style: 'margin-top:5px;',
                  'default': '',
                  validate: function() {
                    // Just a little light validation
                    // 'this' is now a CKEDITOR.ui.dialog.textInput object which
                    // is an extension of a CKEDITOR.ui.dialog.uiElement object
                    var value = this.getValue();
                    value = value.replace(/http:.*youtube.*?v=/, '');
                    this.setValue(value);
                  },
                  // The commit function gets called for each form element
                  // when the dialog's commitContent Function is called.
                  // For our dialog, commitContent is called when the user
                  // Clicks the "OK" button which is defined a little further down
                  commit: commitValue
                },
              ]
            },
            {
              // http://docs.cksource.com/ckeditor_api/symbols/CKEDITOR.dialog.definition.hbox.html
              type: 'hbox',
              widths : [ null, null ],
              styles : [ 'vertical-align:top' ],
              padding: '5px',
              children: [
                {
                  type : 'text',
                  id : 'txtWidth',
                  label: 'Width',
                  // We need to quote the default property since it is a reserved word
                  // in javascript
                  'default': 500,
                  validate : function() {
                    var pass = true,
                      value = this.getValue();
                    pass = pass && CKEDITOR.dialog.validate.integer()( value )
                      && value > 0;
                    if ( !pass )
                    {
                      alert( "Invalid Width" );
                      this.select();
                    }
                    return pass;
                  },
                  commit: commitValue
                },
                {
                  type : 'text',
                  id : 'txtHeight',
                  label: 'Height',
                  'default': 300,
                  validate : function() {
                    var pass = true,
                      value = this.getValue();
                    pass = pass && CKEDITOR.dialog.validate.integer()( value )
                      && value > 0;
                    if ( !pass )
                    {
                      alert( "Invalid Height" );
                      this.select();
                    }
                    return pass;
                  },
                  commit: commitValue
                },
                {
                  // http://docs.cksource.com/ckeditor_api/symbols/CKEDITOR.dialog.definition.checkbox.html
                  type : 'checkbox',
                  id : 'chkAutoplay',
                  label: 'Autoplay',
                  commit: commitValue
                }
              ]
            }
          ]
        }
      ],

      // Add the standard OK and Cancel Buttons
      buttons : [ CKEDITOR.dialog.okButton, CKEDITOR.dialog.cancelButton ],

      // A "submit" handler for when the OK button is clicked.
      onOk : function() {

        // A container for our field data
        var data = {};

        // Commit the field data to our data object
        // This function calls the commit function of each field element
        // Each field has a commit function (that we define below) that will
        // dump it's value into the data object
        this.commitContent( data );

        if (data.info) {
          var info = data.info;
          // Set the autoplay flag
          var autoplay = info.chkAutoplay ? 'autoplay=1': 'autoplay=0';
          // Concatenate our youtube embed url for the iframe
          var src = 'http://youtube.com/embed/' + info.txtVideoId + '?' + autoplay;
          // Create the iframe element
          var iframe = new CKEDITOR.dom.element( 'iframe' );
          // Add the attributes to the iframe.
          iframe.setAttributes({
            'width': info.txtWidth,
            'height': info.txtHeight,
            'type': 'text/html',
            'src': src,
            'frameborder': 0
          });
          // Finally insert the element into the editor.
          editor.insertElement(iframe);
        }

      }
    };

    return dialogDefinition;
  };

  // Little helper function to commit field data to an object that is passed in:
  var commitValue = function( data ) {
    var id = this.id;
    if ( !data.info )
      data.info = {};
    data.info[id] = this.getValue();
  };


})(jQuery);
You might notice a lot of this code is very similar to what we did in the last tutorial. The code to register the dialog as well as the dialog definition itself is exaclty the same. The big difference is that we're registering our dialog command as an actual CKEditor plugin (using CKEDITOR.plugins.add), rather than just cramming it into the editor after it's already been initialized. Speaking of which, we need to clean up the old dialog code from ckeditor_custom_config.js. Just delete everything from line 65 onward.
2. Integrating with the WYSIWYG Module
So now that we've written our plugin, how do we let CKEditor know about it? Well, the WYSIWYG module has a hook for integrating native plugins into it's supported editors: hook_wysiwyg_plugin(). You just provide some information about where your plugin code lives and the WYSIWYG module does the rest:
/**
 * Implements hook_wysiwyg_plugin()
 */
function ckeditor_custom_wysiwyg_plugin($editor, $version) {
  switch ($editor) {
    // Only do this for ckeditor
    case 'ckeditor':
      return array(
        // This key (youtube) needs to be the same as the plugin name used in
        // CKEDITOR.plugins.add() in plugin.js
        'youtube' => array(
          // A URL to the plugin's homepage.
          'url' => '',
          // The full path to the native editor plugin, no trailing slash.
          // Ignored when 'internal' is set to TRUE below.
          'path' => drupal_get_path('module', 'ckeditor_custom') . '/plugins/youtube',
          // The name of the plugin's main JavaScript file.
          // Ignored when 'internal' is set to TRUE below.
          // Default value depends on which editor the plugin is for.
          'filename' => 'plugin.js',
          // A list of buttons provided by this native plugin. The key has to
          // match the corresponding JavaScript implementation - when it's
          // created using editor.ui.addButton(). The value is is displayed on
          // the editor configuration form only.
          'buttons' => array(
            'YouTube' => t('You Tube Embed'),
          ),
          // Boolean whether the editor needs to load this plugin. When TRUE,
          // the editor will automatically load the plugin based on the 'path'
          // variable provided. If FALSE, the plugin either does not need to
          // be loaded or is already loaded by something else on the page.
          // Most plugins should define TRUE here.
          'load' => TRUE,
          // Boolean whether this plugin is a native plugin, i.e. shipped with
          // the editor. Definition must be ommitted for plugins provided by
          // other modules. TRUE means 'path' and 'filename' above are ignored
          // and the plugin is instead loaded from the editor's plugin folder.
          'internal' => FALSE,
        ),
      );
      break;
  }
}
With this hook, the WYSIWYG module will know to load our plugin when it initializes CKEditor. It will also list our plugin on the WYSIWYG profile administration page. There's just a little bit of cleanup we need to do before we can test it out. Firstly, we need to remove bit of code from ckeditor_custom_wysiwyg_editor_settings_alter() in ckeditor_custom.module where we manually added our youtube plugin. We can also remove the css we added to style the button. Just remove this block (line 88-93):
// This is our new youtube command / dialog that we created in
// ckeditor_custom_config.js. If we don't add this here, it won't
// show up in the toolbar!
$new_grouped_toolbar[] = array('YouTube');
// Add a css file to the page that will style our youtube button
drupal_add_css(drupal_get_path('module', 'ckeditor_custom') . '/ckeditor_custom.css');
Secondly, and this is optional, you can add our new plugin to our re-ordered preferred groupings in ckeditor_custom_wysiwyg_editor_settings_alter(). I added mine just after the "Image" button.
...
$preferred_groupings[] = array('Image', 'YouTube', 'Link', 'Unlink', 'Anchor', '-');
...
And that's it. Load up one of your WYSIWYG profile settings at admin/config/content/wysiwyg and enable the plugin in the "Buttons and Plugins" section. Then, load up a page with the editor on it and check out your button in all it's glory.
FUN FACT: The WYSIWYG module also includes a nifty API for writing cross-editor Drupal plugins using the hook: hook_INCLUDE_plugin(). This is how a module like media can implement a cross-editor media button. For more info about the WYSIWYG editor API check out wysiwyg.api.php.
3. Integrating with the CKEditor module
Okay, okay, I know that this is supposed to be a series of posts specifically about CKEditor and the WYSIWYG module, but I figure it wouldn't hurt to show you how to integrate our plugin into the CKEditor module. It's actually quite similar to the WYSIWYG module:
/**
 * Implements hook_ckeditor_plugin()
 */
function ckeditor_custom_ckeditor_plugin() {
  return array(
    // This key (youtube) needs to be the same as the plugin name used in
    // CKEDITOR.plugins.add() in plugin.js
    'youtube' => array(
      // Name of the plugin used to write it. Also needs to be the same as the
      // plugin name used in CKEDITOR.plugins.add() in plugin.js
      'name' => 'You Tube',
      // Description of the plugin - it would be displayed in the plugins management section of profile settings.
      'desc' => t('Embed a youtube video into the content area using the video url'),
      // The full path to the CKEditor plugins directory, with the trailing slash.
      'path' => drupal_get_path('module', 'ckeditor_custom') . '/plugins/youtube/',
      // A list of buttons provided by this plugin. The key has to match the
      // corresponding JavaScript implementation - when it's created using
      // editor.ui.addButton(). If you don't do this, your button won't be
      // available for drag 'n drop ordering on the plugins management section
      // of profile settings
      'buttons' => array(
        'YouTube' => array(
          'icon' => 'images/icon.png',
          'label' => 'You Tube Embed',
        )
      )
    )
  );
}
And that's it. Just enable the plugin in the plugins management section of the profile settings, then put your button where you want it to go using the drag 'n drop interface of the CKEditor module and you're good to go!
Conclusion
Congratulations! You've just created your very own CKEditor plugin and integrated it properly, or as some might say, the "Drupal Way". You've also just completed the final chapter of the CKEditor & the WYSIWYG Module tutorial series! In addition to this new custom plugin, you should also be able to customize existing CKEditor plugins as well as reorganize and group buttons in the toolbar. Although, on that last one, it looks like an effort to add some sort of button management to WYSIWYG has been made by the project maintainer recently which is exciting.
So, that's it for this one. I hope you've learned something useful along the way. Here are the links to download the finished modules in case you just want to get going without reading through my long-winded tutorial.
About Drupal Sun
Drupal Sun is an Evolving Web project. It allows you to:
- Do full-text search on all the articles in Drupal Planet (thanks to Apache Solr)
- Facet based on tags, author, or feed
- Flip through articles quickly (with j/k or arrow keys) to find what you're interested in
- View the entire article text inline, or in the context of the site where it was created
See the blog post at Evolving Web