
Upgrade Your Drupal Skills
We trained 1,000+ Drupal Developers over the last decade.
See Advanced Courses NAH, I know Enough
Composer 2 is an effective solution for increasing productivity when working with Drupal. Everyone knows the situation when simple operations take a lot of time. Using Composer in Drupal makes developers' lives easier.
To speed up workflows, web developers often use the same code many times in many projects. This code can be written not only by other people; that's not the point. Regarding programming, rewriting code is a concern for many developers. Composer allows you to get rid of this problem. You can save parts of PHP code and use them for other projects.
Composer 2: What is it?
You (and other developers) can form the necessary parts of the code into libraries and use these libraries in certain projects. Some libraries are linked to other libraries, and they have a logical connection. So, one project can use different code libraries attached. Sometimes, libraries are also called packages, but the essence remains.
For the convenience of developers, a unique website was created - packagist.org. Therefore, when you need a particular functional element and ask Composer to load it, it automatically searches for this library at the site, not only at this site (you can specify a list of repositories). One library is often linked to others, and you need to download all the libraries to regularly operate a site element. The Composer does this automatically. Composer 2 loads all logically interconnected libraries needed for the stable operation of the component, protocol, etc.
However, you can always configure Composer to search for repositories in other cloud storage sites - GitHub, etc. The main thing is that the Composer will independently search for the necessary libraries, load them into the system, and check the system requirements. In addition, internal conflicts between previously installed and new libraries are also checked. Composer has some simple tools that make a developer's life easier. You need to perform several steps to use the required library in a project, which we will discuss later in the article.
Composer 2 is ideal for managing large amounts of code. By automating many processes, developers spend much less time. You can install Drupal core, themes, and modules using Composer.
Why Composer 2, not Composer?
There are several reasons why you should opt for Composer 2, but the major one is its enhanced functionality. Composer 2 has been greatly improved over the first version. This allowed us to get rid of many problems, conflicts, and improve productivity and speed. Let's take a closer look at the main improvements:
Offline mode
Composer 2 can work offline. This is very convenient if you need help with the Internet and need to get work done. Every developer knows what a "deadline" is.
Optimizations Drupal by Composer 2
The new version of Composer has significantly improved interaction with the processor and memory, which improves performance. Many minor bugs have also been fixed, improving performance and saving a lot of developer time.
Parallel loading
Also, the parallel download feature is available from the very beginning, and no need to install add-ons. This also improved performance.
Smart installation
The "vendor" folder is modified only after all required libraries have been installed.
There are many more large and small changes; we have only described the main ones. To talk about all the innovations and updates in detail, a separate article is needed.
Getting Started with Composer 2
First, we need to understand - Composer works with libraries using just 2 files: composer.json and composer.lock.
- The first of them is “composer.json”, which contains information about installed libraries. So, you install libraries for use in a specific project, and they need to be specified in the “composer.json” file. This file should be in the topmost directory of your project, this is important. In Composer 2, you can make any repository canonical, which is a big plus.
- “Composer.lock” keeps track of library versions - this is very important. This file stores information about the current versions. So, “composer.json” contains a list of dependencies, and “composer.lock” contains a list of installed versions. If a new employee joins the development team, the same versions that other developers already have will be automatically downloaded to his computer. Without this, Composer might just download the newest versions but not the ones it needs.
This is a very simplified description, but it is completely correct and allows you to understand how Composer interacts with libraries and repositories. And, remember - “composer.lock” files are interoperable between 1 & 2 Composer versions.
Drupal with Composer 2 - first steps & commands
Composer looks for dependencies on its own. You must register repositories using the repositories key.
Next, you can download the Drupal core and libraries (packages). Drupal and Composer work great together.
To install Drupal with Composer, you need to enter the next command:
$ composer create-project drupal/recommended-project [project-name-dir]
It can be Drupal 8, 9 or 10 core.
To install the dependencies you need, use the command:
$ php composer.phar install
The Composer will install the dependencies listed in the composer.json file. We have already said above - the versions must be listed in the composer.lock file.
To find libraries, enter the command:
$ composer require [vendor]/[packagename]
where "packagename" is the package you need.
If you want to download a module, the command will look similar:
$ composer require drupal/modulename
where "modulename" is the module you need.
To get the latest dependency updates, use the update command:
php composer.phar update - to update all dependencies.
php composer.phar update monolog/monolog - to update one dependency (specified as an argument).
composer update drupal/modulename - -with-all-dependencies
If you want to preview the update and see - what would happen without any real changes, you need to:
- -dry-run
Sometimes you may need to update a separate module manually:
composer update “drupal/*” - -with-all-dependencies
drush updatedb
drush cache:rebuild
Also, it will clear the cache.
8 tricks to work efficiently with Composer 2 in Drupal
A few tips with Composer Drupal will help you save time. Here they are:
1. ALWAYS (ALWAYS!) use dry-run before major changes. However, many novice developers use dry runs for any changes.
2. Speed and optimization - Composer 2 is no longer an issue, and the optimization plugins you previously installed are no longer needed. For example, “zaporylie” or “prestissimo” plugins. Some people update these plugins to versions that are compatible with Composer 2.
It is actually easier to remove them using the command:
composer remove zaporylie/composer-drupal-optimizations3. Some packages have been abandoned and are no longer supported (doctrine/reflection; webmozart/path-until; swiftmailer; etc.), so you will see messages saying that these plugins are no longer supported. Just ignore. There's nothing you can do about it, you just have to wait.
4. Backward compatible with Composer 1 - yes, it works. But it doesn't work that well, so it's better to have the entire development team update Composer to version 2. This will help avoid conflicts and errors.
5. Sometimes, we find useful modules that do not work with Drupal 9. However, patches have already been released that correct the incompatibility and may make these modules work. What do we do? This is where the Lenient Composer endpoint comes in handy. The Lenient Composer endpoint is added before the standard endpoint. This can be done like this:
"repositories": {
     "lenient": {
         "type": "composer",
         "url": "https://packages.drupal.org/lenient"
     },
     "0": {
         "type": "composer",
         "url": "https://packages.drupal.org/8"
     }
},
After downloading the modules, you need to add changes to the composer.json file. THIS CAN ONLY BE DONE BY YOURSELF! And remember - this method does not work in Composer 1.
6. Error when executing the “composer require” and “composer update” commands. If you see that error when entering these commands, you must immediately update the “cweagans/composer-patches” package. Composer 2 only works with version 1.7.0 or later.
7. “Scaffold” plugin may throw an error after updating to Composer 2. It’s simple - update the plugin to version 8.9 or later. Older versions work only with Composer 1.
8. There are some packages that have security problems. During installation, you may not always be aware of these issues. You can include a security feature in your project to prevent such packages from being installed. This can be done by using two commands:
composer require - -dev roave/security-advisories:dev-master
composer require - -dev drupal-composer/drupal-security-advisories:8.x-dev
Wrapping up
Since its inception, Composer has been an efficient package management tool. The second version of Composer eliminated many problems and conflicts that we can see in the past. This made the work process even faster and simpler. Every modern developer should try this effective and vital tool. If you still need to do this, now is the time. Contact us to get help with Composer 2 because we are profi!
Breadcrumb

Series Overview & ToC | Next Article (coming Apr 24th)
SERIES INTRODUCTION
Today, we are excited to launch a detailed blog series that serves as an in-depth guide on utilizing the Drupal 10 Migrate API. This series is designed to equip you with thorough explanations and step-by-step guidance for migrating all your data from a Drupal 7 site to Drupal 10, facilitating a smooth upgrade to the most current version of the platform.
As we progress, we will introduce a DDEV-based development environment, complete with instructions to set it up. This environment is prepared with a Drupal 7 site already installed and a Drupal 10 site set as the migration target. Through the course of this series, we will walk you through the entire data migration process, covering a wide range of topics along the way, empowering you to migrate your own sites confidently.
Helping you navigate the next steps on your Drupal Migration Journey
The Migrate API, created and co-maintained by Tag1 team members, is a flexible and powerful system that can be used to collect data from multiple sources and import it into Drupal. While migrating data from Drupal 7 to modern versions of Drupal is a common use case, it is just one of many supported scenarios. In fact, the Migrate API is a complete extract, transform, and load (ETL) framework that can be used to import data from CSV files into your site, among many other scenarios.
Many years ago, I worked on a Drupal 6 to 9 data migration that used three different sources: the Drupal 6 site, a Drupal 9 site used for content staging, and multiple CSV files, which contained multilingual content. That data migration is an example of how flexible the Migrate API is. While the focus of this series is the migration of data from a Drupal 7 site, any general knowledge you have about the API and ETL frameworks will prove useful. For more information, I suggest you read another series of articles I wrote on the topic: 31 Days of Drupal Migrations.
Before a deep dive into the technicalities of performing a data migration, it is crucial to understand your current site. In this blog post, we will take a step back and discuss the different components of a Drupal site. This will help you evaluate different approaches and tools that can be utilized for the migration. To keep things simple, we will not touch on additional services like search, distributed content storage, caching layers, or proxies. Instead, we will focus on the Drupal application layer:
-
Configuration: this determines the structure of the site. It includes all the different content types and the fields attached to them, taxonomy vocabularies, menus, user roles and permissions, views, media types, commerce product types, field collection and paragraph types, and webforms. General site settings are also part of the configuration. For example, site name, slogan, active default and administrative themes, enabled modules, date and time formats, text formats and WYSIWYG profiles, image styles, and pathauto patterns for url aliases.
-
Content: this is user-submitted data. Nodes, taxonomy terms, files (addressed in the next point), menu items, users, media items, products, and webform submissions are all considered content. A single page on the website can contain a variety of content pieces. For instance, you can have an article (node) that includes a featured image (file), tags (taxonomy terms) related to the content presented, and a reference to the author (user).
-
Files: these are a special type of content in Drupal. They are assets uploaded by users to be managed and served by Drupal. For example, images, text documents, and spreadsheets. While videos can be uploaded directly to the site, they are usually uploaded to dedicated video hosting providers such as YouTube and Vimeo. After they are uploaded, the videos can be embedded within Drupal.
-
Modules: they provide functionality to the website. Drupal core itself comes with dozens of modules. You can also provide more functionality by adding modules from the contributed repository or by writing custom ones. Modules mostly consist of PHP code.
-
Themes: they control the appearance of the site. Fonts, colors, and responsive behavior are all responsibilities of the theme. Similar to modules, Drupal core ships with a handful of themes, and more available in the contributed repository. Most sites use custom themes that align with the branding of the organization. Themes mostly consist of PHP code, CSS, JavaScript, and assets, such as images.
Configuration is usually created by site builders and developers. Content and files are generally added by content editors and, when allowed, by site visitors. Modules and themes are mostly the responsibility of backend and frontend developers, respectively.
Another aspect that is important to understand is where each of these site components live. Configuration and content are stored in the database. File references are stored in the database, but the assets themselves live in the file system. Modules and themes live in the file system.
Now, we can consider three different approaches for migrating to Drupal 10:
-
Manually create configuration and content in the new site. This is a valid approach for small sites. If the site structure is simple and there is not much content, installing a fresh Drupal 10 site and recreating everything from scratch is achievable.
-
Manually create the configuration and automatically migrate the content. This is the most common approach I have seen over the years. Organizations usually take the opportunity of migrating to Drupal 10 to make improvements and remove things that are no longer needed on their site. This is often reflected in changes to the content model and general site structure. For this approach, site builders and developers manually create the new site configuration per the new requirements. Then, content is moved into the new site structure.
-
Automatically migrate configuration and content. With Drupal 7’s end of life approaching, I have seen more organizations take this approach. If little or no configuration changes are required on the new site, you can automate the migration of the current configuration. If minor tweaks are needed, those can be handled manually on the new site. Once the content model is in place, the content is moved over.
Notice that in the three scenarios, the focus is on configuration and content. That is because the Migrate API is designed to help automate the migration of those two components only. Technically speaking, files are also considered content in Drupal. As such, they are also supported, but neither modules nor themes are part of the scope of the Migrate API.
If your site uses contributed modules and themes, you must verify that they have Drupal 10 compatible versions. If not, you can look for alternative projects that serve as replacements or offer similar functionality. For instance, the Drupal 10 entityqueue module is the successor of the Drupal 7 nodequeue module. If no replacement or alternative is found, consider help porting the module or theme to Drupal 10. As a last resort, you can write custom code for any required feature that is otherwise not readily available.
The code architecture in Drupal 10 is significantly different than that of Drupal 7. Because of this, any custom module or theme needs to be recreated. In the case of modules, you can use the Module Upgrader to get started in the porting process and finish with manual changes. As for themes, there are no tools that assist with the porting. Before writing any custom code, consider your alternatives. In many situations, that which required custom code before could be covered by new functionality added to Drupal core or contributed modules/themes. Alternatively, some features may no longer be needed and can be dropped from the migration.
Note: Matt Glaman has released a project named Retrofit. It aims to run Drupal 7 code on a Drupal 10 site without having to make modifications to it. While I have not tested it myself, Matt has an impressive track record of impactful contributions to Drupal. He also contributes to PHPStan, Drupal Rector, Upgrade Status, and more.
Before closing, it is appropriate to acknowledge that while the Migrate API is the most commonly used method, it is one of many ways to move data into Drupal. Another popular approach is the Feeds module and its ecosystem. There is also a module that uses the Feeds user interface on top of the Migrate API. Another option is to write custom code to get data into Drupal. No matter the approach, I highly recommend that when importing data, Drupal APIs are used instead of direct writes to database tables. Drupal is a flexible and complex system. When a piece of content is created it will likely end up in multiple tables. When using Drupal APIs, access controls, validation, caching, and other systems get a chance to act upon the data that is being imported. Writing to database tables directly bypasses a lot of the safety checks that Drupal implements.
In our next post, we will explain how to audit a Drupal 7 site in preparation for a Drupal 10 upgrade. We will also explain some assumptions and limitations in the Migrate API and how to work around them. And, right before diving into the hands-on exercises, we will explain a key concept in data migration projects: Drupal entities. Stay tuned!
Series Overview & ToC | Next Article (coming Apr 24th)
Image by Gerd Altmann from Pixabay
I attended my first DrupalCon in 2010 in San Francisco, and since then have attended six more in the US and two in Europe. Many elements stay the same, and are a welcome and treasured part of the DrupalCon experience: The DriesNote, the group picture, the keynotes, the BOFs, the sessions and trainings and parties and hallway conversation, on and on. While you can look forward to more of those this year, here are a few additional features that have been added this year to Drupalcon Portland 2024:
Marketing Track
Recognizing the value that effective marketing brings to Drupal websites, DrupalCon 2024 will feature a substantial amount of content specifically targeted to marketers. The Marketing Track features a dozen sessions of particular interest to CMOs and other marketing professionals, including presentations about AI, Personalization, Content Strategy, and multi-channel engagement. Stay tuned for more information about content of particular interest to CMOs.
Extended Welcoming Party
Everybody likes a party, and this year the opening reception is two full hours. You can look forward to dancing to the robot DJ on a light-up dance floor, recording yourself in the 360 photobooth, playing with a giant Lite Brite, and enjoying free food and drink.
Nonprofit Summit
It’s back! After a short break, the Nonprofit Summit returns to DrupalCon, connecting Drupal users from the Nonprofit sector with each other. Facilitated discussions, round table group sessions, and special pricing for the conference and summit are just a few of the features that will help deliver the power of Drupal to one of our most important communities.
Enhanced focus on students
Drupal needs to continuously attract new people. Recognizing this, DrupalCon 2024 is making extra efforts to reach out to students. Targeted advertising to local student communities, focusing on the career-enhancing opportunities of the Drupalcon job fair, mentorship, resume help, and a special student discount price of only $50, job fair, mentorship, and resume help are a few of the enhancements that are specifically aimed at students.
Community-designed DrupalCon T-shirt
New this year, the Drupal Association ran a design contest for the official DrupalCon Portland t-shirt. Many great entries were received, and the winning design will be announced at DrupalCon, and available on the free attendee T-shirt.
As you can see, there are lots of new reasons to join the Drupal community in Portland this May. We can’t wait to see you, so register here!
New Upgrade Status 4.2.0 is beautiful in Gin, improves continuous integration compatibility and more
Breadcrumb
Join us THURSDAY, April 18 at 1pm ET / 10am PT, for our regularly scheduled call to chat about all things Drupal and nonprofits. (Convert to your local time zone.)
This month we'll be preparing for DrupalCon Portland, which features the return of the Nonprofit Summit!
And we'll of course also have time to discuss anything else that's on our minds at the intersection of Drupal and nonprofits. Got something specific you want to talk about? Feel free to share ahead of time in our collaborative Google doc: https://nten.org/drupal/notes!
All nonprofit Drupal devs and users, regardless of experience level, are always welcome on this call.
This free call is sponsored by NTEN.org and open to everyone.
-
Join the call: https://us02web.zoom.us/j/81817469653
-
Meeting ID: 818 1746 9653
Passcode: 551681 -
One tap mobile:
+16699006833,,81817469653# US (San Jose)
+13462487799,,81817469653# US (Houston) -
Dial by your location:
+1 669 900 6833 US (San Jose)
+1 346 248 7799 US (Houston)
+1 253 215 8782 US (Tacoma)
+1 929 205 6099 US (New York)
+1 301 715 8592 US (Washington DC)
+1 312 626 6799 US (Chicago) -
Find your local number: https://us02web.zoom.us/u/kpV1o65N
-
- Follow along on Google Docs: https://nten.org/drupal/notes
Introduction
This article explains what is self-management and why it’s important, and shares tips and strategies to get better at self-management, especially at work.
We all have dreams and obligations we’d like to achieve.
But it's not as easy as our initial thoughts convince us to be.
Many elements stand between where we are and where we want to be.
But none, perhaps, more powerfully so than our own selves—our self-doubts, fears, negative dialogues, and limiting thought patterns.
That's why it's so essential to learn how to manage this self, which often stops us from doing the things we were born to do.
What Is Self-Management?
Self-management is the ability to manage and control oneself through various skills and behaviors.
In short, you can get yourself to do what you should do and when you should do it—even when you don’t feel like it.
Self-management involves:
- Setting priorities
- Managing time effectively
- Maintaining emotional stability
- Making informed decisions
You proactively control your time, priorities, and actions—so that you can make conscious choices that align with your values and objectives.
A person is able to stay organized, overcome procrastination, and show resilience when facing challenges by getting good at self-management.
Why Is Self-Management Important At Work?
In terms of importance and time investment, work is a big part of life (not the totality of it, though).
Practicing self-management has the same effect on work as on life beyond it.
Here are four major reasons why self-management is important for you, especially at work:
- Increases efficiency and productivity: It helps you stay on track, organized, and productive with manageable stress levels.
A self-managed individual plans their day strategically, allocates sufficient time to each task, and avoids procrastination.
- Promotes professionalism and reliability: People who practice self-management demonstrate punctuality, meet deadlines consistently, and take ownership of their work, earning trust and respect from colleagues.
- Prevents burnout: Effective self-management includes techniques for managing stress, such as prioritizing tasks, setting boundaries, and practicing self-care.
These techniques enable people to maintain a healthy work-life balance and address stressors proactively.
- Boosts career development: Self-managed teammates are often perceived as proactive and driven because they can consistently deliver high-quality work, demonstrate initiative, and seek opportunities for growth and development that align with their own goals.

Tips And Strategies To Improve Self-Management Skills
These tips and strategies will help you practice and improve your self-management skills so that you can take charge of your life and career.
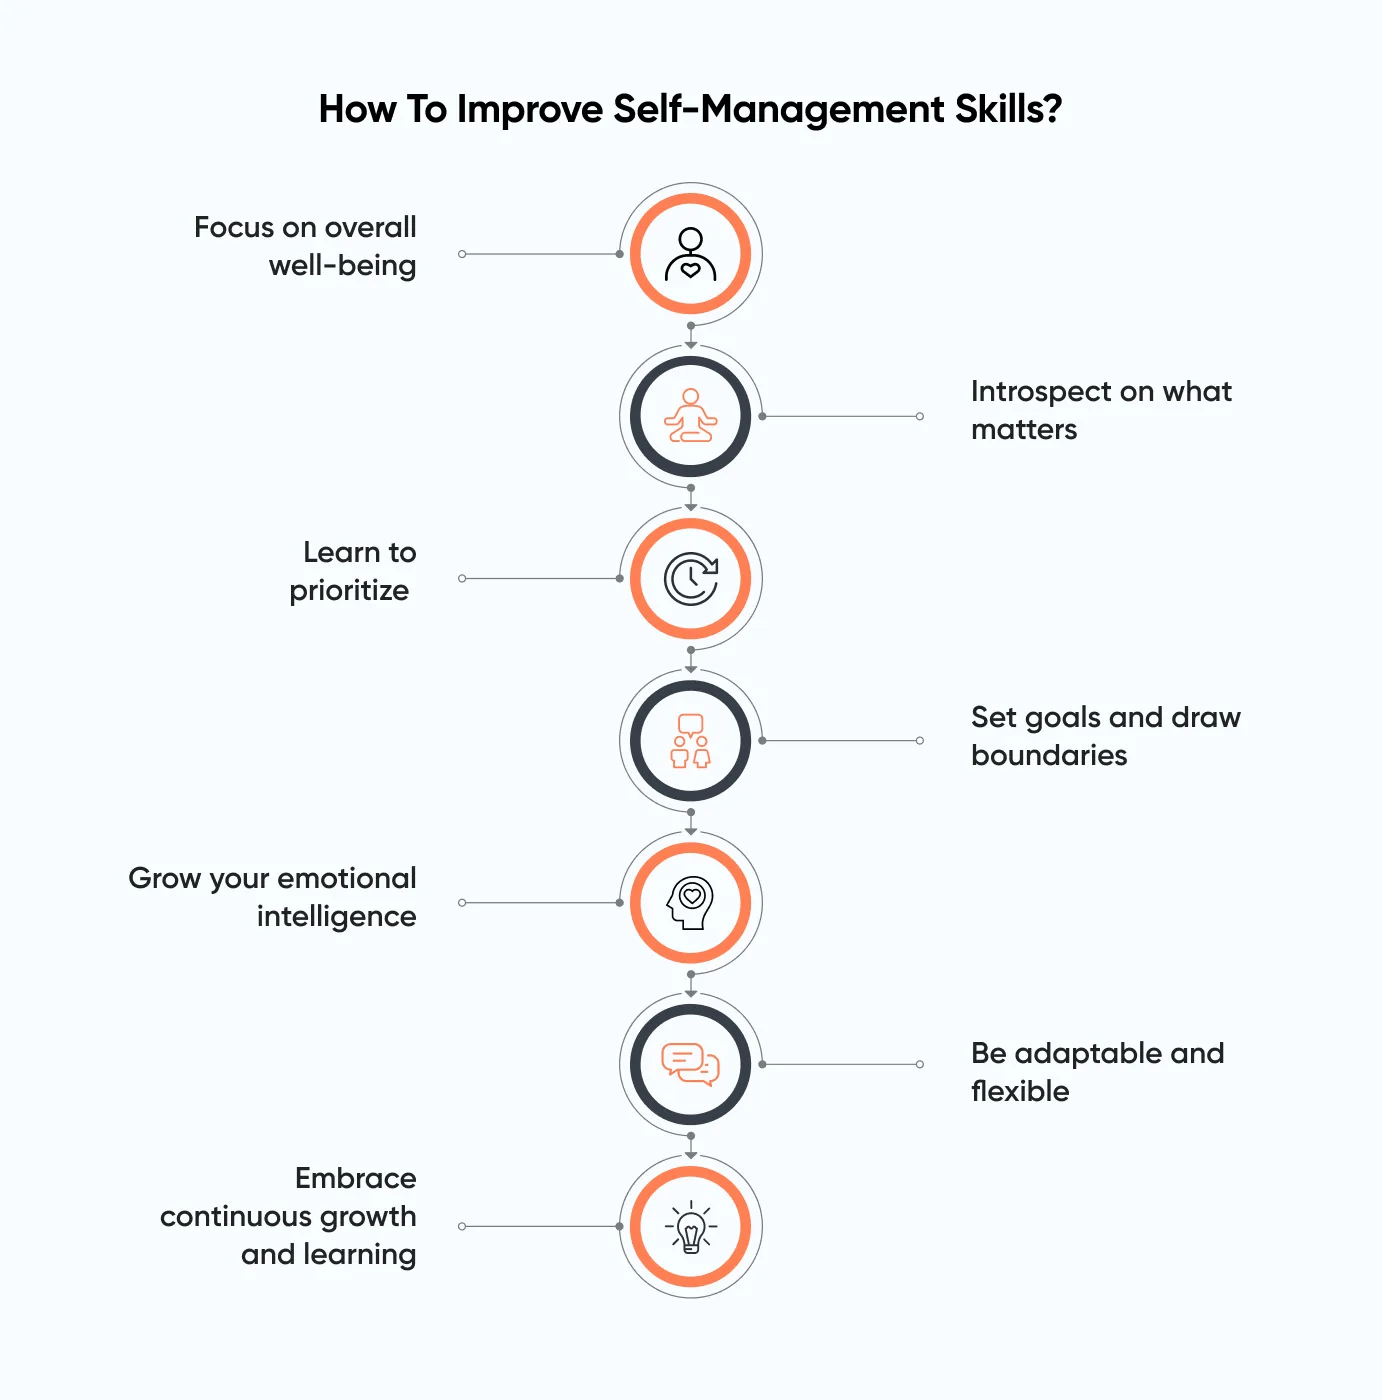
Focus On Overall Well-Being
When life gets stressful, people often suspend activities and habits that enhance their well-being.
No more fooling around, we say to ourselves. And double down on constantly worrying about our stressors—falling into this vicious cycle.
Tough, stressful situations demand more effort to realize that these are precisely when we should focus on our health.
Because with a healthy, happy, functioning mind and body, we are always better prepared to deal with stress.
Here are four tips to increase your well-being:
- Establish healthy lifestyle habits: Regularly exercise for at least 20 minutes, get adequate sleep according to your circadian rhythm (seven to eight hours), and switch to nutritious eating habits to boost physical and mental health.
- Include mindfulness practices: Introduce mindfulness techniques—meditation, deep breathing exercises, yoga, etc.—into your daily life to reduce stress and enhance focus and clarity.
Start small, five to 10 minutes initially, and work your way up.
- Seek support when you need help: Sometimes, you just need people to listen to you, like friends and family.
But when that's not enough, you may need professional help from counselors or therapists. Get that help because you and your health are worth it.
- Learn stress management techniques: There are many ways to manage stress, including mindfulness practices.
Harvard Health recommends trying out these. You can also take up journaling, practicing gratitude, or engaging in hobbies that bring joy and relaxation.
Introspect On What Matters
Introspection is the act of examining one's actions, behaviors, thoughts, feelings, goals, and motives.
We are bombarded with situations and questions at work that need self-reflection.
Introspection helps us understand the "why" behind what we do or want to do.
Daily inner reflection will give you clarity on your priorities and values, which in turn will help you make decisions faster.
It can also help you discover improvement areas to reach where you want.
Here are some ways to introspect at work:
- Regular journaling: Set aside time each week to journal your thoughts, feelings, and insights about your professional experiences, accomplishments, challenges.
- Seeking feedback: Actively seek feedback from colleagues, mentors, and supervisors about your performance, communication style, strengths, and areas for development.
Remember, you don't have to accept all feedback at face value.
Acknowledge, reflect, and select feedback that will genuinely help you improve.
- Goal setting and review: Regularly set short-term and long-term goals for your professional growth and development.
Periodically review your progress towards these goals, reassess your priorities, and adjust your action plans as needed.
This process of goal setting and review can help you stay focused, motivated, and aligned with your objectives.
Learn To Prioritize
You need to prioritize your work based on what's important to you and your organization.
This strategic approach will let you focus on activities that add the most value and impact.
And help you manage your workload and time effectively.
Here are three prioritization strategies you can use directly or as inspiration to create something that works for you:
- Use the Eisenhower Matrix: Divide tasks into four quadrants: urgent and important, important but not urgent, urgent but not important, and neither urgent nor important.
Focus on addressing tasks in the first quadrant first, followed by the second, and so on
- Effective time management: Start by estimating time for each task. Allocate specific time slots for different tasks or categories of work: focused work, meetings, breaks, daily collaborations, etc.
This way, you can ensure that critical tasks receive attention and minimize the risk of procrastination.
- Try the Pareto Principle (80/20 Rule): Identify the vital few tasks that contribute the most to your objectives—typically around 20%—and concentrate on completing them first.
Focusing on the critical few tasks that yield the most substantial results maximizes productivity and ensures that your time is allocated efficiently.

Set Goals And Draw Boundaries
Setting goals is crucial for professional growth and self-management.
And it's the first step to focusing your time, energy, and efforts in the right direction.
Here are four strategies to set goals that work for you:
- Identify what success looks like for you: In most cases, your KPIs (key performance indicators) will be the primary expectations from your role to measure success.
If that's unavailable, you need to identify which success metrics apply to you with your supervisor.
- Create your goals: Identify specific, measurable, and achievable objectives that you want to accomplish within a defined timeframe in your role.
Keep things realistic—remember, you impress others by achieving goals and not by setting them, no matter how big.
- Choose your action items: The "how" behind achieving your objectives depends on certain action items.
These will be the roadmap towards your identified goals.
For instance, if you want to take up a certification course to become an EXIN Agile Scrum Master, you'd need to divide and allocate the total hours needed to complete the course on your calendar.
- Draw boundaries: Once your roadmap is ready, say "no" to things that don't align with your goals.
You must establish boundaries to maintain a healthy work-life balance and prevent burnout.
Grow Your Emotional Intelligence
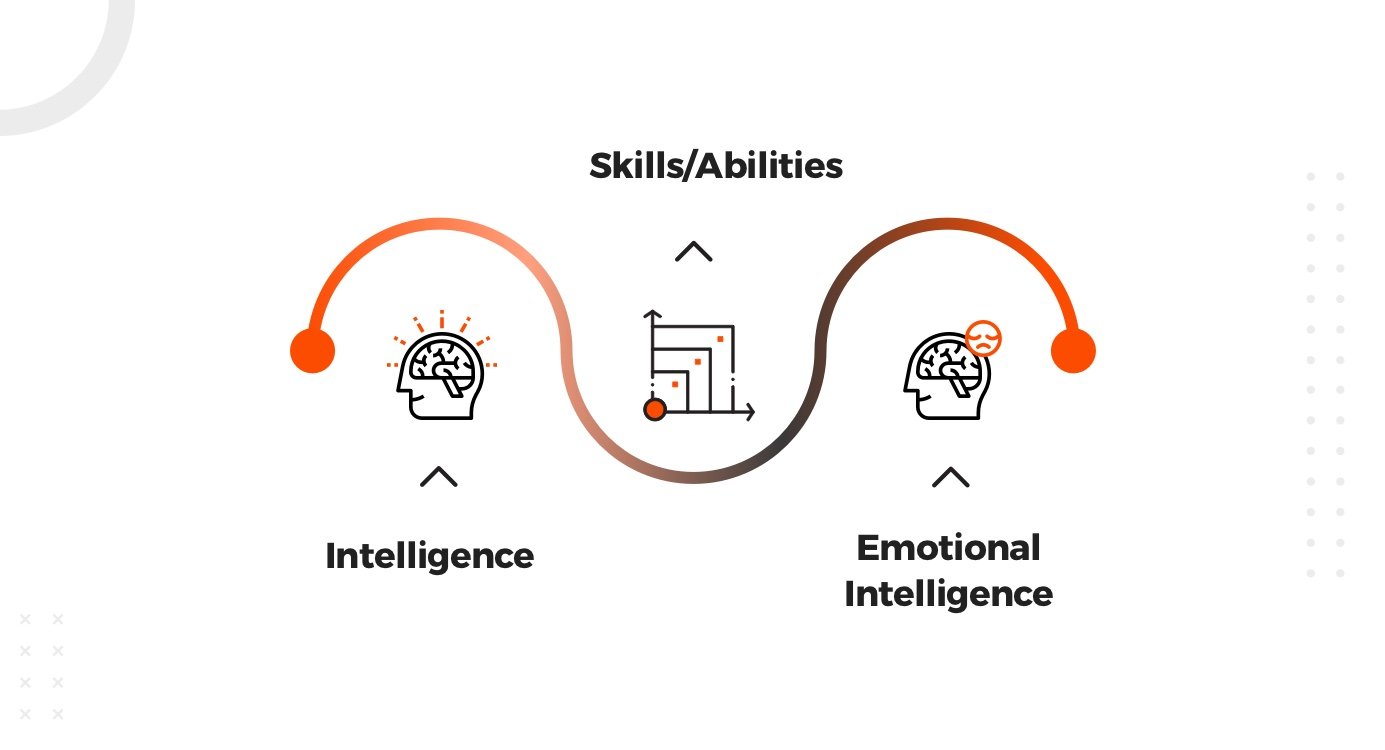
Emotional intelligence, also known as emotional quotient (EQ), is a skill set that involves recognizing, understanding, and managing your emotions and those of others.
It demands a range of abilities, such as self-awareness, self-regulation, empathy, and social skills.
A person's level of emotional intelligence has been shown to dictate their ability to learn and grow, form meaningful relationships with colleagues, clients, and stakeholders, and influence team dynamics for the better.
That's why employers see EQ as a top leadership skill and deciding factor for hiring.
If you want to succeed in your professional journey, you must consciously put effort into growing your emotional intelligence.
Be Adaptable And Flexible
Given how fast things are evolving (we are looking at you, AI), the ability to be adaptable and flexible can be the difference between a thriving and a stagnant career.
The ability to adjust to changing circumstances, priorities, and demands with ease and agility has always been a big part of self-management. But it's going to be even more critical in the future.
Here are four ways you can practice adaptability:
- Embrace change: Adopt a growth mindset that welcomes change as an opportunity for learning and growth rather than a setback.
Stay open-minded and flexible in your approach to new situations and challenges.
- Develop resilience: There are many ways to build up resilience in life.
You can try Stoicism. Learn positive self-talk. Practice affirmations. Choose a practice that works for you and stick with it until you see results.
If you have access to supportive friends and family, you already have a support system to share your thoughts and emotions when they weigh heavy on you.
- Keep your mind and work agile: Continuously assess and reassess your goals, priorities, and strategies in light of evolving circumstances.
It's easier said than done.
Yes, it does take extra time and effort. Yes, you will get your bearing right sometimes; sometimes, you will encounter more questions than clarity.
But that's good. That's what going forward looks like.
- Seek clarity: Actively seek clarity from supervisors and mentors with specific questions about your doubts.
You will need it to align your way ahead with your team's objectives.
Embrace Continuous Growth And Learning
It's strange to imagine a time when people had careers with the same set of skills, doing the same type of work.
That doesn’t work anymore.
To succeed in your career, you need to be aware of changes in your industry, learn new skills, improve old ones, and practice and demonstrate people skills—in other words, you need to grow consistently.
And continuous growth requires a growth mindset.
Here's how you can start a life-long habit of growth:
- Embrace curiosity: Cultivate a sense of curiosity and wonder about your work.
Approach tasks with an open mind, seeking opportunities to learn and grow from each experience.
Ask questions, seek help, and explore new ideas and perspectives when facing challenges.
- Start small: Break down your learning and development goals into manageable, bite-sized tasks or habits.
By starting small and gradually increasing the difficulty or complexity of your tasks over time, you can build momentum and maintain consistency in your learning journey.
- Focus on process: Shift your focus from outcomes to processes.
Prioritize the steps and actions required to achieve your goals, and adjust your steps by evaluating what's not working.
And don’t forget to celebrate progress along the way, no matter how small.
- Make learning a habit: Set aside dedicated time daily or weekly for self-study, skill development, or exploring new technologies that make you curious and are relevant to your profession.
Consistency is key to building lasting habits and driving continuous growth.
Self-management is perhaps the most complex skill to acquire in life.
It's foundational to one's ability to grow and thrive—not just at work but in every sphere.
Start your journey toward yourself with the first step: self-awareness and introspection.
You might discover the most fascinating person you've ever crossed paths with.
Coincidence?
We're ready to celebrate and build (even more) amazing Drupal 8 websites.
On November 19 we'll put our Drupal 8 websites in the spotlight...be sure to come back and check out our website.
By
Michèle WeiszShare


Want to know more?
Contact us todayor call us +32 (0)3 298 69 98
© 2015 Wunderkraut Benelux
Drupalcon 2015
People from across the globe who use, develop, design and support the Drupal platform will be brought together during a full week dedicated to networking, Drupal 8 and sharing and growing Drupal skills.
As we have active hiring plans we’ve decided that this year’s approach should have a focus on meeting people who might want to work for Wunderkraut and getting Drupal 8 out into the world.
As Signature Supporting Partner we wanted as much people as possible to attend the event. We managed to get 77 Wunderkrauts on the plane to Barcelona! From Belgium alone we have an attendance of 17 people.
The majority of our developers will be participating in sprints (a get-together for focused development work on a Drupal project) giving all they got together with all other contributors at DrupalCon.
We look forward to an active DrupalCon week.
If you're at DrupalCon and feel like talking to us. Just look for the folks with Wunderkraut carrot t-shirts or give Jo a call at his cell phone +32 476 945 176.
Share
Related Blog Posts
Want to know more?
Contact us todayor call us +32 (0)3 298 69 98
© 2015 Wunderkraut Benelux
How Wunderkraut feels about Drupal 8
Drupal 8 is coming and everyone is sprinting hard to get it over the finish line. To boost contributor morale we’ve made a motivational Drupal 8 video that will get them into the zone and tackling those last critical issues in no time.
[embedded content]
Share
Related Blog Posts
Want to know more?
Contact us todayor call us +32 (0)3 298 69 98
© 2015 Wunderkraut Benelux
Once again Heritage day was a huge succes.
About 400 000 visitors visited Flanders monuments and heritage sites last Sunday. The Open Monumentendag website received more than double the amount of last year's visitors.
Visitors to the website organised their day out by using the powerful search tool we built that allowed them to search for activities and sights at their desired location. Not only could they search by location (province, zip code, city name, km range) but also by activity type, keywords, category and accessibility. Each search request being added as a (removable) filter for finding the perfect activity.
By clicking on the heart icon, next to each activity, a favorite list was drawn up. Ready for printing and taking along as route map.
Our support team monitored the website making sure visitors had a great digital experience for a good start to the day's activities.
Did you experience the ease of use of the Open Monumentendag website? Are you curious about the know-how we applied for this project? Read our Open Monumentendag case.
Breaking ground as Drupal's first Signature Supporting Partner
Drupal Association Executive Director Holly Ross is thrilled that Wunderkraut is joining as first and says: "Their support for the Association and the project is, and has always been, top-notch. This is another great expression of how much Wunderkraut believes in the incredible work our community does."
As Drupal Signature Supporting Partner we commit ourselves to advancing the Drupal project and empowering the Drupal community. We're very proud to be a part of it as we enjoy contributing to the Drupal ecosystem (especially when we can be quircky and fun as CEO Vesa Palmu states).
Our contribution allowed the Drupal Association to:
- Complete Drupal.org's D7 upgrade - now they can enhance new features
- Hired a full engineering team committed to improving Drupal.org infrastructure
- Set the roadmap for Drupal.org success.

By
Michèle WeiszShare
Related Blog Posts
Want to know more?
Contact us todayor call us +32 (0)3 298 69 98
© 2015 Wunderkraut Benelux
But in this post I'd like to talk about one of the disadvantages that here at Wunderkraut we pay close attention to.
A consequence of the ability to build features in more than one way is that it's difficult to predict how different people interact (or want to interact) with them. As a result, companies end up delivering solutions to their clients that although seem perfect, turn out, in time, to be less than ideal and sometimes outright counterproductive.
Great communication with the client and interest in their problems goes a long way towards minimising this effect. But sometimes clients realise that certain implementations are not perfect and could be made better. And when that happens, we are there to listen, adapt and reshape future solutions by taking into account these experiences.
One such recent example involved the use of a certain WYSIWYG library from our toolkit on a client website. Content editors were initially happy with the implementation before they actually started using it to the full extent. Problems began to emerge, leading to editors spending way more time than they should have performing editing tasks. The client signalled this problem to us which we then proceed to correct by replacing said library. This resulted in our client becoming happier with the solution, much more productive and less frustrated with their experience on their site.
We learned an important lesson in this process and we started using that new library on other sites as well. Polling our other clients on the performance of the new library revealed that indeed it was a good change to make.
A few years ago most of the requests started with : "Dear Wunderkraut, we want to build a new website and ... " - nowadays we are addressed as "Dear Wunderkraut, we have x websites in Drupal and are very happy with that, but we are now looking for a reliable partner to support & host ... ".
By the year 2011 Drupal had been around for just about 10 years. It was growing and changing at a fast pace. More and more websites were being built with it. Increasing numbers of people were requesting help and support with their website. And though there were a number of companies flourishing in Drupal business, few considered specific Drupal support an interesting market segment. Throughout 2011 Wunderkraut Benelux (formerly known as Krimson) was tinkering with the idea of offering support, but it was only when Drupal newbie Jurgen Verhasselt arrived at the company in 2012 that the idea really took shape.
Before his arrival, six different people, all with different profiles, were handling customer support in a weekly rotation system. This worked poorly. A developer trying to get his own job done plus deal with a customer issue at the same time was getting neither job done properly. Tickets got lost or forgotten, customers felt frustrated and problems were not always fixed. We knew we could do better. The job required uninterrupted dedication and constant follow-up.
That’s where Jurgen came in the picture. After years of day job experience in the graphic sector and nights spent on Drupal he came to work at Wunderkraut and seized the opportunity to dedicate himself entirely to Drupal support. Within a couple of weeks his coworkers had handed over all their cases. They were relieved, he was excited! And most importantly, our customers were being assisted on a constant and reliable basis.
By the end of 2012 the first important change was brought about, i.e. to have Jurgen work closely with colleague Stijn Vanden Brande, our Sys Admin. This team of two ensured that many of the problems that arose could be solved extremely efficiently. Wunderkraut being the hosting party as well as the Drupal party means that no needless discussions with the hosting took place and moreover, the hosting environment was well-known. This meant we could find solutions with little loss of time, as we know that time is an important factor when a customer is under pressure to deliver.
In the course of 2013 our support system went from a well-meaning but improvised attempt to help customers in need to a fully qualified division within our company. What changed? We decided to classify customer support issues into: questions, incidents/problems and change requests and incorporated ITIL based best practices. In this way we created a dedicated Service Desk which acts as a Single Point of Contact after Warranty. This enabled us to offer clearly differing support models based on the diverse needs of our customers (more details about this here). In addition, we adopted customer support software and industry standard monitoring tools. We’ve been improving ever since, thanks to the large amount of input we receive from our trusted customers. Since 2013, Danny and Tim have joined our superb support squad and we’re looking to grow more in the months to come.
When customers call us for support we do quite a bit more than just fix the problem at hand. Foremostly, we listen carefully and double check everything to ensure that we understand him or her correctly. This helps to take the edge off the huge pressure our customer may be experiencing. After which, we have a list of do’s and don’t for valuable support.
- Do a quick scan of possible causes by getting a clear understanding of the symptoms
- Do look for the cause of course, but also assess possible quick-fixes and workarounds to give yourself time to solve the underlying issue
- Do check if it’s a pebkac
- and finally, do test everything within the realm of reason.
The most basic don’t that we swear by is:
- never, ever apply changes to the foundation of a project.
- Support never covers a problem that takes more than two days to fix. At that point we escalate to development.
We are so dedicated to offering superior support to customers that on explicit request, we cater to our customers’ customers. Needless to say, our commitment in support has yielded remarkable results and plenty of customer satisfaction (which makes us happy, too)
If your website is running Drupal 6, chances are it’s between 3 and 6 years old now, and once Drupal 8 comes out. Support for Drupal 6 will drop. Luckily the support window has recently been prolonged for another 3 months after Drupal 8 comes out. But still, that leaves you only a small window of time to migrate to the latest and greatest. But why would you?
There are many great things about Drupal 8 that will have something for everyone to love, but that should not be the only reason why you would need an upgrade. It is not the tool itself that will magically improve the traffic to your site, neither convert its users to start buying more stuff, it’s how you use the tool.
So if your site is running Drupal 6 and hasn’t had large improvements in the last years it might be time to investigate if it needs a major overhaul to be up to par with the competition. If that’s the case, think about brand, concept, design, UX and all of that first to understand how your site should work and what it should look like, only then we can understand if a choice needs to be made to go for Drupal 7 or Drupal 8.
If your site is still running well you might not even need to upgrade! Although community support for Drupal 6 will end a few months after Drupal 8 release, we will continue to support Drupal 6 sites and work with you to fix any security issues we encounter and collaborate with the Drupal Security Team to provide patches.
My rule of thumb is that if your site uses only core Drupal and a small set of contributed modules, it’s ok to build a new website on Drupal 8 once it comes out. But if you have a complex website running on many contributed and custom modules it might be better to wait a few months maybe a year until all becomes stable.
So how does customer journey mapping work?
In this somewhat simplified example, we map the customer journey of somebody signing up for an online course. If you want to follow along with your own use case, pick an important target audience and a customer journey that you know is problematic for the customer.
1. Plot the customer steps in the journey

Write down the series of steps a client takes to complete this journey. For example “requests brochure”, “receives brochure”, “visits the website for more information”, etc. Put each step on a coloured sticky note.
2. Define the interactions with your organisation

Next, for each step, determine which people and groups the customer interacts with, like the marketing department, copywriter and designer, customer service agent, etc. Do the same for all objects and systems that the client encounters, like the brochure, website and email messages. You’ve now mapped out all people, groups, systems and objects that the customer interacts with during this particular journey.
3. Draw the line

Draw a line under the sticky notes. Everything above the line is “on stage”, visible to your customers.
4. Map what happens behind the curtains

Now we’ll plot the backstage parts. Use sticky notes of a different color and collect the persons, groups, actions, objects and systems that support the on stage part of the journey. In this example these would be the marketing team that produces the prod brochure, the printer, the mail delivery partner, web site content team, IT departments, etc. This backstage part is usually more complex than the on stage part.
5. How do people feel about this?

Now we get to the crucial part. Mark the parts that work well from the perspective of the person interacting with it with green dots. Mark the parts where people start to feel unhappy with yellow dots. Mark the parts where people get really frustrated with red. What you’ll probably see now is that your client starts to feel unhappy much sooner than employees or partners. It could well be that on the inside people are perfectly happy with how things work while the customer gets frustrated.
What does this give you?
Through this process you can immediately start discovering and solving customer experience issues because you now have:
- A user centred perspective on your entire service/product offering
- A good view on opportunities for innovation and improvement
- Clarity about which parts of the organisation can be made responsible to produce those improvements
- In a shareable format that is easy to understand
Mapping your customer journey is an important first step towards customer centred thinking and acting. The challenge is learning to see things from your customers perspective and that's exactly what a customer journey map enables you to do. Based on the opportunities you identified from the customer journey map, you’ll want to start integrating the multitude of digital channels, tools and technology already in use into a cohesive platform. In short: A platform for digital experience management! That's our topic for our next post.
In combination with the FacetAPI module, which allows you to easily configure a block or a pane with facet links, we created a page displaying search results containing contact type content and a facets block on the left hand side to narrow down those results.
One of the struggles with FacetAPI are the URLs of the individual facets. While Drupal turns the ugly GET 'q' parameter into a clean URLs, FacetAPI just concatenates any extra query parameters which leads to Real Ugly Paths. The FacetAPI Pretty Paths module tries to change that by rewriting those into human friendly URLs.
Our challenge involved altering the paths generated by the facets, but with a slight twist.
Due to the projects architecture, we were forced to replace the full view mode of a node of the bundle type "contact" with a single search result based on the nid of the visited node. This was a cheap way to avoid duplicating functionality and wasting precious time. We used the CTools custom page manager to take over the node/% page and added a variant which is triggered by a selection rule based on the bundle type. The variant itself doesn't use the panels renderer but redirects the visitor to the Solr page passing the nid as an extra argument with the URL. This resulted in a path like this: /contacts?contact=1234.
With this snippet, the contact query parameter is passed to Solr which yields the exact result we need.
/**
 * Implements hook_apachesolr_query_alter().
 */
function myproject_apachesolr_query_alter($query) {
  if (!empty($_GET['contact'])) {
    $query->addFilter('entity_id', $_GET['contact']);
  }
}
The result page with our single search result still contains facets in a sidebar. Moreover, the URLs of those facets looked like this: /contacts?contact=1234&f[0]=im_field_myfield..... Now we faced a new problem. The ?contact=1234 part was conflicting with the rest of the search query. This resulted in an empty result page, whenever our single search result, node 1234, didn't match with the rest of the search query! So, we had to alter the paths of the individual facets, to make them look like this: /contacts?f[0]=im_field_myfield.
This is how I approached the problem.
If you look carefully in the API documentation, you won't find any hooks that allow you to directly alter the URLs of the facets. Gutting the FacetAPI module is quite daunting. I started looking for undocumented hooks, but quickly abandoned that approach. Then, I realised that FacetAPI Pretty Paths actually does what we wanted: alter the paths of the facets to make them look, well, pretty! I just had to figure out how it worked and emulate its behaviour in our own module.
Turns out that most of the facet generating functionality is contained in a set of adaptable, loosely coupled, extensible classes registered as CTools plugin handlers. Great! This means that I just had to find the relevant class and override those methods with our custom logic while extending.
Facet URLs are generated by classes extending the abstract FacetapiUrlProcessor class. The FacetapiUrlProcessorStandard extends and implements the base class and already does all of the heavy lifting, so I decided to take it from there. I just had to create a new class, implement the right methods and register it as a plugin. In the folder of my custom module, I created a new folder plugins/facetapi containing a new file called url_processor_myproject.inc. This is my class:
/**
 * @file
 * A custom URL processor for cancer.
 */

/**
 * Extension of FacetapiUrlProcessor.
 */
class FacetapiUrlProcessorMyProject extends FacetapiUrlProcessorStandard {

  /**
   * Overrides FacetapiUrlProcessorStandard::normalizeParams().
   *
   * Strips the "q" and "page" variables from the params array.
   * Custom: Strips the 'contact' variable from the params array too
   */
  public function normalizeParams(array $params, $filter_key = 'f') {
    return drupal_get_query_parameters($params, array('q', 'page', 'contact'));
  }

}
I registered my new URL Processor by implementing hook_facetapi_url_processors in the myproject.module file.
**
 * Implements hook_facetapi_url_processors().
 */
function myproject_facetapi_url_processors() {
  return array(
    'myproject' => array(
      'handler' => array(
        'label' => t('MyProject'),
        'class' => 'FacetapiUrlProcessorMyProject',
      ),
    ),
  );
}
I also included the .inc file in the myproject.info file:
files[] = plugins/facetapi/url_processor_myproject.inc
Now I had a new registered URL Processor handler. But I still needed to hook it up with the correct Solr searcher on which the FacetAPI relies to generate facets. hook_facetapi_searcher_info_alter allows you to override the searcher definition and tell the searcher to use your new custom URL processor rather than the standard URL processor. This is the implementation in myproject.module:
/**
 * Implements hook_facetapi_search_info().
 */
function myproject_facetapi_searcher_info_alter(array &$searcher_info) {
  foreach ($searcher_info as &$info) {
    $info['url processor'] = 'myproject';
  }
}
After clearing the cache, the correct path was generated per facet. Great! Of course, the paths still don't look pretty and contain those way too visible and way too ugly query parameters. We could enable the FacetAPI Pretty Path module, but by implementing our own URL processor, FacetAPI Pretty Paths will cause a conflict since the searcher uses either one or the other class. Not both. One way to solve this problem would be to extend the FacetapiUrlProcessorPrettyPaths class, since it is derived from the same FacetapiUrlProcessorStandard base class, and override its normalizeParams() method.
But that's another story.
Welcome back to “Skills Upgrade” a Talking Drupal mini-series following the journey of a D7 developer learning D10. This is episode 7.
Topics
-
Review Chad's goals for the previous week
- Test Example
- Set up phpunit.xml
- Start with FrontPageLinkTest.php
-
Review Chad's questions
- In the testing_example module, the file "src/Controller/TestingExampleController.php" has a function for simpletestDescription(). Is this an outdated artifact that should have been removed at some point? The module itself doesn't appear to use Simpletest elsewhere and appears to only rely on PHPUnit.
- What do you recommend for the minimal code structure to include for any given test type? Is the Testing Example module an ideal model or are there other resources I should review? The testing reference from Selwyn was helpful.
- In the "FrontPageLinkDependenciesTest.php" setUp() function, the createContentType() function is called without specifying the type. Is that set somewhere else? I may have overlooked it. Nevermind—it's set using randomMachineName() in the createContentType() function.
Is there anything extra or standard to write in tests for drupal.org?
-
Tasks for the upcoming week
- Smart Date - Martin (maintainer) to review promptly, I've already chatted with him about it. Create a new functional test: "submit a range with an end time before the start and validate that an error is returned"
- Create an issue in the Smart Date queue and assign to yourself.
- Create an issue fork.
- Check out the issue fork locally.
- Write (and test) the test locally.
- Commit and push to the issue fork.
- Mark issue as "Needs review".
- Ask someone to review - if all looks good, the reviewer will mark as RBTC.
- Smart Date - Martin (maintainer) to review promptly, I've already chatted with him about it. Create a new functional test: "submit a range with an end time before the start and validate that an error is returned"
Resources
Chad's Drupal 10 Learning Curriclum & Journal
Chad's Drupal 10 Learning Notes
The Linux Foundation is offering a discount of 30% off e-learning courses, certifications and bundles with the code, all uppercase DRUPAL24 and that is good until June 5th
https://training.linuxfoundation.org/certification-catalog/
Hosts
AmyJune Hineline - @volkswagenchick
Guests
Chad Hester - chadkhester.com @chadkhest
Mike Anello - DrupalEasy.com @ultimike
At Studio.gd we love the Drupal ecosystem and it became very important to us to give back and participate.
Today we're proud to announce a new module that we hope will help you !
Inline Entity Display module will help you handle the display of referenced entity fields directly in the parent entity.
For exemple if you reference a taxomony "Tags" to an Article node, you will be able directly in the manage display of the article to display tags' fields. It can become very usefull with more complex referenced entity like field collection for exemple.
VOIR LE MODULE : https://www.drupal.org/project/inline_entity_display
Features
- You can control, for each compatible reference field instances, if the fields from the referenced entities would be available as extra fields. Disabled by default.
- You can manage the visibility of the referenced entities fields on the manage display form. Hidden by default.
- View modes are added to represent this context and manage custom display settings for the referenced entities fields in this context {entity_type}_{view_mode} Example: "Node: Teaser" is used to render referenced entities fields, when you reference an entity into a node, and you view this node as a teaser if there are no custom settings for this view mode, fields are rendered using the default view mode settings.
- Extra data attributes are added on the default fields markup, so the field of the same entity can be identified.
Compatible with Field group on manage display form.
Compatible with Display Suite layouts on manage display form.
Requirements
- Entity API
- One of the compatible reference fields module.
Tutorials
simplytest.me/project/inline_entity_display/7.x-1.x
The simplytest.me install of this module will come automatically with these modules: entity_reference, field_collection, field_group, display suite.
VOIR LE MODULE : https://www.drupal.org/project/inline_entity_display
We are currently developping a similar module for Drupal 8 but more powerful and more flexible, Stay tuned !
Ressources
Migrate in Drupal 8
Migrate is now included in the Drupal core for making the upgrade path from 6.x and 7.x versions to Drupal 8.
Drupal 8 has two new modules :
Migrate: « Handles migrations »
Migrate Drupal : « Contains migrations from older Drupal versions. »
None of these module have a User Interface.
« Migrate » contains the core framework classes, the destination, source and process plugins schemas and definitions, and at last the migration config entity schema and definition.
« Migrate Drupal » contains implementations of destination, sources and process plugins for Drupal 6 and 7 you can use it or extend it, it's ready to use. But this module doesn't contain the configuration to migrate all you datas from your older Drupal site to Drupal 8.
The core provides templates of migration configuration entity that are located under each module of the core that needs one, under a folder named 'migration_templates' to find all the templates you can use this command in your Drupal 8 site:
To make a Drupal core to core migration, you will find all the infos here : https://www.Drupal.org/node/2257723 there is an UI in progress for upgrading.
A migration framework
Let have a look at each big piece of the migration framework :
Source plugins
Drupal provides an interface and base classes for the migration source plugin :
- SqlBase : Base class for SQL source, you need to extend this class to use it in your migration.
- SourcePluginBase : Base class for every custom source plugin.
- MenuLink: For D6/D7 menu links.
- EmptySource (id:empty): Plugin source that returns an empty row.
- ...
Process plugins
There is the equivalent of the D7 MigrateFieldHandler but this is not reduced to fields or to a particular field type.
Its purpose is to transform a raw value into something acceptable by your new site schema.
The method transform() of the plugin is in charge of transforming your $value or skipping the entire row if needed.
If the source property has multiple values, the transform() will happen on each one.
Drupal provides migration process plugin into each module of the core that needs it (for the core upgrade),
To find out which one and where it is located you can use this command :
Destination plugins
Destination plugins are the classes that handle where your data are saved in the new Drupal 8 sites schemas.
Drupal provides a lot of useful destination classes :
- DestinationBase : Base class for migrate destination classes.
- Entity (id: entity) : Base class for entity destinations.
- Config (id: config) : Class for importing configuration entities.
- EntityBaseFieldOverride (id: entity:base_field_override): Class for importing base field.
- EntityConfigBase : Base class for importing configuration entities.
- EntityImageStyle (id: entity:image_style): Class for importing image_style.
- EntityContentBase (id: entity:%entity_type): The destination class for all content entities lacking a specific class.
- EntityNodeType: (id: entity:node_type): A class for migrate node type.
- EntityFile (id: entity:file): Class for migrate files.
- EntityFieldInstance: Class for migrate field instance.
- EntityFieldStorageConfig: Class for migrate field storage.
- EntityRevision, EntityViewMode, EntityUser, Book...
- And so more…
Builder plugins:
"Builder plugins implement custom logic to generate migration entities from migration templates. For example, a migration may need to be customized based on the data that is present in the source database; such customization is implemented by builders." - doc API
This is used in the user module, the builder create a migration configuration entity based on a migration template and then add fields mapping to the process, based on the data in the source database. (@see /Drupal/user/Plugin/migrate/builder/d7/User)
Id map plugins:
"It creates one map and one message table per migration entity to store the relevant information." - doc API
This is where rollback, update and the map creation are handled.
Drupal provides the Sql plugin (@see /Drupal/migrate/Plugin/migrate/id_map/Sql) based on the core base class PluginBase.
And we are talking only about core from the beginning.
All the examples (That means docs for devs) are in core !
About now :
While there *almost* a simple UI to use migration in Drupal 8 for Drupal to Drupal, Migrate can be used for every kind of data input. The work is in progess for http://Drupal.org/project/migrate_plus to bring an UI and more source plugins, process plugins and examples. There already is the CSV source plugin and a pending patch for the code example. The primary goal of « migrate plus » is to have all the features (UI, Sources, Destinations.. ) of the Drupal 7 version.
Concrete migration
(migration with Drupal 8 are made easy)
I need to migrate some content with image, attached files and categories from custom tables in an external SQL database to Drupal.
To begin shortly :
- Drush 8 (dev master) and console installed.
- Create the custom module (in the code, I assume the module name is “example_migrate”):
$ Drupal generate:module
or create the module by yourself, you only need the info.yml file. - Activate migrate and migrate_plus tools
$ Drupal module:install migrate_tools
or
$ drush en migrate_tools - What we have in Drupal for the code example :
- a taxonomy vocabulary : ‘example_content_category’
- a content type ‘article’
- some fields: body, field_image, field_attached_files, field_category
- Define in settings.php, the connexion to your external database:
We are going to tell migrate source to use this database target. It happens in each migration configuration file, it’s a configuration property used by the SqlBase source plugin:
This is one of the reasons SqlBase has a wrapper for select query and you need to call it in your source plugin, like $this->select(), instead of building the query with bare hands.
N.B. Each time you add a custom yml file in your custom module you need to uninstall/reinstall the module for the config/install files to imports. In order to avoid that, you can import a single migration config file by copy/paste in the admin/config configuration synchronisation section.
The File migration
The content has images and files to migrate, I suppose in this example that the source database has a unique id for each file in a specific table that hold the file path to migrate.
We need a migration for the file to a Drupal 8 file entity, we write the source plugin for the file migration:
File: src/Plugin/migrate/source/ExampleFile.php
We have the source class and our source fields and each row generate a path to the file on my local disk.
But we need to transform our external file path to a local Drupal public file system URI, for that we need a process plugin. In our case the process plugin will take the external filepath and filename as arguments and return the new Drupal URI.
File: src/Plugin/migrate/process/ExampleFileUri.php
We need another process plugin to transform our source date values to timestamp (created, changed), as the date format is the same across the source database, this plugin will be reused in the content migration for the same purpose:
File: src/Plugin/migrate/process/ExampleDate.php
For the destination we use the core plugin: entity:file.
Now we have to define our migration config entity file, this is where the source, destination and process (field mappings) are defined:
File: config/install/migrate.migration.example_file.yml
We are done for the file migration, you can execute it with the migrate_tools (of the migrate_plus project) drush command:
The Term migration
The content has categories to migrate.
We need to import them as taxonomy term, in this example I suppose the categories didn't have unique ids, it is just a column of the article table with the category name…
First we create the source :
File: src/Plugin/migrate/source/ExampleCategory.php
And we can now create the migration config entity file :
File: config/install/migrate.migration.example_category.yml
This is done, to execute it :
The Content migration
The content from the source has an html content, raw excerpt, image, attached files, categories and the creation/updated date in the format Y-m-d H:i:s
We create the source plugin:
File: src/Plugin/migrate/source/ExampleContent.php
Now we can create the content migration config entity file :
File: config/install/migrate.migration.example_content.yml
Finally, execute it :
Group the migration
Thanks to migrate_plus, you can specify a migration group for your migration.
You need a to create a config entity for that :
File: config/install/migrate_plus.migration_group.example.yml
Then in your migration config yaml file, be sure to have the line migration_group next to the label:
So you can use the command to run the migration together, and the order of execution will depend on the migration dependencies:
I hope that you enjoyed our article.
Best regards,
For the example we are going to implement an area that will present some links and text in a custom way, not sure if it's really usefull, but that not the point of this article.
The Plugin system
For the first post on the plugins I will introduce briefly on the concept. For those that already been using Ctools plugins system, you already now about the plugin system purposes.
For those who doesn't know about it, the plugin system is a way to let other module implements her own use case for an existing features, think of Field formatter : provide your own render array for a particular field display, or Widget : provide your own form element for a particular field type, etc...
The plugin system has three base elements :
Plugin Types
The plugin type is the central controlling class that defines how the plugins of this type will be discovered and instantiated. The type will describe the central purpose of all plugins of that type; e.g. cache backends, image actions, blocks, etc.
Plugin Discovery
Plugin Discovery is the process of finding plugins within the available code base that qualify for use within this particular plugin type's use case.
Plugin Factory
The Factory is responsible for instantiating the specific plugin(s) chosen for a given use case.
Detailled informations : https://www.drupal.org/node/1637730
In our case Views is responsible of that implementations so we are not going further on that, let see now how to implement a plugin definition.
The Plugin definitions
The existing documentation on the plugin definitions are a little abstract for now to understand how it really works (https://www.drupal.org/node/1653532).
You have to understand simply that a Plugin in most case is a Class implementation, namespaced within the namespace of the plugin type, in our example this is : \Drupal\module_name\Plugin\views\area
So if I implement a custom views area Plugin in my module the class will be located under the location module_name/src/Plugin/views/area/MyAreaHandler.php
To know where to implement a plugin definition for a plugin type, you can in most case look at module docs, or directly in the source code of the module (looking at an example of a definition will be enough)
In most cases, the modules that implement a Plugin type will provide a base class for the plugins definitions, in our example views area provide a base class : \Drupal\views\Plugin\views\area\AreaPluginBase
Drupal provide also a base class, if you implement a custom Plugin type, for the Plugin definition : \Drupal\Component\Plugin\PluginBase
Your custom plugin definition class must also have annotation metadata, that is defined by the module that implement the plugin type, in our example : \Drupal\views\Annotation\ViewsArea
In the case of views you will also need to implement the hook_views_data() into module_name.views.inc file, there you will inform views about the name and metadata of your Area handler.
Hands on implementation
So we have a custom module let's call it module_name for the example :)
We will create the class that implements our plugin definition and we are gonna give it this Plugin ID : my_custom_site_area.
We save this file into module_name/src/Plugin/views/area/MyCustomSiteArea.php
Now we just have to implements the hook_views_data() and yes this is the end, you can use your awesome views area handler into any view and any area.
Define this hook into the file : module_name/module_name.views.inc
There is three types of configuration data :
The Simple Configuration API
-
Used to store unique configuration object.
-
Are namespaced by the module_name.
-
Can contain a list of structured variables (string, int, array, ..)
-
Default values can be found in Yaml : config/install/module_name.config_object_name.yml
-
Have a schema defined in config/schema/module_name.schema.yml
Code example :
The States
-
Not exportable, simple value that hardly depend of the environment.
-
Value can differ between environment (e.g. last_cron, maintenance_mode have different value on your local and on the production site)
The Entity Configuration API
-
Configuration object that can be multiple (e.g. views, image style, ckeditor profile, ...).
-
New Configuration type can be defined in custom module.
-
Have a defined schema in Yaml.
-
Not fieldable.
-
Values can be exported and stored as Yaml, can be stored by modules in config/install
Code example :
https://www.drupal.org/node/1809494
Store configuration object in the module :
Config object (not states) can be stored in a module and imported during the install process of the modules.
To export a config object in a module you can use the configuration synchronisation UI at /admin/config/development/configuration/single/export
Select the configuration object type, then the object, copy the content and store it in your custom module config/install directory following the name convention that is provided below the textarea.
You can also use the features module that is now a simple configuration packager.
If after the install of the module, you want to update the config object, you can use the following drush command :
Configuration override system
Remember the variable $conf in settings.php in D6/D7 for overriding variables.
In D8, you can also override variable from the configuration API:
You can also do overrides at runtime.
Example: getting a value in a specific languages :
Drupal provide a storage for override an module can specify her own way of override, for deeper informations look at :
https://www.drupal.org/node/1928898
Configuration schema
The config object of Config API and of the configuration entity API have attached schema defined in module_name/config/install/module_name.schema.yml
These schema are not mandatory, but if you want to have translatable strings, nor form configuration / consistent export, you must take the time to implement the schema for your configuration object. However if you don't want to, you can just implement the toArray() method in your entity config object class.
Example, docs and informations : https://www.drupal.org/node/1905070
Configuration dependencies calculation
Default is in the .info of the module that define the config object like in D6/D7
But config entity can implements calculateDependencies() method to provide dynamic dependencies depending on config entity values.
Think of Config entity that store field display information for content entities specific view modes, there a need to have the module that hold the fields / formatters in dependencies but these are dynamic depending on the content entity display.
More information : https://www.drupal.org/node/2235409
Discover Why DrupalCon Portland 2024 Is the Must-Attend Event of the Year

If you're part of the Drupal community or interested in Drupal, you won't want to miss DrupalCon Portland 2024! The conference is set to be the most exciting and informative event of the year, catering to developers, marketers, content editors, content publishers, and anyone else who interacts with their website. In this blog post, I'll outline the top five reasons why attending DrupalCon Portland in 2024 is a must.
Immerse Yourself in the Ultimate Drupal Experience
DrupalCon Portland 2024 promises an entire week dedicated to Drupal and the vibrant Drupal Community. It's your chance to connect with some of the most brilliant minds in the industry, engage in discussions, build lasting friendships, and simply have a fantastic time. Key highlights of the event include:
-
Foster Community Through In-Person Connections: Experience the warmth and synergy of the Drupal community by connecting face-to-face with fellow Drupal enthusiasts. This is a unique chance to share your passion for Drupal with like-minded individuals in a vibrant, engaging setting.
-
Driesnote & Eminent Speakers: Gain insights from the Drupal founder during the much-anticipated Driesnote and learn from a lineup of distinguished speakers. These sessions promise to be thought-provoking, offering deep dives into various aspects of Drupal, its ecosystem, and future directions.
-
Contribution Opportunities: Participate in contribution sprints where you can tackle real-world problems, contribute to the project, and interact with key project contributors and maintainers. This is your chance to make a tangible impact and glean insights from the guardians of the Drupal codebase.
-
Social Gatherings and Welcome Party: DrupalCon isn't just about learning; it's also about having a great time. The Welcome Party and other social events provide perfect settings to unwind, celebrate, and build friendships in a more relaxed atmosphere. View the social events or submit yours now.
-
Birds of a Feather Sessions: Engage in "Birds of a Feather" (BoF) sessions, where small groups gather to discuss hot topics and share knowledge on specific areas of interest within Drupal and technology. These small gatherings encourage open dialogue and are a great way to dive deep into subjects you care about with peers.
Rediscover the Thriving Drupal Community
After years of remote work and lockdowns, DrupalCon Portland 2024 provides a refreshing opportunity to step out of your home office and connect with passionate Drupal enthusiasts. Meet the faces behind your favorite modules and engage with like-minded individuals who share your love for Drupal.
Unparalleled Learning Opportunities
DrupalCon offers unparalleled opportunities for learning and growth. From inspiring keynotes and informative sessions to hands-on training and contribution sprints, this event is the ultimate platform to expand your knowledge and expertise. Break out of your routine and explore the full potential of Drupal.
This year will be filled with broader topics to help you drive your digital experiences forward. Some of the new highlights this year include:
- A new marketing track dedicated to driving your business goals forward.
- Artificial Intelligence (AI) - Learning how AI is being incorporated into Drupal and how it can help you improve your day to day and achieve your goals.
- Birds of a Feather - More structure and planning going into our BOF sessions to drive higher levels of engagement and inform stronger conversations.
Be Inspired by Innovations
Witness the transformative power of Drupal and be inspired by the innovative and talented Drupal community. Attendees at DrupalCon Portland are focused on:
- Crafting cutting-edge content management systems.
- Delivering groundbreaking customer experiences.
- Mastering their craft and pushing boundaries.
Forge Valuable Connections
DrupalCon Portland is the perfect environment to connect with individuals who share your passion for Drupal, open-source technology, and delivering top-notch digital experiences. Building relationships here can significantly impact your career, opening doors to exciting opportunities.
There are countless reasons to join us at DrupalCon Portland 2024, and we can't wait to welcome you! It's a unique opportunity to connect with the Drupal community, discover the incredible work happening within Drupal, and spend quality time with friends and colleagues from around the world who share your common passion. We look forward to seeing you there!
Authored by: Nadiia Nykolaichuk.
Robust CMSs like Drupal and AI services seem to be a perfect pairing when it comes to supercharging content management workflows. Luckily, Drupal has got you covered with nice integration options. Soon after the rapid advance of generative AI, the first modules for OpenAI/ChatGPT integration with Drupal came on the scene. Among them were the OpenAI and the Augmentor AI modules, which are at the forefront of Drupal’s ever-growing ecosystem of AI-related tools.
We are always happy to help you discover the most advanced ways to bring efficiency, innovation, and better user experiences to your website. So we walked you through the steps of setting up the OpenAI module and the ways to use AI tools to enhance your SEO. And now it’s time to take a deep dive into the Augmentor AI module that has recently gained traction in the Drupal circles.
The Augmentor AI module acts as a bridge between Drupal and a wide range of external AI services, facilitating integration and configuration. It has a pluggable architecture and is endlessly customizable. This creates infinite possibilities for prompt engineering, which we’ll also touch upon in this article. So prepare for an exciting journey.
Getting the desired output, or a glimpse at prompt engineering
You already know that in order to get the best answer to a question, you must ask it as clearly as possible. This works with humans and even better with AI models that are more predictable and programmable in how they respond.
Designing and refining your queries to AI models to receive the most relevant and meaningful output is the basic idea behind the new “prompt engineering” concept. Prompt engineering is usually associated with the use of so-called LLMs — large language models. An example of this is a GPT (Generative Pre-trained Transformer) model.
A prompt is what a user provides to the AI system when seeking information or assistance — a question, additional context, or instructions. When an AI model is integrated with a website or application, prompt engineering involves adjusting the language, structure, and format of prompts to guide users effectively in their interactions with AI. This may include form fields and labels, buttons, wizards, or format guidelines, to name a few. The flexible Augmentor module is great in this area, so let’s move on directly to the overview of what it can do.
The key capabilities of the Augmentor AI module for Drupal
A rich variety of integrations and potential AI-powered tasks
With the Augmentor AI module, you can connect your Drupal website to AI services by OpenAI, NLP Cloud, Google, AWS, and others. For specific integrations, the module’s maintainers have provided a set of related modules:
Thanks to those integrations, potential AI-powered features on your Drupal website include (but are not limited to):
- automatic text summarization
- suggesting relevant tags or keywords
- image analysis with tag generation
- auto-generating content in a certain tone and structure
- suggesting content ideas
- grammar checks
- sentiment analysis
- interactive chat bots
- text translations
- spam detection
- voice search
Furthermore, thanks to the pluggable architecture, the module can connect Drupal websites to any other AI service. Martin Anderson-Clutz (mandclu), one of the module’s co-maintainers confirmed the possibility of adding your own AI integrations and called it “the beauty of having a composable approach.” He did so in the “Module of the Week” issue of the “Talking Drupal” podcast dedicated to Augmentor AI.
The concept of augmentors
The Augmentor AI module introduces configuration entities called augmentors, and provides a user interface for managing them. An augmentor includes details such as what message should be sent to the AI service prompting it to perform a certain task, and how Drupal should handle the response.
You’ll need at least one augmentor for a specific AI service. Furthermore, the module’s maintainers suggest creating multiple augmentors that represent specific use cases within the same AI service (such as an augmentor for image tagging, an augmentor for content summarizing, and so on). This should allow for structuring the prompts more specifically.
“A content editor needs to be able to click a button and interact with the interface. The augmentor should then be able to go out to an external API, get that data back, and then update the UI for the editor. Then the editor should be able to review the content and accept it or reject it. That’s the basic flow.”
— Murray Woodman, the creator of Augmentor AI
At the DrupalSouth session “AI-Powered Drupal: A new era for content creation and management,” Murray Woodman (murrayw) demonstrates multiple buttons on the content editing form for various content management tasks. Each of these buttons triggers an augmentor execution. For example, Murray shows the “Content tags'' button that generates tags as an array. A content editor can accept the ones they like by clicking on them and they’ll be added to “Tags.”
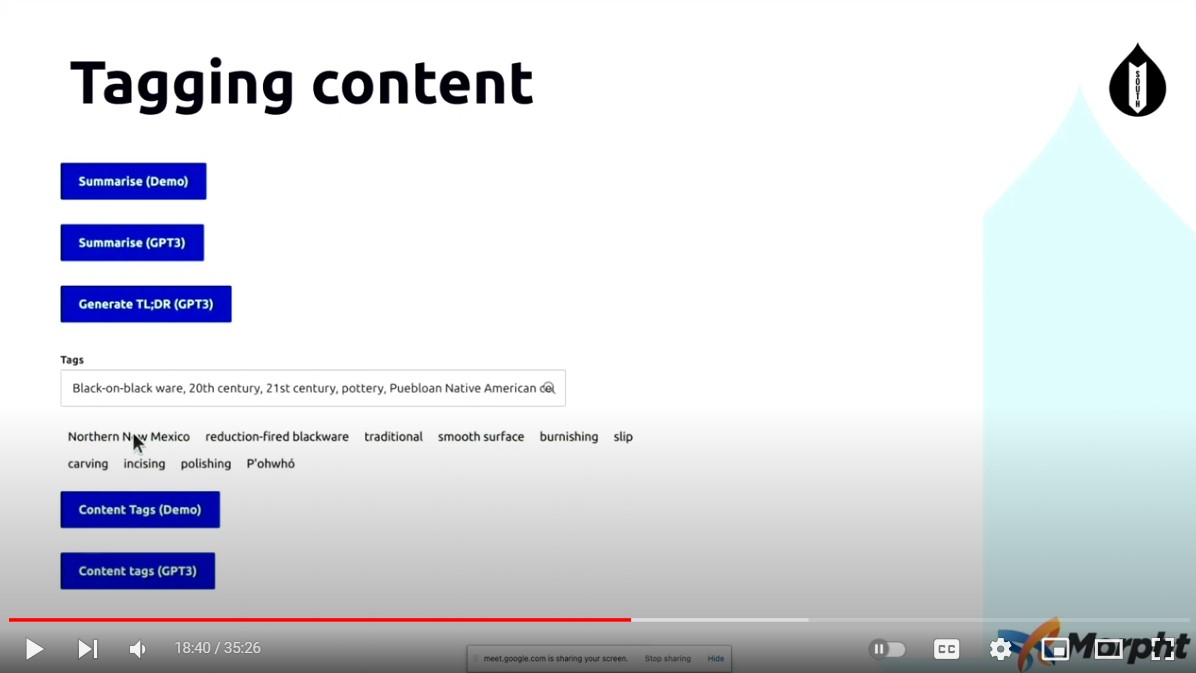 Multiple augmentor buttons on the content management form demoed by Murray Woodman.
CKEditor integration
The module supports augmentor integration with CKEditor 4 and 5. Thanks to this, content creators can trigger AI actions directly in the text area. For example, they might want to summarize a piece of content they are writing, generate tags, or get tags for an image they’re inserting into an article. With the “Augmentors” button added to the CKEditor toolbar, content editors can select available augmentors from the dropdown menu.
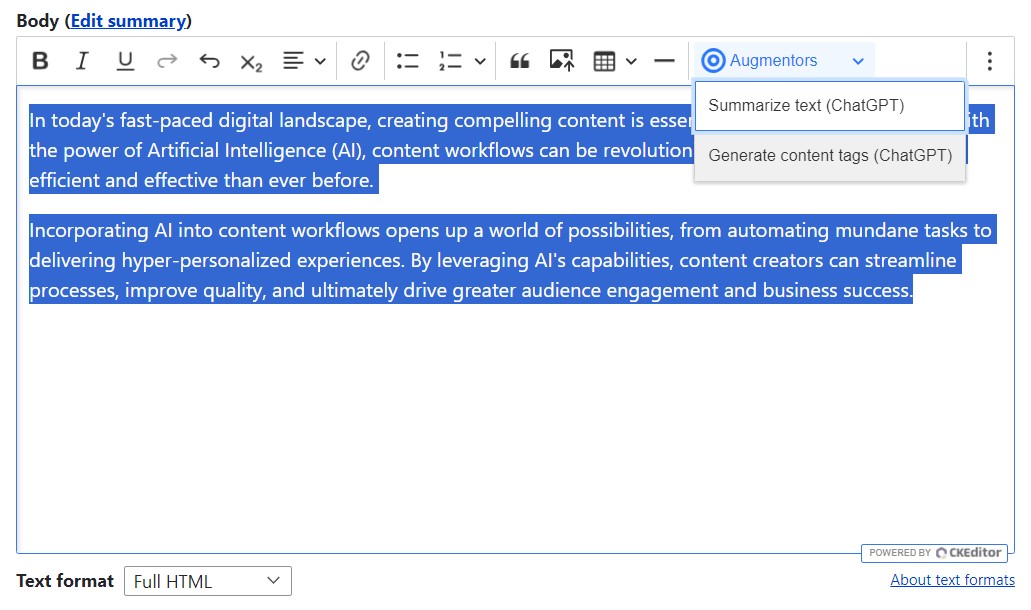 A dropdown with available augmentors on the CKEditor 5 toolbar.
Usage in fields with special widgets
Another possible usage of augmentors is by adding augmentor fields to the content structure. When using augmentors in fields, you can set up the rules for AI-powered tasks at the field level such as:
- from which fields the AI service should take the content and to which fields it needs to go after the returned response
- how users interact with the AI functionality (for example, via the buttons on the content management form)
To provide that, the Augmentor AI module provides the “Field Augmentor” field type. The module also comes packed with extremely customizable field widgets such as the standard widget, a widget with a select list for choosing between specific responses, a widget for generating tags, and many more. We’ll discuss more details about fields and widgets further in the “Installation and configuration” part of this article.
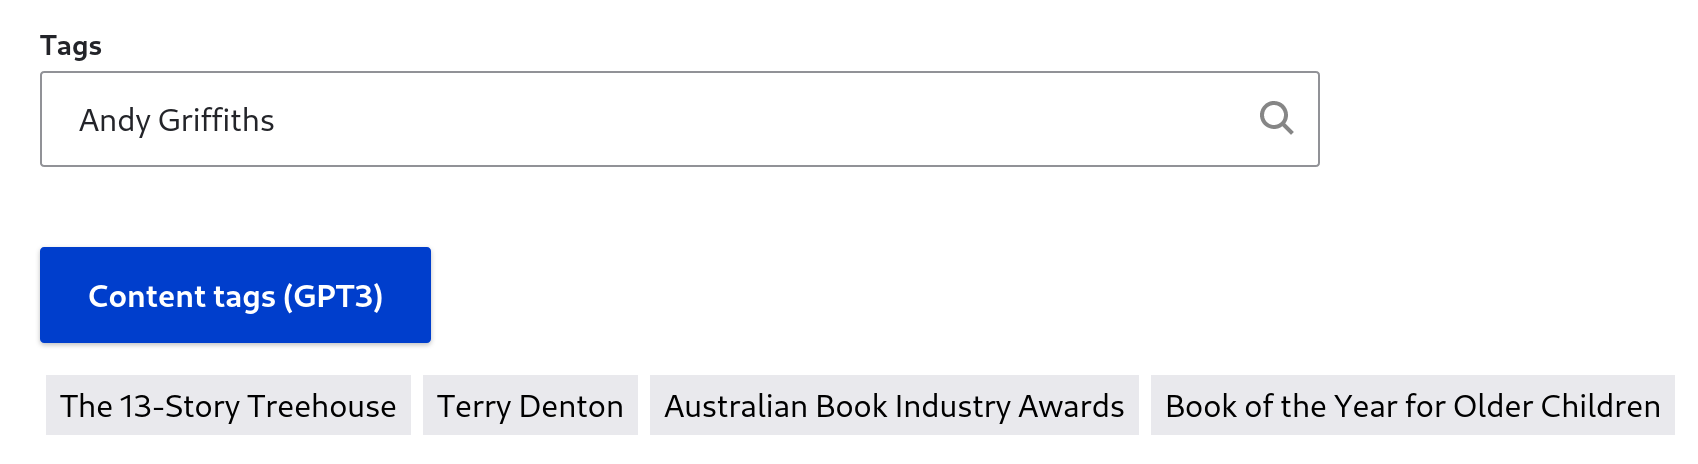 An example of generating content tags via a button after configuring the augmentor field widget.
Built-in demo augmentor
The Augmentor AI module comes packed with the Demo Augmentor submodule. When enabled, the latter provides a blueprint for developers and site builders.
Search API integration
Great news is here for Drupal websites that use the Search API engine for advanced search interfaces. The Augmentor AI module’s main package includes the Search API Augmentor Processors submodule for augmenting search results.
Support for ECA
As mentioned by Murray Woodman in his overview article about the Augmentor AI module, great effort has been put into providing support for the ECA (Event - Condition - Action) framework. This allows for triggering automatic actions for augmentors based on certain events and conditions.
The installation and configuration of the Augmentor AI module
Installing the module(s)
The Augmentor AI module depends on another Drupal module — Key. If you use Composer for installation, it will automatically install the Key module as well:
composer require drupal/augmentor
Next, enable the Augmentor module’s submodules as desired:
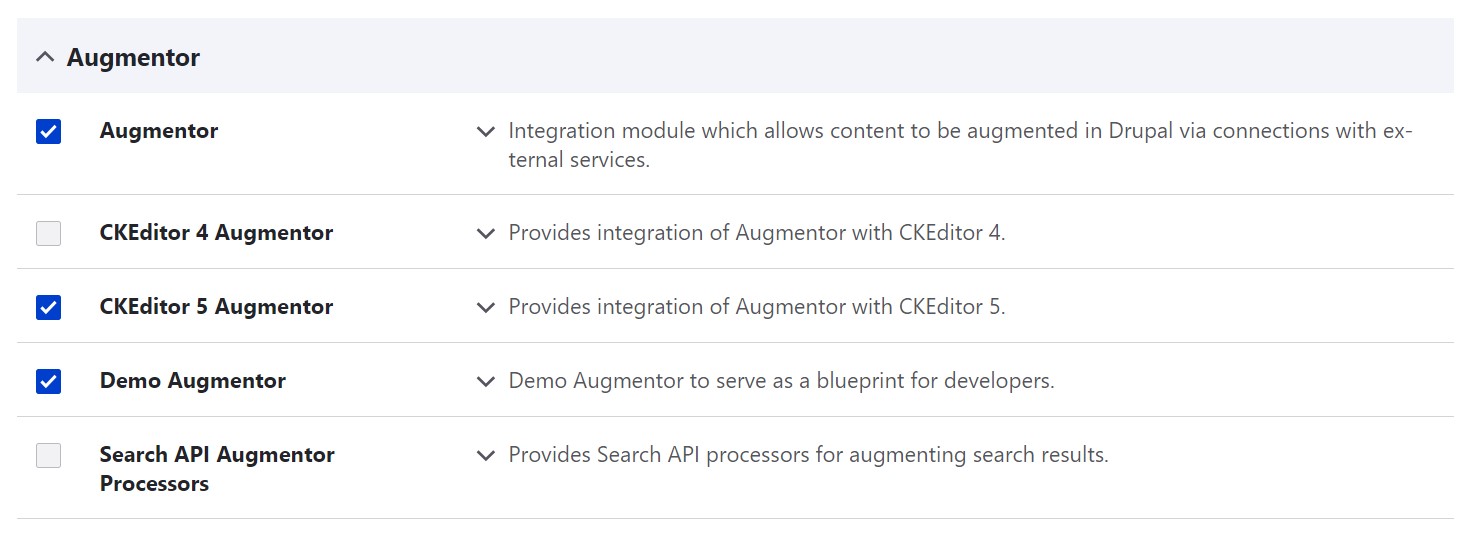 Enabling the Augmentor AI submodules.
Finally, install and enable related modules for specific AI services you’d like to use.
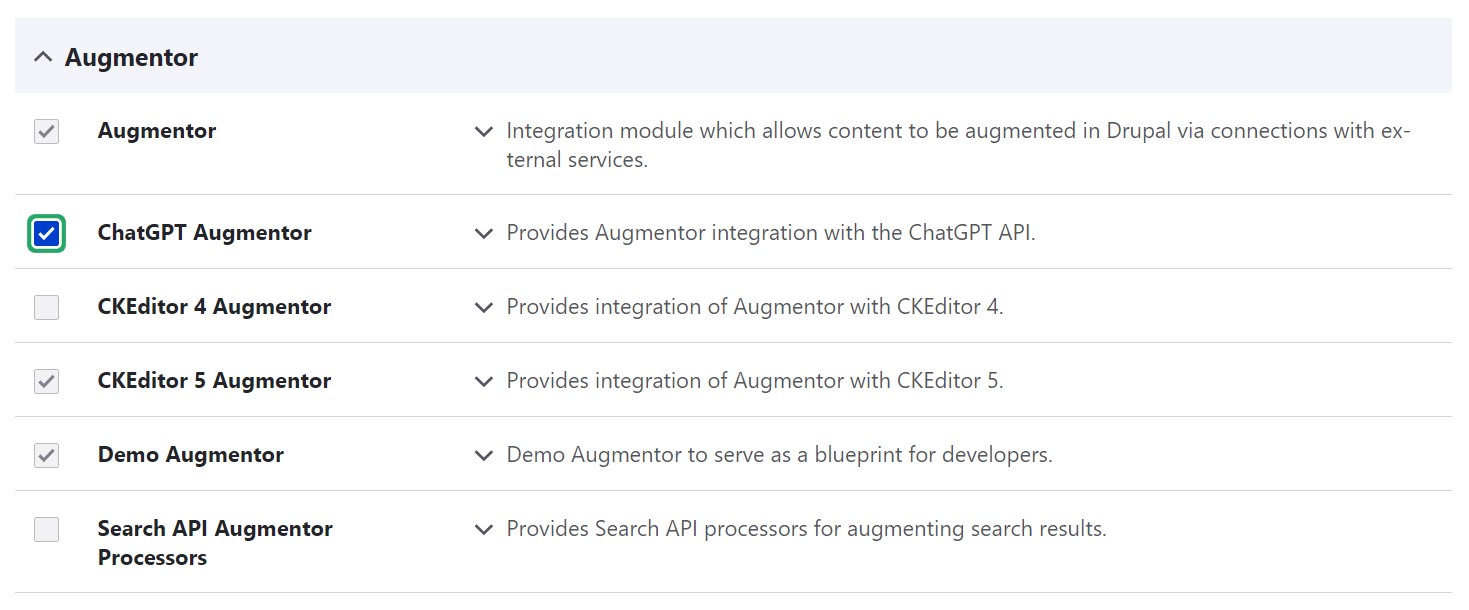 An example of enabling a related augmentor module a for specific AI service.
Getting an API key from an AI service
You’ll need to be logged in to your account with the specific AI service to get its API key. The instructions to get an API key vary depending on the service.
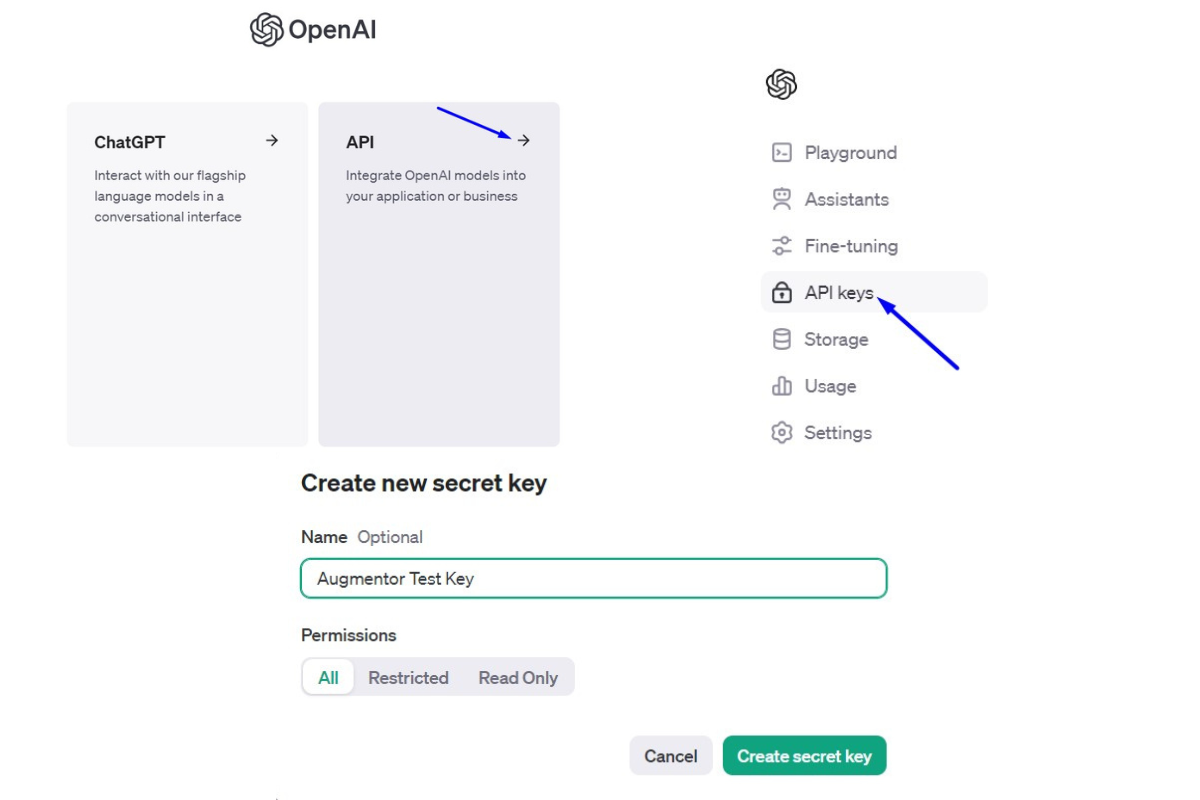 An example of steps to getting an API key from an AI service (OpenAI).
Adding the AI service API key to Drupal
Go to Configuration > System > Keys on your Drupal website’s administrative dashboard and create a key entry with the API key for each AI service you intend to use. Martin Anderson-Clutz at the above-mentioned “Module of the Week” podcast said it’s possible to have separate keys for different augmentors as well.
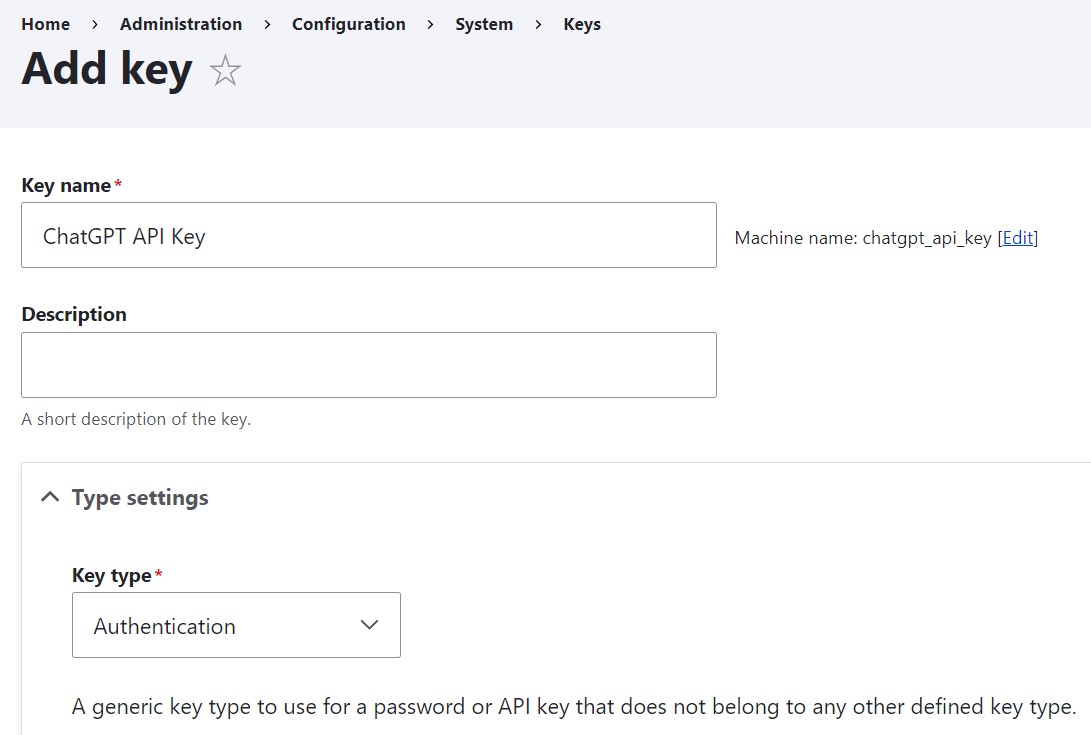 Creating a key entry in Drupal for an AI service (step 1).
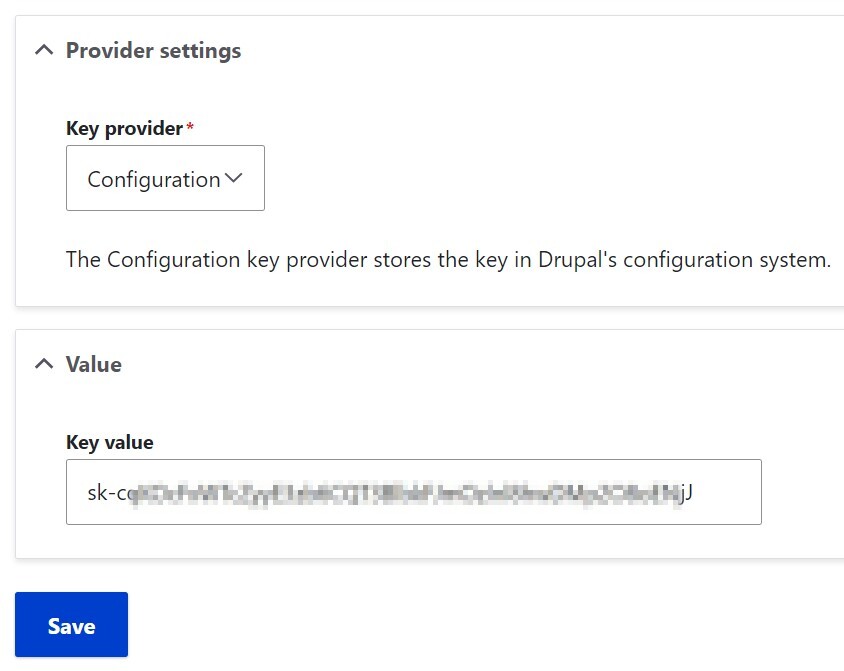 Creating a key entry in Drupal for an AI service (step 2).
Creating augmentors
Go to Web Services > Augmentor and start by selecting your new augmentor type. This means choosing from the dropdown menu which AI service your augmentor should use, or whether you’d like to choose the Demo Augmentor, and then clicking “Add.”
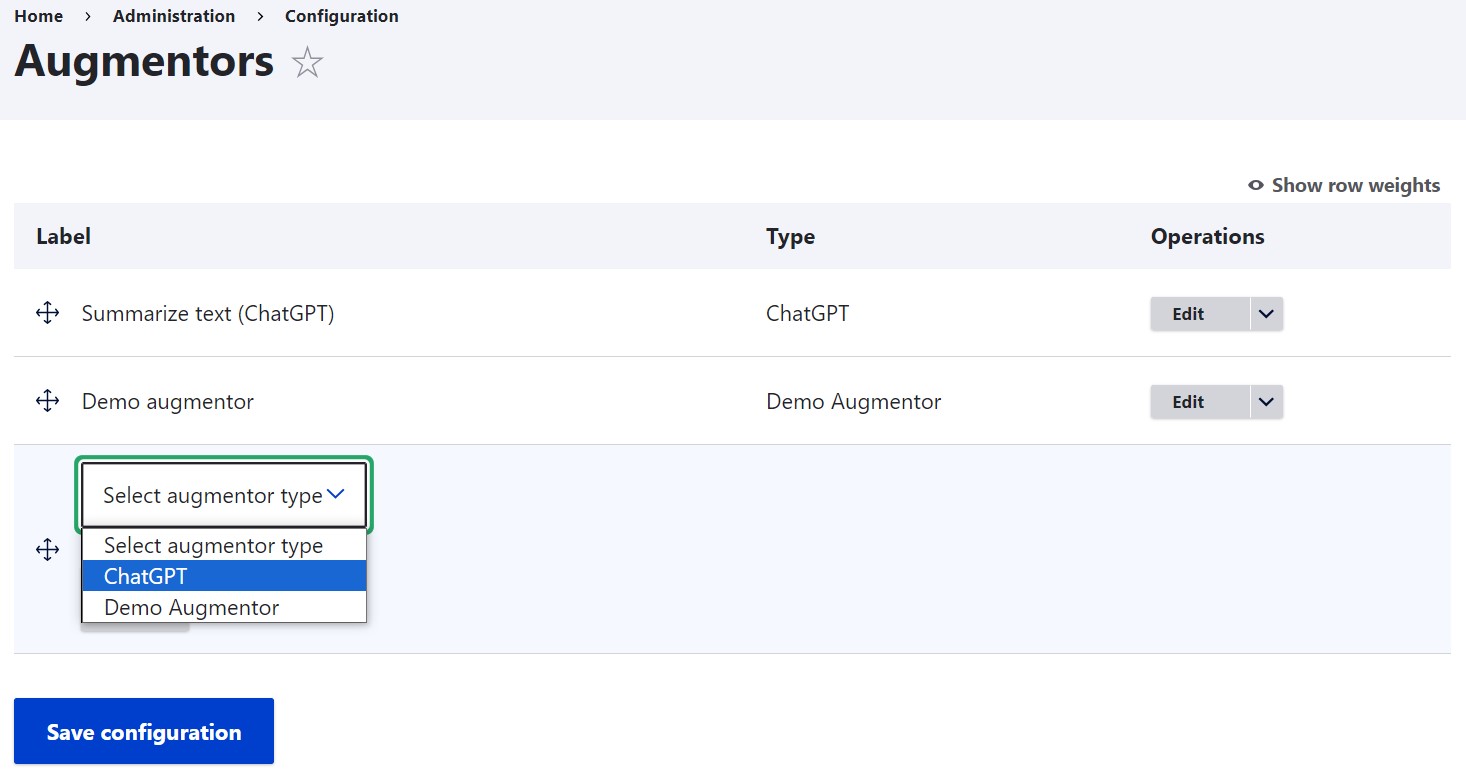 Selecting the augmentor type when creating a new augmentor in Drupal.
Next, on the augmentor’s settings page, give your augmentor a label explaining its mission, specify the API key, and select the AI service’s model.
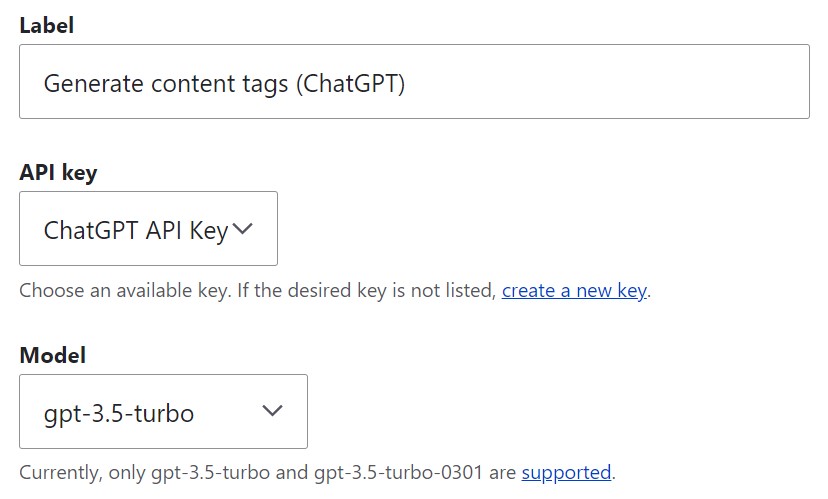 Specifying the label, API key, and AI model for a new augmentor in Drupal.
Next, there is the “Content” field where you can enter the main message(s), or prompt(s) that will be sent to the AI service. Use the format described in the official documentation for the specific AI service (in the case of OpenAI, it’s here).
In this formatting example for ChatGPT, the placeholder token {input} is used. It represents the input text provided by the user. So a prompt for generating tags from content could look like this:
“Please generate tags for the following content: {input}”
where {input} will be dynamically replaced with the actual text the user provides when they interact with this augmentor.
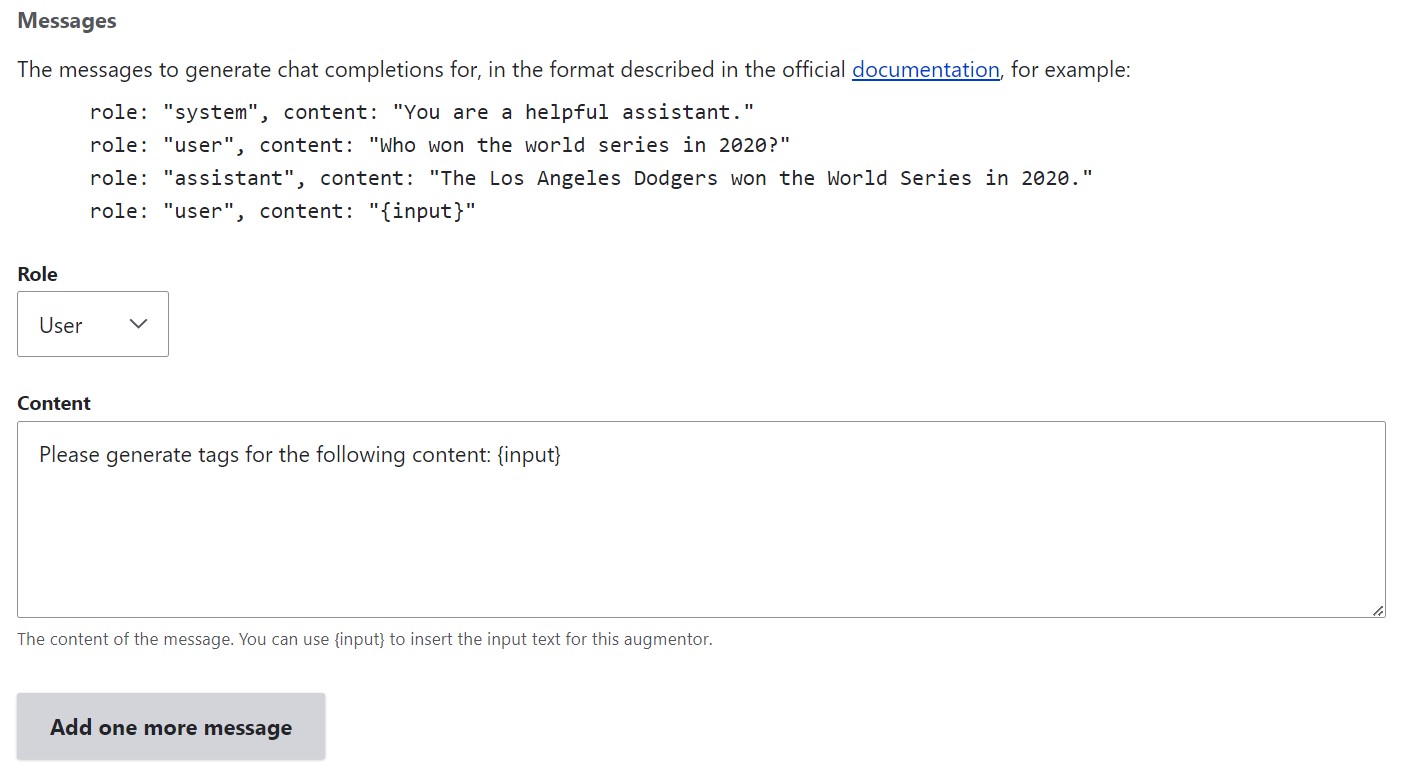 Creating the prompt message for the augmentor in Drupal.
Just above the message box, there is a dropdown with roles. Using all three of them is not required but, depending on your use case, they should be used to configure the query and the response formats and set up the prompts:
- If the role is “User,” it means the message is from the user interacting with the augmentor (like “Please summarize the following content: {input}”).
- If the role is “Assistant,” it means the message is from the AI assistant providing feedback or results (like “Sure! Please wait while I summarize the following text: {input}”)
- If the role is “System,” it could be some initial setup or high-level instructions (like “You are a helpful assistant. Explain any acronyms in the response. Use an authoritative and friendly tone.”).
In advanced settings further down the page, you can configure the response characteristics such as randomness, maximum length, and more.
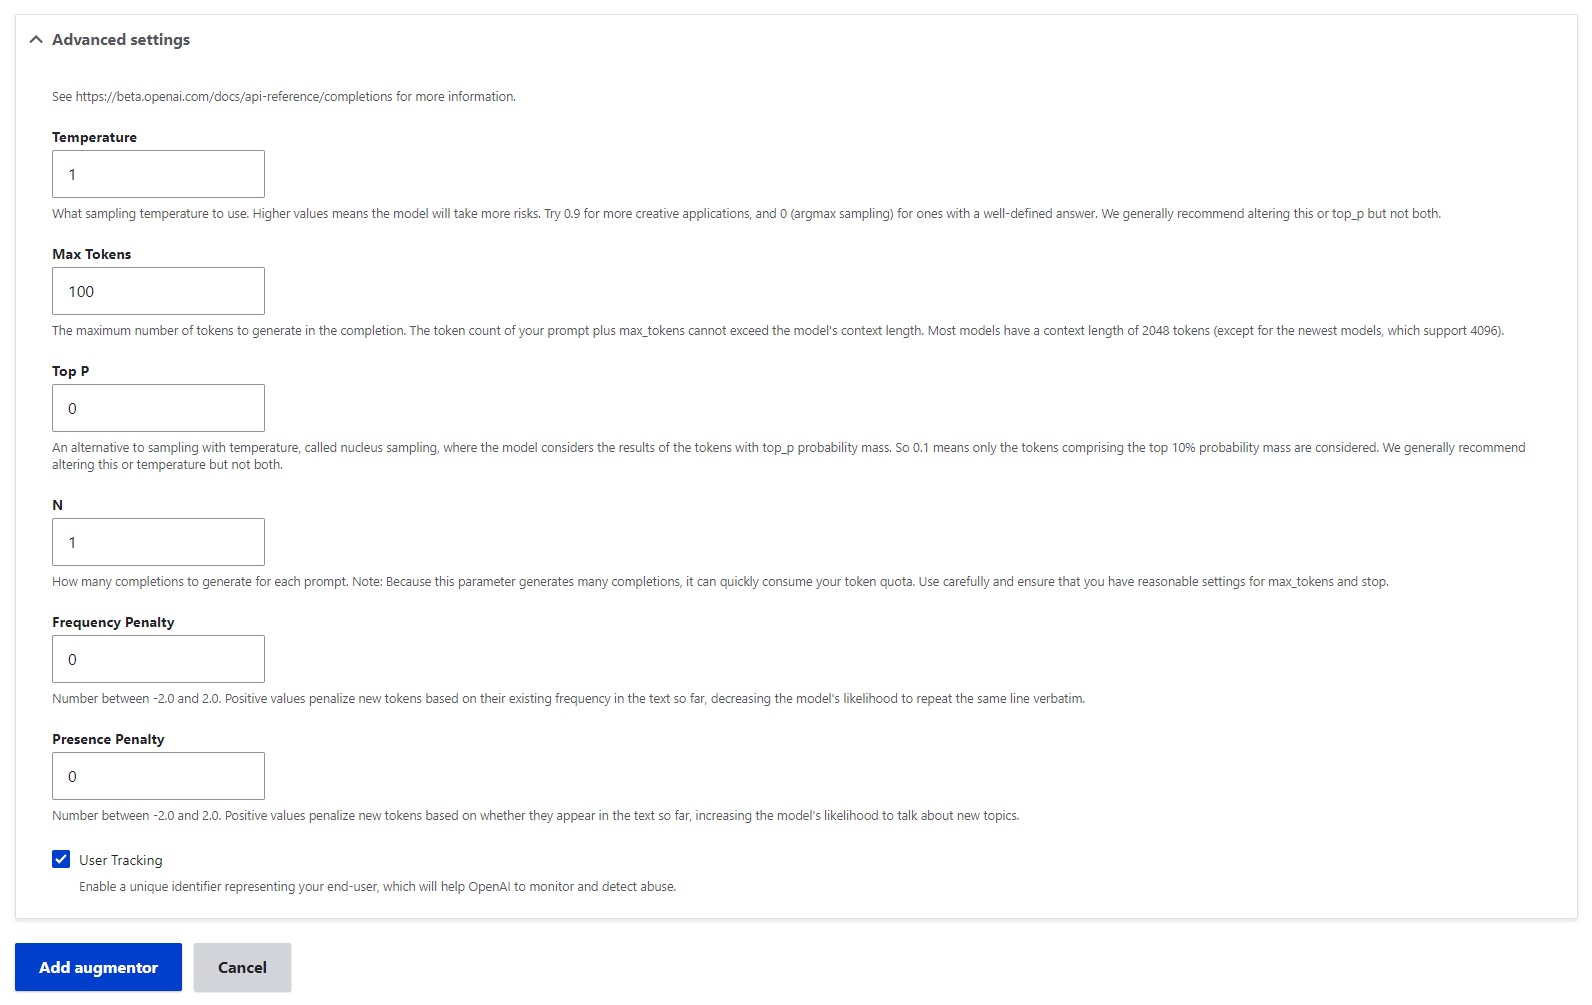 Configuring the response characteristics for the augmentor in Drupal.
Adding the Augmentors button to the CKEditor toolbar
To add the Augmentors button to the CKEditor toolbar, go to Configuration > Content authoring > Text formats and editors, configure the text format, and drag the Augmentors buttons to the active toolbar. You could also check out more details about adding and configuring buttons for the CKEditor toolbar.
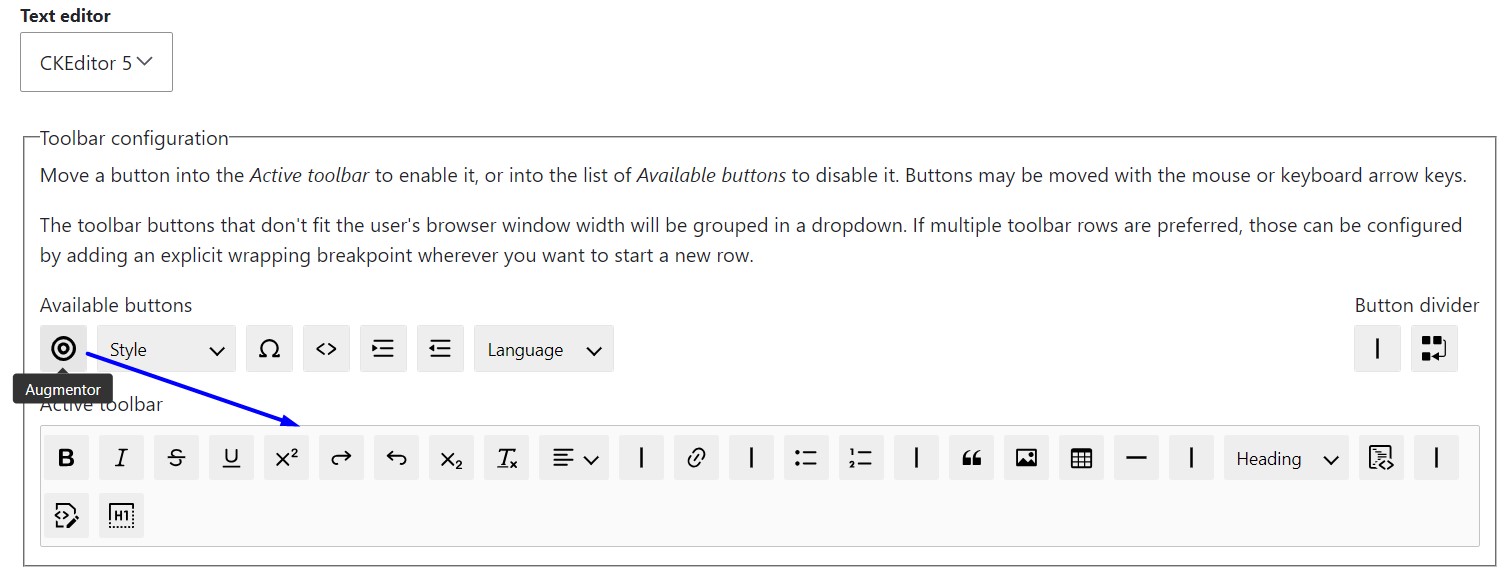 Adding the Augmentors button to the CKEditor toolbar.
Furthermore, you can scroll down to the Augmentor plugin settings and select the audmentors that you’d like to be available in the content editing form.
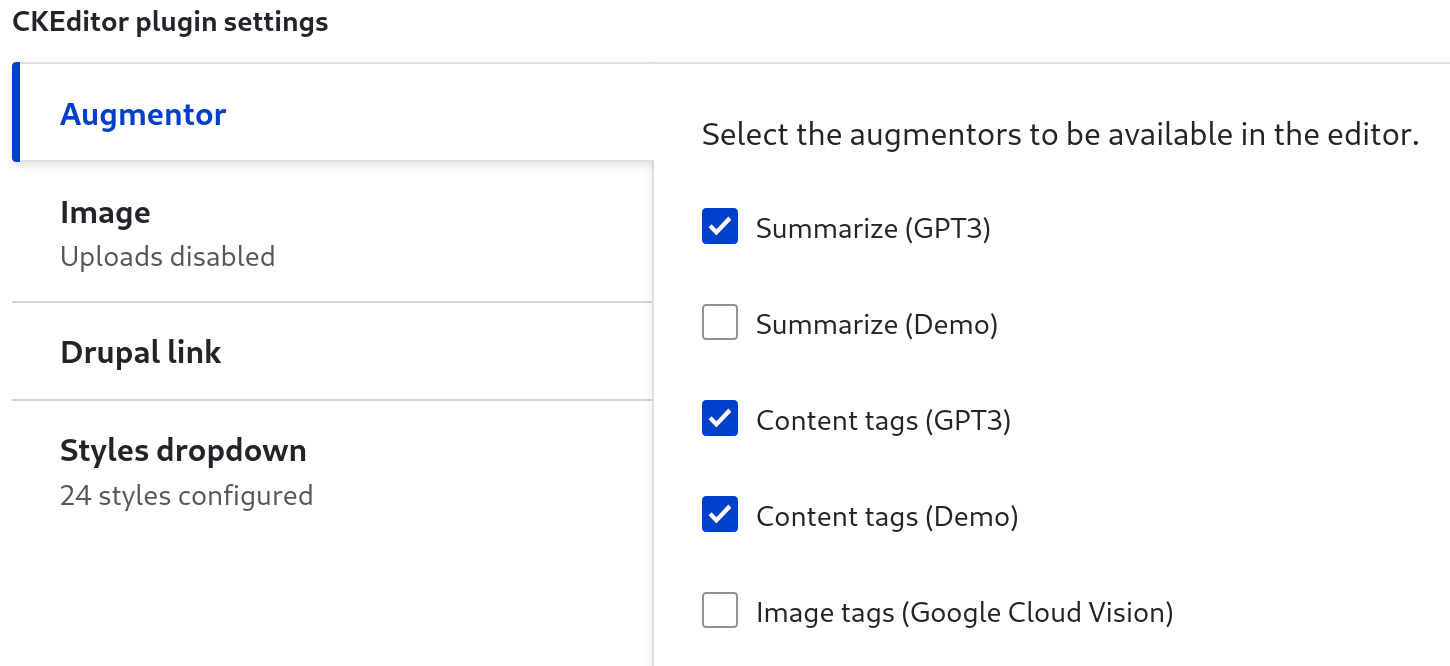 Enabling available augmentors for CKEditor.
Adding fields and configuring widgets
Go to Structure > Content types > [Your content type] > Manage fields and add a field of the “Field Augmentor” type.
 Adding a field of the “Field Augmentor” type to a Drupal content type.
Once the field setup is complete, switch to the “Manage form display” tab. Select the widget for the newly added field. Currently, the built-in widgets include:
- Augmentor. It’s a general and versatile widget that can be used for various types of augmentors. It’s used for interacting with different types of AI services and handling various types of responses.
- Augmentor Default Widget. It’s best for simple fields that only need to manage a single value response from the AI service.
- Augmentor Select Widget. It provides a select box for choosing between multiple options for responses.
- Augmentor Tags Widget. It is used for reference fields, typically for taxonomy, which is great for AI-generated tags.
- Augmentor Select RegEx Widget. It is similar to the Select Widget but it uses a regular expression pattern.
- Augmentor Summary Widget. It takes content from the main text field and generates a summary.
- Augmentor File Widget. This widget is used when dealing with file fields, such as uploading images or documents.
After selecting the widget, click the gear icon to the right to configure the details.
 Selecting the augmentor field widget and clicking to open its settings.
In the widget settings, you’ll need to specify the source and the target fields:
- The source field is where the content for the prompt will be taken from.
- The target field is where the AI-generated content will be placed after processing.
For example, you have an “Article” content type where you want to use the “Generate content tags” augmentor. The “Body” field could be the source field and the “Tags” field could be the target field. The AI service should read the content in the “Body” field, generate tags, and return them to the “Tags” field.
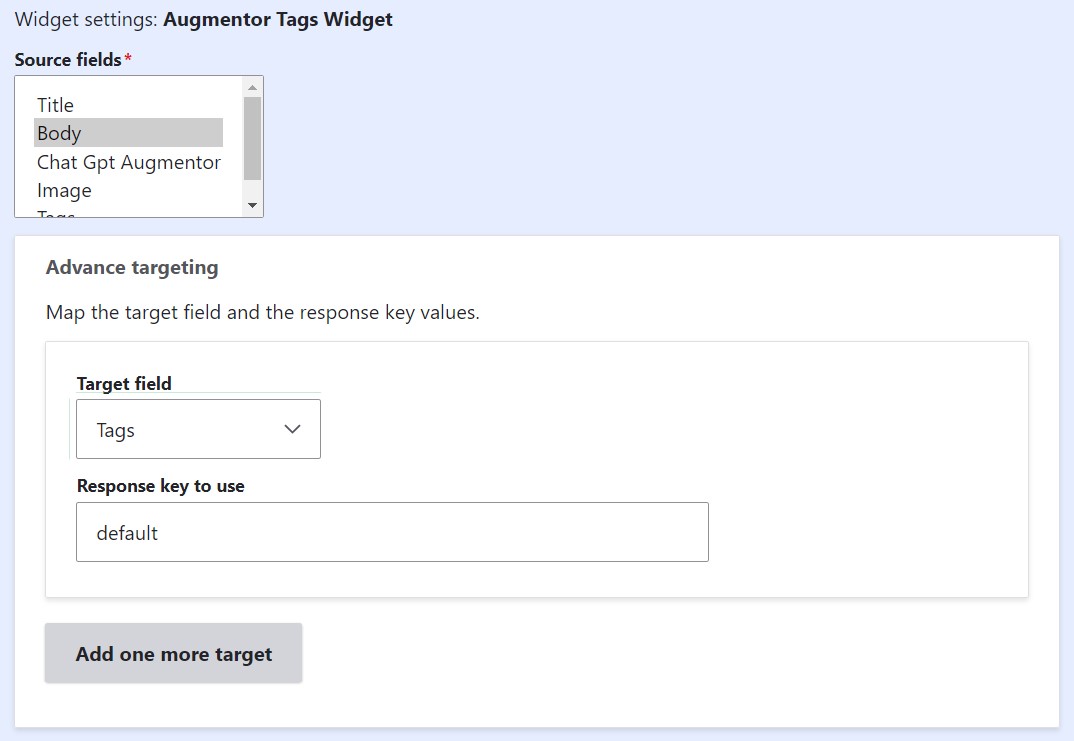 Configuring the augmentor field widget (step 1).
As the next thing in the widget settings, you’ll need to specify:
- which augmentor to use
- what to do with the existing content in the field (append, prepend, or replace)
- what text to show on the button that will be displayed to content editors (like “Generate tags”)
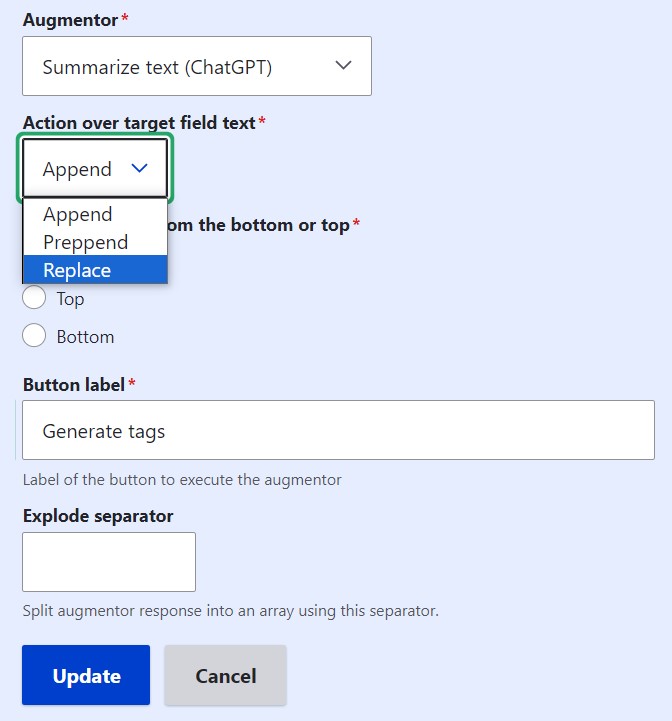 Configuring the augmentor field widget (step 2).
Finally, update the widget and save the entire “Manage form display” settings. You can also position the field as desired in the content editing form.
Final thoughts
Every AI module offers a different approach, and you can choose the right tool for your Drupal website based on its needs. It’s great when there are options to choose from and when it’s possible to compare them in every detail.
The earlier discussed OpenAI module is extremely user-friendly and ready to run almost immediately after you set up the OpenAI API credentials, offering nice defaults and available customizations. The Augmentor AI, on the other hand, offers much more space for a prompt engineer’s imagination but may look a bit tricky in its setup. It’s also not limited to the OpenAI products.
If you are thinking of integrating an AI service with your Drupal website, let’s discuss what will work best for you to take your content or other workflows to a new level — and seamlessly implement it!
Today we are talking about Test Driven Development, Why it’s important, and How it improves development with guest Alexey Korepov. We’ll also cover Test Helpers as our module of the week.
For show notes visit:
www.talkingDrupal.com/446
Topics
- What does the term Test Driven Development (TDD) mean
- Does Drupal make use of TDD
- What makes TDD different from other methods of Development
- Do you have to change your way of thinking
- What are some good resources to learn TDD
- Do you have any pointers for teams looking to get started
- Are certain kinds of projects better suited to TDD
- How have dev teams adapted to TDD
- Any advice on environment setup
- Any special tools
Resources
Guests
Alexey Korepov - korepov.pro Murz
Hosts
Nic Laflin - nLighteneddevelopment.com nicxvan
Martin Anderson-Clutz - mandclu
Matt Glaman - mglaman.dev mglaman
MOTW
Correspondent
Martin Anderson-Clutz - mandclu
- Brief description:
- Have you ever wanted an API that could dramatically simplify the process of writing Drupal unit tests? There’s a module for that.
- Module name/project name:
- Brief history
- How old: created in Sep 2022 by today’s guest, Alexey Korepov
- Versions available: 1.3.0 compatible with versions of Drupal 9.4 or newer, right up to Drupal 11
- Maintainership
- Actively maintained, latest release less than 3 months ago
- Security coverage
- Test coverage, would be ironic if it didn’t
- API Documentation is available, linked from the project page
- Number of open issues: 2 open issues, which are actually feature requests
- Usage stats:
- 5 sites officially, but modules or sites can leverage Test Helpers without enabling it, and this usage is recommended, so the number is actually higher
- Module features and usage
- Provides a new container that automated tests can leverage to perform common tasks with much less code.
- For example, you can create a user or a node with a single line of code
- You can also mock more complex operations like an entityQuery or loadMultiple call, again with a single line of code
- Traditionally, writing unit tests is more complicated because by design they run without fully bootstrapping Drupal
- That means that your test needs to mock functions or services in the code you’re testing which can result in units tests being much longer than the code they’re testing
- Test Helpers also allows your tests to leverage existing mocks and stubs for popular services
- The project page also links to the recording and slides for a talk Alexey gave about Test Helpers at DrupalCon Pittsburgh last year, if you want to do a deeper dive
Introduction
According to the Cisco 2022 Consumer Privacy Survey, 37% of global customers have switched brands over data privacy concerns.
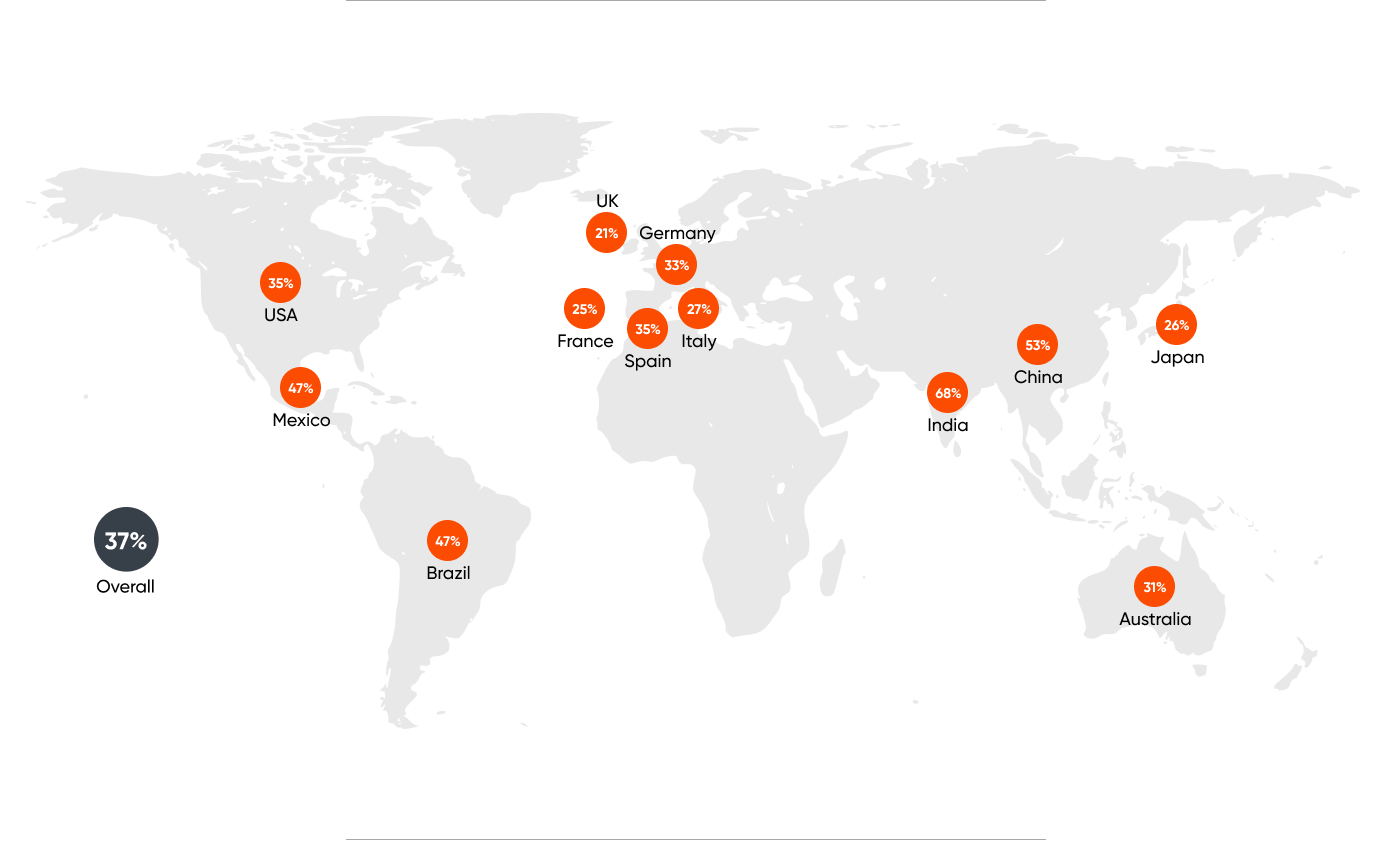
Several legal and government authorities have also established their privacy standards for organizations collecting and using customer data. Google failed to comply with state consumer protection laws by misleading users about its location tracking practices. As a result, they agreed to a $391.5 million settlement with 40 US states.
Salesforce Marketing Cloud can help organizations comply with these regulations and maintain customer trust.
Understanding Privacy Regulations
General Data Protection Regulation (GDPR) and California Consumer Privacy Act (CCPA) are two most prominent regulations that govern personal data collection, processing, and storage.
General Data Protection Regulation (GDPR)
The General Data Protection Regulation (GDPR) governs how organizations, companies, governments, and other entities handle the personal data of individuals. The GDPR mandates compliance for all organizations processing the data of EU residents.
The GDPR establishes seven key principles for data processing.
- Lawfulness, Fairness, And Transparency: Organizations must have a legal basis for processing data. This should be done in a fair, transparent, and unbiased manner.
- Purpose Limitation: Data collection is restricted to legitimate purposes that are clearly communicated to individuals.
- Data Minimization: Organizations can only collect the minimum amount of personal data necessary to achieve their stated goals.
- Accuracy: Data must be accurate and kept up-to-date through rectification.
- Storage Limitation: Personal data can only be retained for as long as necessary for the intended purpose.
- Integrity and Confidentiality: Robust security measures, such as encryption, are required to safeguard data integrity and confidentiality.
- Accountability: The data controller is responsible for demonstrating compliance with all these principles.
Non-compliance with the GDPR can incur significant financial penalties. These fines are tiered based on the severity of the infringement.
- For less serious violations, organizations may face a fine of up to €10 million or 2% of their global annual revenue, whichever is greater.
- More serious infringements can result in fines of up to €20 million or 4% of their global annual revenue, whichever is higher.
California Consumer Privacy Act (CCPA)
The California Consumer Privacy Act (CCPA) empowers California residents with control over their personal data. CCPA regulates how businesses collect, use, and disclose personal data. Organizations that conduct business in California with annual gross revenue of over $25 million must comply with CCPA.
CCPA provides the following privacy protections to California residents.
- Right to Know: Businesses must disclose the categories and specific details of personal information they have collected upon request.
- Transparency at Collection: Before collecting data, businesses must clearly inform consumers about the types of personal information they gather and how it will be used.
- Right to Access: Consumers have the right to request and receive, free of charge, their personal information held by a business. However, businesses are only obligated to fulfill such requests twice within a 12-month period.
Non-compliance with CCPA can result in the following penalties.
- Intentional Violations: Intentional violations of the California Consumer Privacy Act can bring civil penalties of up to $7500 for each violation.
- Unintentional Violations: The maximum penalty for unintentional violations is $2500 per violation.
Health Insurance Portability And Accountability Act Of 1996 (HIPAA)
The Health Insurance Portability and Accountability Act of 1996 (HIPAA) is a federal law. According to this law, organizations should create privacy standards for protecting customer health information from being disclosed without consent.
To comply with the HIPAA Security Rule, all covered entities must abide by the following.
- Ensure the confidentiality, integrity, and availability of all Electronic Protected Health Information (e-PHI).
- Detect and safeguard against anticipated threats to the security of the information.
- Protect against anticipated, impermissible uses or disclosures that are not allowed by the rule.
- Certify compliance by the organization’s workforce.
Non-compliance with HIPAA results in Civil Monetary Penalties (CMPs) based on the level of culpability.
- Unknowing: Between $100 and $50,000 per violation and not exceeding $25,000 per year.
- Reasonable Cause: Between $1,000 and $100,000 per year.
- Willful Neglect: Between $10,000 and $250,000 per year.
- Willful Neglect And No Fix: Between $50,000 and $1.5 million per year.
Is Salesforce HIPAA Compliant?
Organizations can make Salesforce HIPAA compliant by implementing practices like:
- Prevent caching sensitive data including Patient Medical Information (PMI).
- Refrain from enabling autologin on websites storing sensitive health information.
- Implement a consent-based data collection methodology.
Read more to find about Salesforce's comprehensive set of compliance certifications and attestations
12 Strategies To Ensure Privacy Compliance With Salesforce Marketing Cloud
The following strategies will allow organizations to comply with relevant privacy regulations.
1. Obtaining Explicit Consent
81% of US citizens feel they have very little to no control over the data organizations collect. This can result in loss of confidence or trust.
Organizations must get the explicit consent of consumers for all data collection and processing activities, including email communications, tracking website interactions, and personalized marketing.
Ducati, a multinational motorcycle manufacturer, uses Salesforce to clearly list the information it collects whenever customers fill out forms on the landing page. Ducati also has a transparent privacy policy that mentions data collection, storage, and usage.
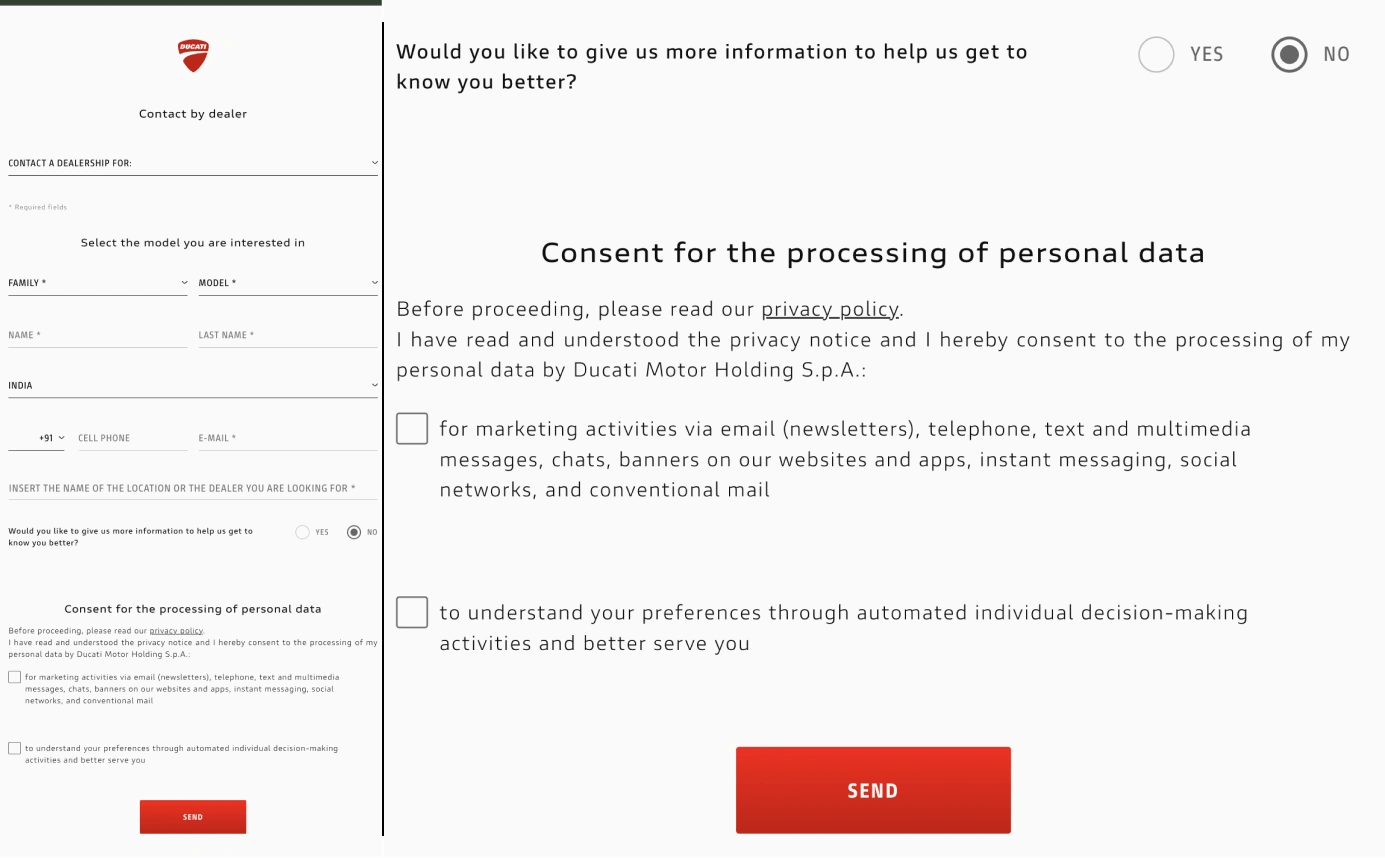
2. Utilizing Consent Management Tools
Use consent management tools within Salesforce Marketing Cloud to obtain consent for all marketing activities and prevent tracking of contacts who request otherwise.
Consent can also be obtained by using the Salesforce Consent Data Model. It is a standard model for managing consent at multiple levels, from global preferences to setting granular controls. This data can be connected to Marketing Cloud to respect customer’s consent preferences.

3. Segmenting Data
Segment customers according to their preferences to receive marketing communications. This helps comply with regulations and reduces the risk of sending unsolicited messages. Sending messages to the right customers also increases delivery rates and eliminates the chances of being flagged as spam by Internet Service Providers (ISPs).
Spotify, one of the largest global streaming platforms, uses Salesforce Marketing Cloud to segment its users based on consent and preferences. This allows the brand to elevate its digital experiences by sending more customized communications to customers.
4. Anonymizing Data
43% of US customers believe they are not able to protect their personal data collected by organizations. To avoid facing this issue with your customers, consider anonymizing or pseudonymizing data where possible to protect individual privacy while still being able to use the data.
5. Implementing Data Retention Policies
Implement data retention policies to retain personal data only for a short time. Regularly delete data that is no longer needed. To uphold its customer-first approach, T-Mobile, one of the largest telecom service providers, uses Salesforce to ethically collect, retain, and use all the customer data. It also clearly states all this information on the official website.
6. Implementing Transparent Privacy Policies
63% of global customers believe most companies aren’t transparent about how their data is used.

Ensure privacy policies are clear, concise, and easily accessible to customers. Explain how the data is collected, stored, and used. The privacy policies should also state the customer's rights under data protection laws.
BMW Motorrad, a multinational luxury vehicle manufacturer, clearly states its privacy policy.
7. Maintaining Data Portability
Be prepared to provide individuals with their data upon request, as regulations require. Ensure systems can export and transmit personal data in a standard format. Salesforce Marketing Cloud makes it easy for businesses to give customers their data on request. The following table shows how to extract customer data from various SFMC components.
8. Appointing Data Protection Officers (DPOs)
Appoint a Data Protection Officer if the organization is subject to GDPR or similar regulations. The DPO can help ensure compliance and act as a point of contact for privacy-related issues.
Lindsey Finch, the Executive Vice President at Salesforce, is also the Data Protection Officer at Salesforce. She and her team collaborate throughout the company to promote a privacy-oriented culture.
They work on designing, implementing, and ensuring compliance with the global privacy program. This includes integrating privacy considerations into the product development process.
9. Conducting Data Protection Impact Assessments (DPIAs)
Conduct DPIAs to assess the potential risks and privacy implications of Salesforce Marketing Cloud activities. Address identified risks and implement safeguards accordingly.
To Conduct a DPIA with Salesforce Marketing Cloud, organizations should follow eight steps.
- Step 1: Document how data will be processed throughout the project and the scope of the data.
- Step 2: Justify the data processing activities that occur by justifying the resources for the objectives and outcomes of the project.
- Step 3: Consult several key parties, like the Data Protection Officer and project stakeholders, throughout the course of the DPIA.
- Step 4: Create a prioritized list of the assets and identify potential vulnerabilities.
- Step 5: Strategically formulate and implement appropriate risk mitigation measures.
- Step 6: Once all risks are identified and an appropriate security strategy is devised, obtain sign-off for implementation from relevant parties.
- Step 7: Deploy the solutions and other measures to reduce risks.
- Step 8: Produce a final DPIA report with the project details, identified risks, and mitigation measures.
10. Implementing Opt-Out Mechanisms
Make it easy for individuals to opt out of marketing communications and ensure the process is transparent and straightforward.
For example, while running email campaigns with the Email Studio, always add an “unsubscribe” link within it. By clicking on this link, the individual should be able to seamlessly opt out of all future communications.
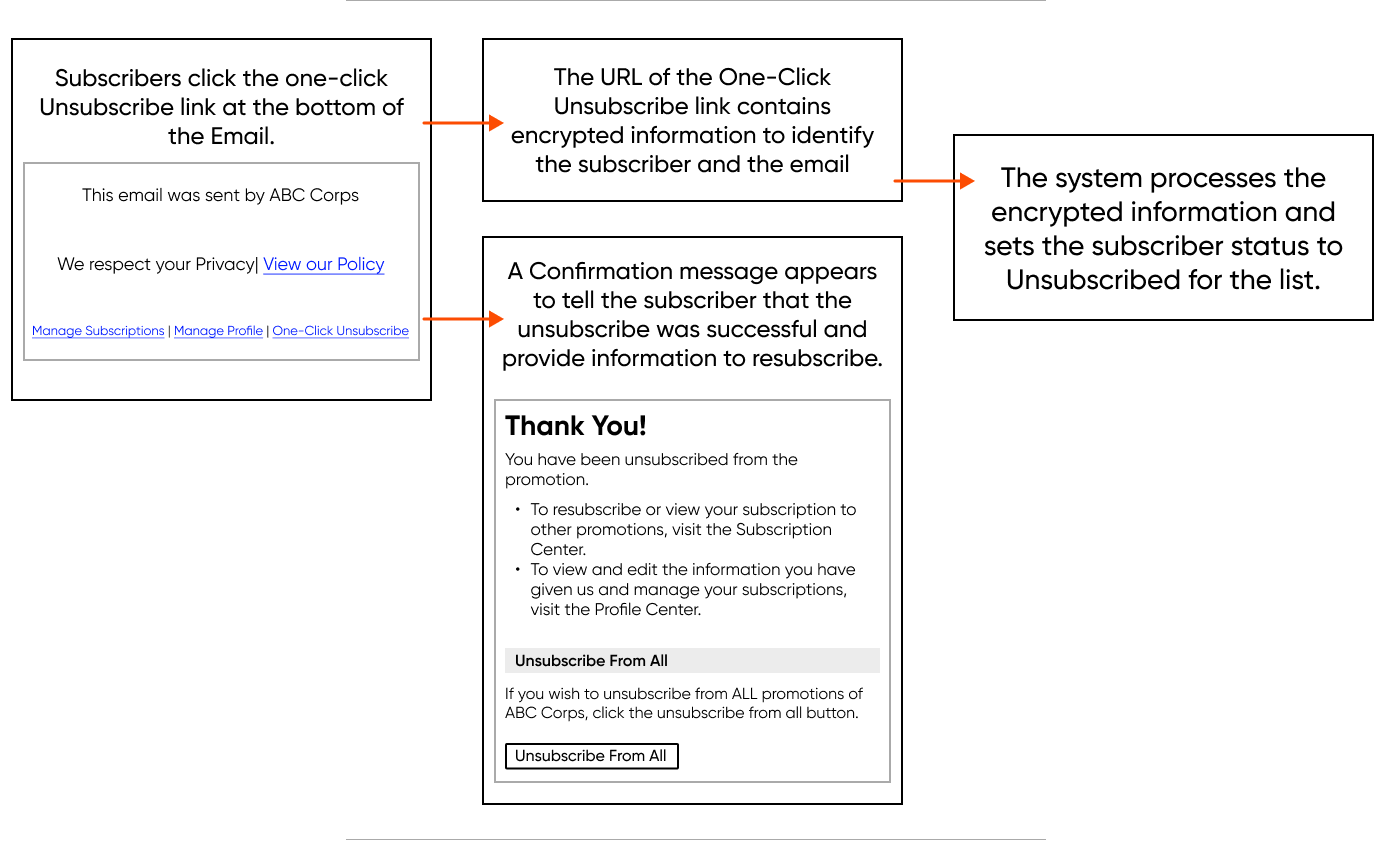
11. Developing A Data Breach Response Plan
81% of users believe the way a company treats their personal data is indicative of the way it views them as a customer. Develop a clear and effective plan for responding to data breaches, including notifying affected individuals and relevant authorities. Practices like these not only help secure the data but also help build trust and loyalty.
12. Training And Awareness
Educate the marketing and sales teams about privacy regulations and data protection laws. While implementing a Digital Experience Platform, ensure they understand the importance of privacy compliance and the potential consequences of non-compliance.
Ensuring Privacy Regulations in Your Organization
Want to learn more about how to remain compliant with data privacy regulations with Salesforce Marketing Cloud? Take this Trailhead course to learn more.
Or speak to Salesforce experts to get quick recommendations on how you can ensure compliance with relevant privacy and data protection regulations.
Introduction
Google has agreed to settle a lawsuit by paying $93 million for deceptive location tracking practices. Despite users turning off their location history, the tech giant reportedly persisted in collecting and storing their location data.
In 2022, Google resolved a comparable lawsuit initiated by attorneys general from 40 states. The suit made identical claims regarding Google's deceptive practices concerning location privacy. The settlement amounted to nearly $392 million.
These are the examples of dark patterns or deceptive patterns.
What Are Dark Patterns?
According to the official website, Deceptive Patterns (also known as Dark Patterns) are tricks used in websites and apps that make you do things that you didn't mean to, like buying or signing up for something.
Dark patterns are design choices that intentionally deceive or manipulate users, leading them to make decisions they might not otherwise make. These patterns often exploit psychological principles to nudge users into taking actions. These actions benefit the business at the expense of the user's best interests.
What Are Some Of The Most Common Types of Dark Patterns?
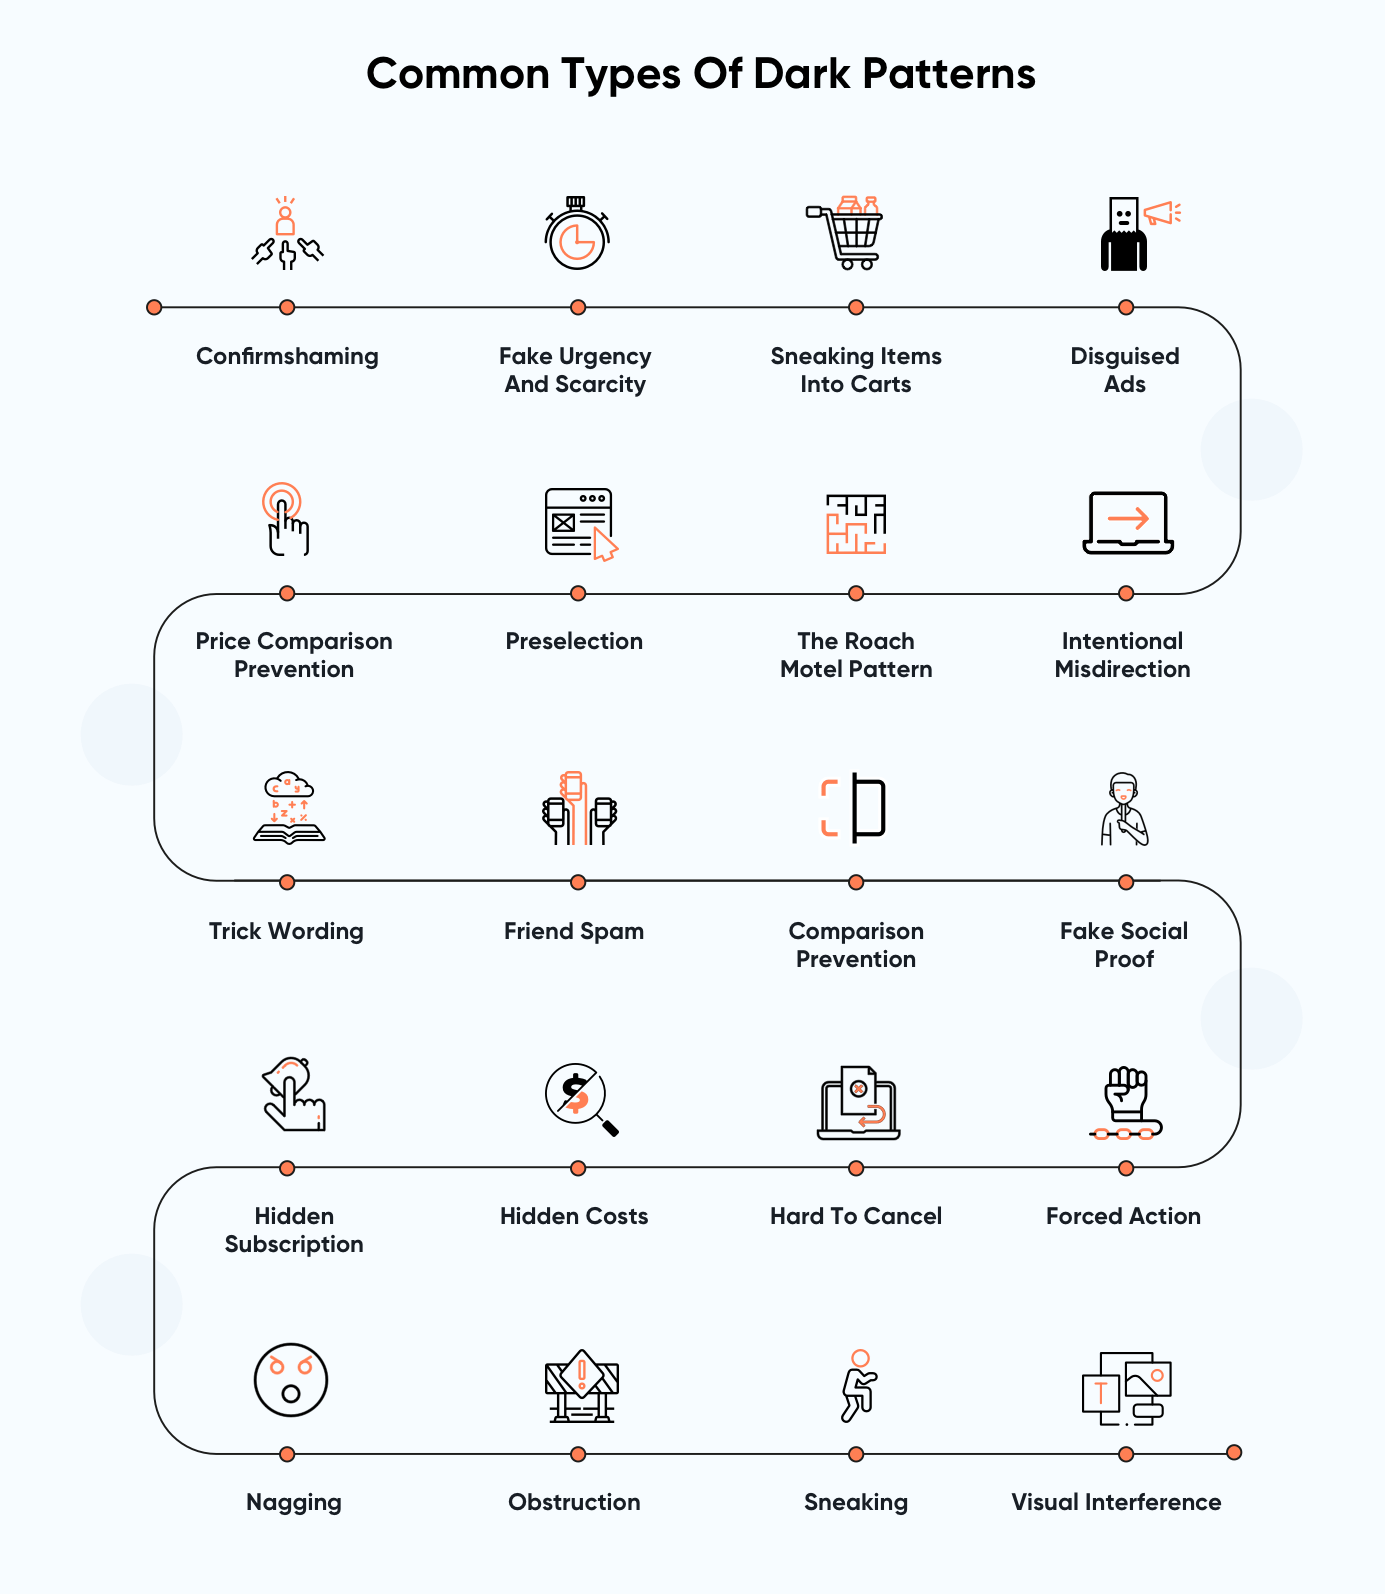
- Confirmshaming: Using emotionally manipulative language like "Are you sure you want to abandon your masterpiece?" to guilt users into completing an action.
- Fake urgency and scarcity: Displaying fake countdown timers or limited-quantity claims to pressure users into buying before they "miss out."
- Sneaking items into carts: Pre-selecting add-on items or subscriptions during checkout without clear opt-out options.
- Disguised ads: Blending ads seamlessly into content, making it difficult for users to distinguish them from genuine information.
- Intentional misdirection: Using confusing button placements, unclear language, or hidden menus to make it difficult for users to find what they need.
- The roach motel pattern: Making it easy to sign up for a service but difficult to cancel, trapping users in unwanted subscriptions.
- Preselection: Setting default options that favor the company, like pre-checking a box for additional fees or newsletters.
- Price comparison prevention: Hiding or making it difficult to compare prices with competitors, limiting user choice.
- Trick wording: Using double negatives, confusing wording, or misleading language to manipulate users into giving unintended answers.
- Friend spam: Requesting access to user contact lists without clear consent to send marketing messages or invitations.
- Comparison prevention: The user struggles to compare products because features and prices are combined in a complex manner, or because essential information is hard to find.
- Fake social proof: The user is misled into believing a product is more popular or credible than it really is, because they were shown fake reviews, testimonials, or activity messages.
- Forced action: The user wants to do something, but they are required to do something else undesirable in return.
- Hard to cancel: The user finds it easy to sign up or subscribe, but when they want to cancel they find it very hard.
- Hidden Costs: The user is enticed with a low advertised price. After investing time and effort, they discover unexpected fees and charges when they reach the checkout.
- Hidden subscription: The user is unknowingly enrolled in a recurring subscription or payment plan without clear disclosure or their explicit consent.
- Nagging: The user tries to do something, but they are persistently interrupted by requests to do something else that may not be in their best interests.
- Obstruction: The user is faced with barriers or hurdles, making it hard for them to complete their task or access information.
- Sneaking: The user is drawn into a transaction on false pretences, because pertinent information is hidden or delayed from being presented to them.
- Visual interference: The user expects to see information presented in a clear and predictable way on the page, but it is hidden, obscured or disguised.
What Are The Consequences Of Dark Patterns?
![Erosion-Of-Trust]() Erosion Of Trust
Erosion Of Trust
 Erosion Of Trust
One of the most significant consequences of employing dark patterns is the erosion of trust. Users who feel manipulated are likely to lose confidence in a brand, leading to negative word-of-mouth and a decline in customer loyalty.
![Damaged-Reputation]() Damage To Reputation
Damage To Reputation
 Damage To Reputation
With the rise of social media, word about a bad user experience tends spread rapidly. As a result, brands using dark patterns risk damaging their reputation, leading to a potential loss of customers and a tarnished image.
![Legal-Ramifications]() Legal Troubles
Legal Troubles
 Legal Troubles
As awareness about user privacy and ethical design practices increases, regulatory bodies are becoming more vigilant. Employing dark patterns may lead to legal consequences, with fines and penalties for businesses that violate user rights.
AT&T paid $105 million to settle charges that they were adding unauthorized fees for services onto customers' phone bills, without their knowledge or consent.
Ethical Design: Balancing Business Goals And User Experience
![Prioritizing-Transparency]() Prioritizing Transparency
Prioritizing Transparency
 Prioritizing Transparency
Transparency is key to ethical design. Businesses should be upfront about the consequences of user actions, clearly presenting information about costs, commitments, and any potential drawbacks of their products or services.
![Opt-In-Not-Opt-Out]() Opt-In, Not Opt-Out
Opt-In, Not Opt-Out
 Opt-In, Not Opt-Out
Give users the power to make informed choices by adopting an opt-in approach. Avoid tricking users into subscriptions or services; instead, let them choose to engage with your offerings willingly.
![User-Centric-Testing]() User-Centric Testing
User-Centric Testing
 User-Centric Testing
Implement user-centric testing to understand how users interact with your design. Identify potential points of confusion or frustration and refine your design accordingly. Regular usability testing combined with UX audits can help businesses stay in tune with user expectations.
The Role Of UX Designers In Ethical Design
UX designers play a crucial role in shaping the user experience. It's their responsibility to advocate for ethical design principles and resist pressure to implement dark patterns for short-term gains.
Education is also a powerful tool in the fight against dark patterns. By educating UX designers about the ethical implications of their decisions, businesses can create a culture that values integrity and user well-being.
Dark patterns may offer short-term gains, but the long-term consequences can be severe. By prioritizing transparency, adopting user-centric testing, and empowering UX designers to advocate for ethical design, businesses can create digital products that not only meet business goals but also prioritize the well-being and trust of their users.
Learn how Axelerant’s team of designers practice ethical design principles and implement them in various projects.
This blog post was written by DrupalCon Portland Higher Education Summit Committee members Megan Bygness Bradley and Michael Miles.
As a part of the landscape of higher education web technology, many of us are navigating the digital realm somewhat disconnected from one another. We’re solving similar problems, but do not often have the opportunity to talk to others about the whys, hows, and the gotchas of implementing within the sphere of higher ed. DrupalCon Portland's Higher Education Summit is tailor-made for you! It's not just another conference; it's an amazing opportunity to connect, collaborate, and elevate your expertise in Drupal with your peers in the higher education sector.
Why Attend?
The Higher Education Summit at DrupalCon isn't just about listening to speakers; it's about engaging in meaningful discussions, sharing experiences, and building valuable connections within the higher education community.
Dive Deep into Drupal Best Practices
Whether you're a seasoned Drupal user or just getting started, this summit offers a wealth of knowledge and expertise tailored to the higher education sector. Learn about the latest Drupal developments, strategies for site management, effective documentation and training techniques, and more.
Connect with Peers
Connect with fellow web developers, content creators, designers, strategists, and managers from universities and colleges around the world. Share insights, learn from each other's experiences, and build a network of like-minded professionals who understand the unique challenges and opportunities within higher education.
Gain Insights from Drupal Experts in Higher Ed
From lightning talks to sponsor presentations, the summit features a lineup of industry experts sharing their insights and experiences. Learn from speakers who have successfully navigated the intersection of Drupal and higher education. See the Summit schedule here.
Participate in Interactive Discussions
The summit format is designed to be relaxed and informal, fostering open discussions and collaboration. Engage in small group discussions after every talk and Birds of a Feather sessions focused on topics such as site management, documentation and training, design and UX, AI, and more.
Collaborate and Network
In a rapidly evolving digital landscape, staying ahead of the curve is essential. Discover how Drupal can empower your institution by collaborating and networking with people just like you from across the world.
Don't miss out on this unique opportunity to expand your knowledge, network with peers, and gain insights from industry experts at DrupalCon's Higher Education Summit. Whether you're looking to optimize your Drupal workflow, enhance the user experience, or navigate the challenges of higher education, this summit has something for you. Register now and elevate your expertise in Drupal within the higher education sector!
Introduction
According to the PwC Future of Customer Experience report, one out of three customers will stop interacting with a brand they love after one bad experience.
To provide better digital experiences, marketers need to create relevant and targeted customer journeys.
Salesforce Marketing Cloud Engagement can help build and optimize such customer journeys through its various components.
What Is Salesforce Marketing Cloud Engagement?
Salesforce Marketing Cloud Engagement is a marketing automation platform utilized for creating and managing marketing relationships and campaigns with customers. The Marketing Cloud incorporates integrated solutions for customer journey management, email, mobile, social media, web personalization, advertising, content management, and data analysis.
It offers two types of modules that help build extensive customer experience journeys.
- Studios: Studios help organizations collect and analyze customer data from multiple channels. This data provides crucial insights into customer behavior, preferences, and demographics.
- Builders: Builders utilize the collected data to create customized journeys. It also helps optimize customer journeys based on engagement metrics.
Components For Building Customer Journeys In Salesforce Marketing Cloud
Salesforce Marketing Cloud offers a comprehensive suite of tools for building and optimizing customer journeys.
Journey Builder
Salesforce Marketing Cloud's Journey Builder has a user-friendly interface that enables organizations to build tailored customer journeys. Organizations can seamlessly craft the complete customer journey, spanning from initial engagement to final interaction.
Email Studio
With Email Studio, brands can design, send, and track personalized email campaigns, ensuring that messages are relevant throughout the customer journey.
Data Studio
Data Studio consolidates, manages, and analyzes customer data, providing comprehensive insights for optimized marketing strategies. Data Studio analytics reveal valuable insights into customer behavior and preferences.
Advertising Studio
Advertising Studio integrates with various advertising platforms to deliver targeted ads to specific audience segments. It helps optimize ad spending and maximizes ROI throughout the customer journey. On an average, businesses that use Salesforce Marketing Cloud tools have a 25% increase in revenue and a 30% increase in lead conversions.
Analytics
Salesforce Marketing Cloud offers robust reporting and analytics tools to track crucial metrics such as click-through rates, open rates, conversions, and ROI. Marketers can leverage these insights to optimize marketing strategies, improve audience engagement, and drive better outcomes.
How Salesforce Marketing Cloud Boosted Hmlet's Lead-to-Sales Conversion Rate by 28%
Hmlet, now acquired by Habyt, is the world's largest co-living company. The organization wanted to generate and maintain a steady flow of new leads. To achieve this goal, Hmlet utilized Salesforce Marketing Cloud to build customer journeys, engage prospects, and deliver a personalized experience.
Hmlet used Journey Builder to build customer journeys and nurture new leads to drive them down the sales funnel. The goal of this journey was to convert MQLs into SQLs. Every step was engineered based on behavioral data to drive engagement and conversions.
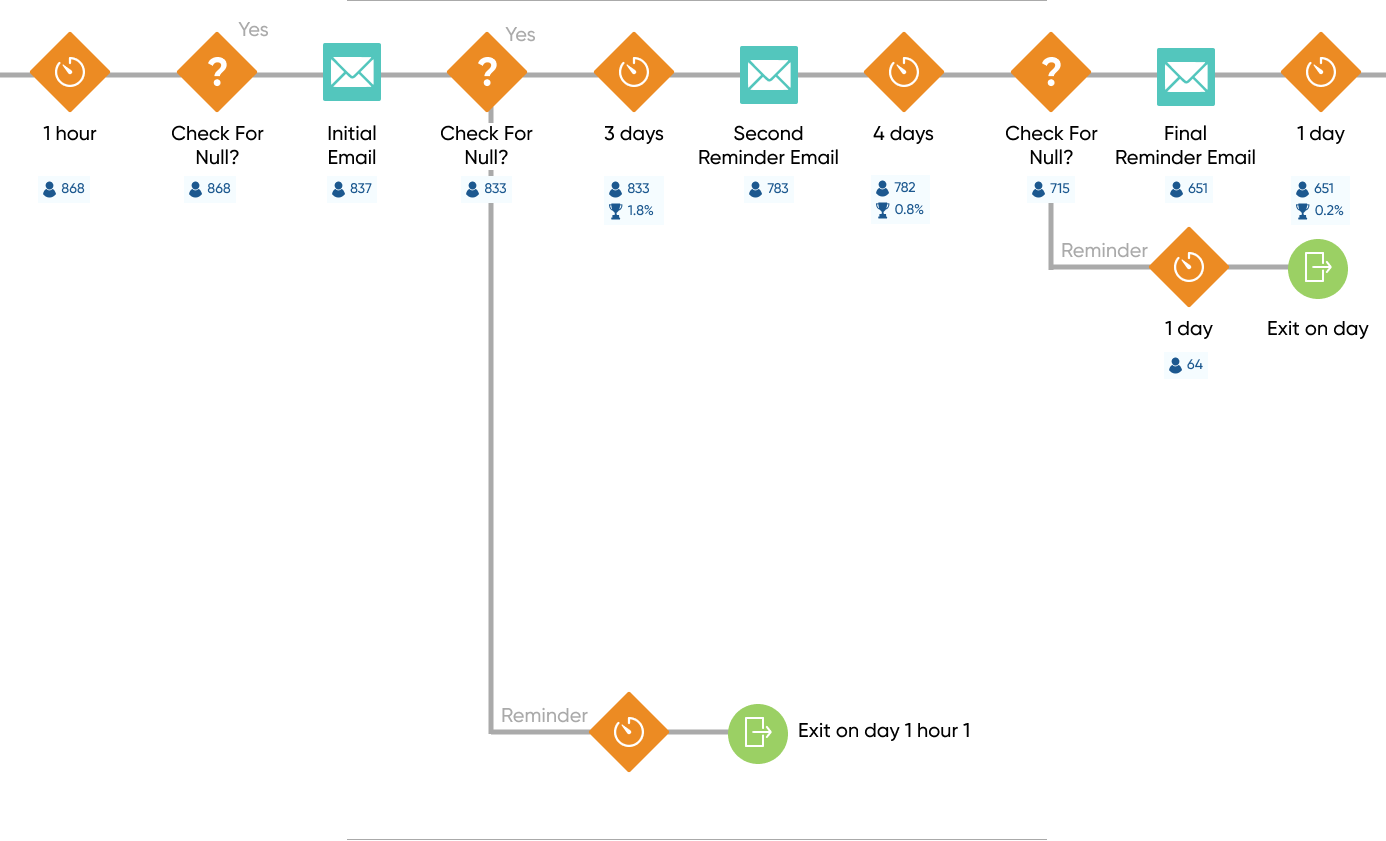
The journey begins with the prospect showing interest in Hmlet's services using the chatbot. These prospects receive an email thanking them for their interest with a ‘secure booking’ call-to-action.

As the prospects click on the CTA, they are redirected to a landing page to share their basic information along with critical details like move-in date, duration of stay, and budget. Hmlet used this information to contact leads and launch personalized campaigns.
Using the Email Studio, a reminder email was sent to those who did not take action within 3 days after receiving the first email. A final reminder email was sent after 4 days to those who still hadn’t taken the desired action.
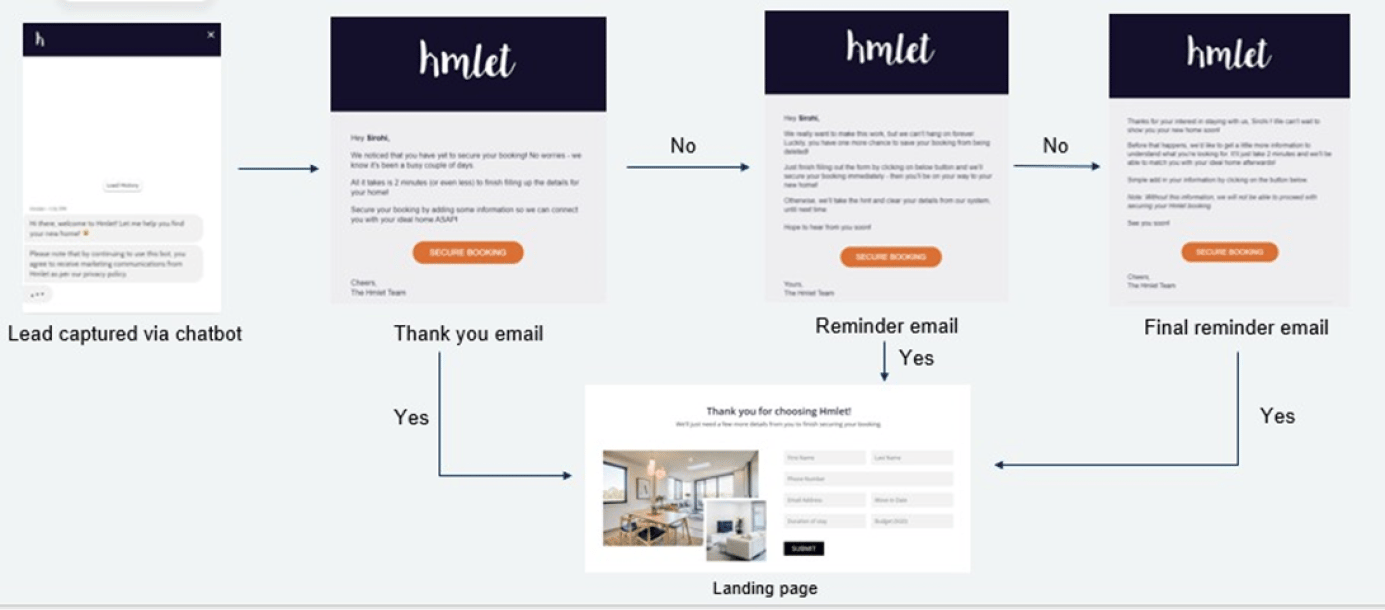
Hmlet automated the journey according to the customer’s desired move-in date. An automated email to schedule a call with the community managers was sent 15 days before the proposed move-in date.
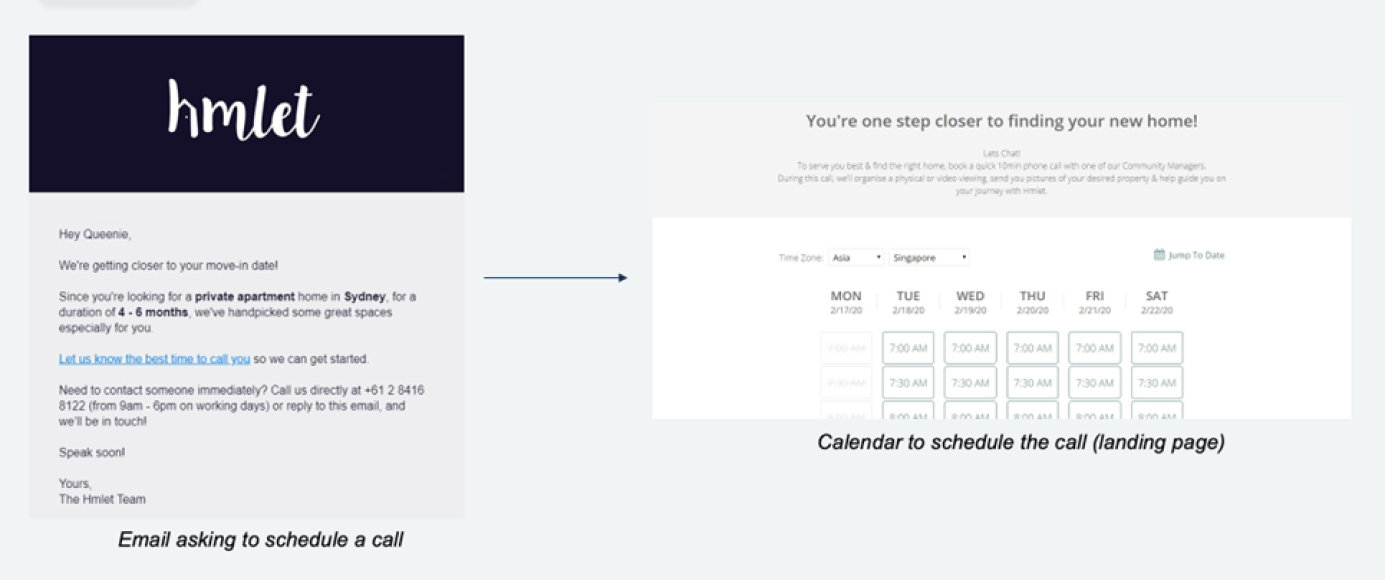
Throughout the customer journey, Hmlet used analytics to track and optimize the performance of the customer journeys.
By utilizing these strategies, Hmlet increased their MQL-to-SQL conversion by 67% and lead-to-sales conversion by 28%.
Steps For Creating Optimized Customer Journeys
There are seven steps organizations can follow to create personalized customer journeys.
Step 1: Identify Target Customer Personas
Define the target audience segments or personas based on demographic, psychographic, and behavioral characteristics. Understand their needs, pain points, motivations, and preferences to tailor the journey map accordingly.
Panasonic Life Solutions, a global electronics giant, identified target customer personas and ran targeted marketing campaigns to boost its sales productivity by 22%. The organization streamlined and automated its entire B2B sales lifecycle across six business units. Panasonic Life Solutions also optimized opportunity management, conversions, negotiations, and order management.
Step 2: Define The Customer Journey Stages
Outline the key stages or touchpoints that customers typically go through when interacting with the brand. These stages can include awareness, consideration, purchase, post-purchase, and advocacy.
%201-1.webp?width=1385&height=790&name=svgexport-1%20(3)%201-1.webp)
Customize the stages to comply with specific business models and customer journeys. Lyca Mobile, one of the largest telecom service providers, increased its conversion rates to over 30% by studying the customer interaction stages and implementing relevant campaigns.
With SFMC, the team at Lyca Mobile has a unified view of customer journeys across all touchpoints. This helps them deliver seamless omnichannel experiences. Lyca Mobile also uses Marketing Cloud to segment its audiences based on shared attributes. This makes customer communication more contextual and relevant.
Step 3: List Touchpoints
To identify various touchpoints, analyze both online and offline interactions with the customers across various stages.
- Awareness: Initial touchpoints can include social media ads, online search results, or word-of-mouth referrals.
- Consideration: Customers can visit the website, sign up for newsletters, or explore product/service reviews.
- Decision: Interactions might involve visiting a physical store for further product evaluation or contacting customer service for inquiries.
- Purchase: Touchpoints may include completing the transaction online or in-store, receiving confirmation emails, and post-purchase follow-ups.
- Post-Purchase: Follow-up communications such as feedback requests, loyalty program updates, or customer support interactions to complete the journey.
%202.webp?width=1385&height=790&name=svgexport-1%20(3)%202.webp)
Step 4: Identify Pain Points And Opportunities
Find out the pain points and opportunities for optimizing the customer journey. Identify moments of delight or satisfaction that can be utilized to boost the overall customer experience.
Walmart GoLocal retailers struggled to scale their business beyond a certain point. By utilizing Salesforce Marketing Cloud, these retailers identified challenges like:
- Lack of real-time order visibility
- Unreliable local pickup
- Fickle local delivery options
These challenges were caused primarily due to data silos. Using the Commerce Cloud, Walmart GoLocal shared access to a centralized repository of customer data and business opportunities with local vendors. This helped streamline efforts and improve business outcomes.
Step 5: Create Content
Creating content begins with understanding customer needs through detailed research and content mapping. The goal is to ensure a strategic alignment between content and journey stages.
Several content formats, such as videos, blog posts, and webinars, can be developed to cater to diverse preferences and consumption habits.
While creating content, organizations should follow clear brand guidelines to maintain consistency in messaging. Follow a content calendar and cross-channel content distribution to ensure a cohesive brand identity and user experience across all touchpoints.
Step 6: Choose Channels
Start by understanding customer preferences through data analysis. Identify preferred channels like email, SMS, social media, and mobile apps. Align these channels with specific journey stages, ensuring relevance and effectiveness at each step.
For example, organizations can use email for awareness and consideration stages while leveraging SMS for immediate and transactional communications.
CEAT, a multinational tyre manufacturing company, selected relevant channels while building their customer journey. This led to a 220% boost in its lead conversion rates. CEAT uses a Customer 360 dashboard for their sales teams. This data also guides the creation of customer journeys to include channels with the highest engagement.
Step 7: Analyze Data For Optimization
Collect data from various sources, integrate it into a centralized platform, deepen data insights with Pivot Tables and use analytics for tracking customer behavior and engagement. By monitoring key metrics, businesses can identify areas for improvement and implement iterative changes to enhance the overall experience.
While collecting user engagement data, businesses must comply with user privacy regulations to maintain customer trust.
L’Oréal, the world’s largest cosmetics and beauty company, uses Salesforce Marketing Cloud Analytics to track the performance of all its 28 sister brands. The goal of the organization is to ensure coordinated operations and engagement with millions of global customers.
L’Oréal consolidates their sales efforts and backend systems. This helps the Professional Products Division to share data and coordinate brands, resulting in a jump in operational efficiencies.
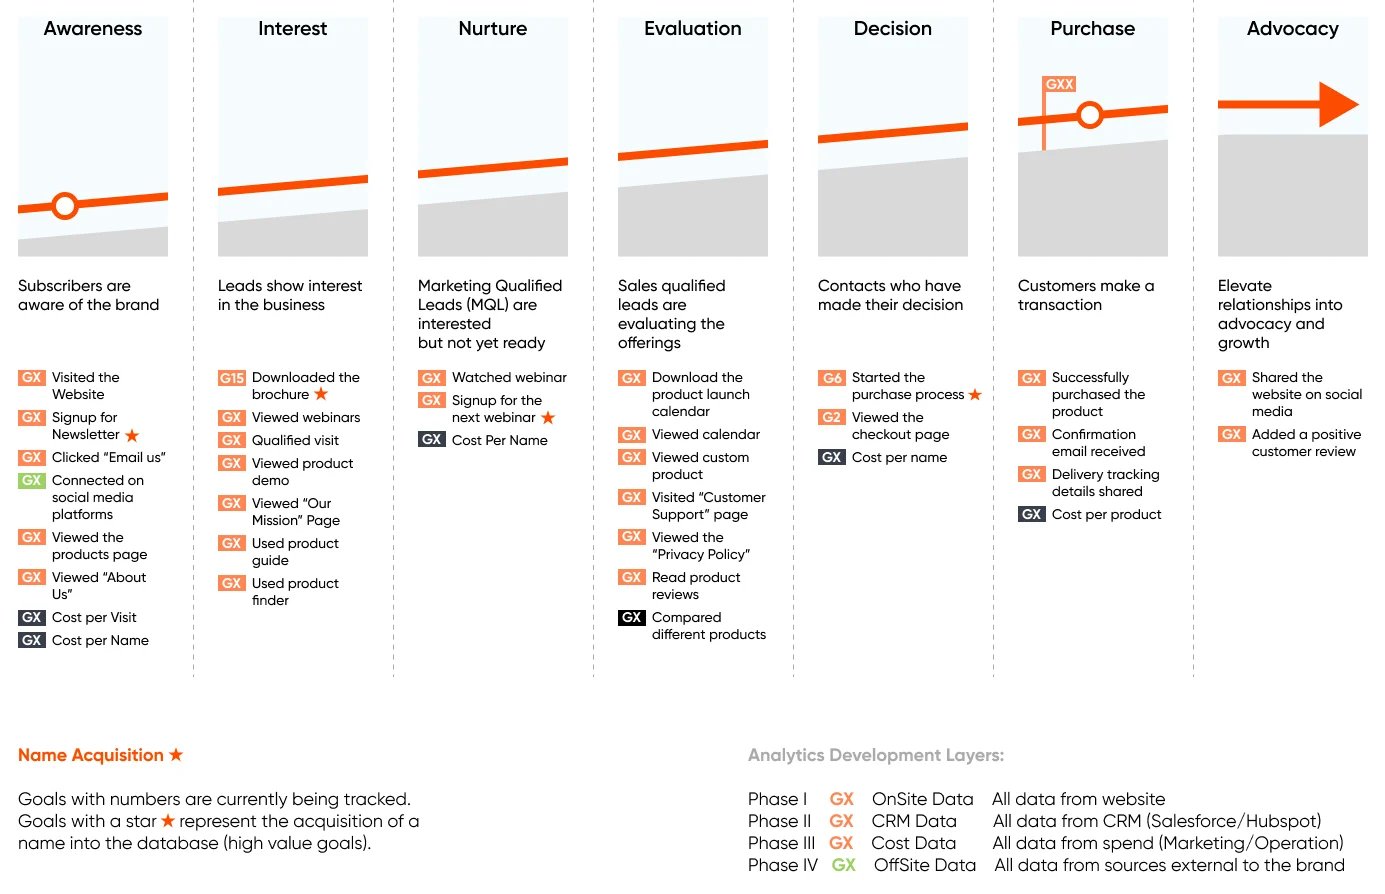
How Ottobock Is Utilizing Customer Journeys To Personalize User Experiences
Ottobock, a world leader in wearable bionics, operates in 60+ countries and 360+ patient care centers. Ottobock suffered from departmental silos that hindered the digital transformation required for maintaining their brand identity.
As a part of their Digital Experience Platform, Ottobock harnessed the power of data to fuel all interactions with customers. They built customer journeys mapped to treatment plans in Marketing Cloud to automate communications with prospective and existing product users.
After every purchase, a refitting customer journey is also triggered. Product users are sent reminders before the warranty expires or when their prosthetic or orthotic is due to be refitted or replaced.
As a result, Ottobock has seen an increase in their revenue, leads, and brand value.
Our experts at Axelerant can help build a similar solution that leverages customer journeys to personalize user experience. Schedule a call to learn how.
I am pleased to share the schedule for the upcoming 2024 DrupalCon Nonprofit Summit. There is a special rate ($395.00) for nonprofit org staff, and those who are affiliated with nonprofits, and the summit is included free with your ticket! You can register here.
Relying on community feedback and past experience, we put together an agenda that we hope encompasses the spirit of open source camaraderie and will provide nourishment for the mind and soul. We tried to balance the technical with the strategy and networking with expertise. We look forward to seeing you there.
Agenda
9:00 am - 9:15 am: Welcome and overview
Julia Kranzthor
9:15 am - 10:30 am: Why Should Nonprofits Use Drupal? The Case for Owning Your Own Data and Using Drupal to Manage It.
Fireside Chat with Tim Lehnen, Johanna Bates, and Jess Snyder
10:30 am - 10:45 am: Break
10:45 am -11:00 am: Sponsor Case Study #1
11:00 am - 12:15 pm: Breakout Sessions
Round Table Discussions
-
Using Drupal to Promote Engagement With Your Audience: Tools, Challenges, and Measurement
-
Web Analytics for Nonprofits: Google Analytics 4 and Alternatives.
-
Thriving as a Lone Wolf: Navigating the Challenges of Being the Only Drupalist at a Nonprofit
-
Migrating from Drupal 7 to Drupal 10
-
Managing a Major Website Rebuild/Migration
-
Birds of a Feather: Topic to be determined on-site
12:15 pm - 1:15 pm: Lunch
A time for relaxing, and networking if you feel like it.
1:15 pm - 2:30 pm: Breakout Sessions
Round Table Discussions
-
Web Accessibility and Site Governance
-
Using Drupal in Small Nonprofits with Limited Staff and Financial Resources
-
Preparing for Impact on Your Website Redesign
-
Development and Hosting Challenges for Nonprofits
-
Leveraging CiviCRM with Drupal: Open Source CRM for Contact Management and Engagement Tracking
-
Birds of a Feather: Topic to be determined on-site
2:30 pm - 2:45 pm: Sponsor Case Study #2
2:45 pm - 3:00 pm: Break
3:00 pm - 4:00 pm: Drupal 10 Migration: How to Stop Kicking the Can (of Worms) Down the Road
Panel discussion with Tim Lehnen and Fran Garcia-Linares
4:00 pm - 5:00 pm: Optional Networking
Wrap up conversations, visit with colleagues.

Welcome to DrupalCon Portland 2024, where innovation, collaboration, and excellence converge! As the premier event for Drupal enthusiasts, developers, and businesses, it's the perfect occasion to explore why Drupal stands tall as the preferred choice for web development. In this article, we'll delve into the compelling reasons that make Drupal the ultimate solution for your web development needs.
Open Source Excellence
Drupal is renowned for being an open-source content management system (CMS), fostering a vibrant community of developers and contributors. The power of collaboration within the Drupal community results in continuous improvements, security updates, and a wealth of modules that cater to a wide range of functionalities. Choosing Drupal means embracing a platform that is constantly evolving and adapting to the ever-changing landscape of the digital world.
Flexibility and Scalability
Drupal's flexibility is one of its key strengths. Whether you're building a personal blog, a corporate website, or a complex e-commerce platform, Drupal adapts to your needs. Its modular architecture allows developers to create custom functionalities and integrate third-party tools seamlessly. As your business grows, Drupal scales with you, ensuring that your website remains robust, high-performing, and capable of handling increased traffic and data.
Exceptional Content Management
Content is at the heart of any successful website, and Drupal excels in providing an intuitive and powerful content management experience. The platform offers a sophisticated taxonomy system, making it easy to organize and categorize content. With a user-friendly interface, content creators can effortlessly publish, edit, and manage content, empowering organizations to maintain a dynamic and engaging online presence.
Security First
In the digital age, security is non-negotiable. Drupal takes a proactive approach to security, with a dedicated security team that monitors, identifies, and addresses vulnerabilities promptly. The platform's robust security features, frequent updates, and a vigilant community ensure that your website is well-protected against potential threats. By choosing Drupal, you're investing in a platform that prioritizes the security of your digital assets.
Mobile Responsiveness
With the increasing prevalence of mobile devices, it's crucial for websites to be responsive and accessible across various screen sizes. Drupal is designed with mobile responsiveness in mind, offering a seamless experience for users on smartphones, tablets, and other devices. This ensures that your website not only looks great but also performs optimally, regardless of the device your audience is using.
Community Support and Knowledge Sharing
Drupal's strength lies not only in its codebase but also in its vast and supportive community. DrupalCon is a testament to the spirit of collaboration and knowledge sharing within the community. Whether you're a seasoned developer or a newcomer, Drupal's community is there to offer support, guidance, and a wealth of resources to help you succeed. By choosing Drupal, you're not just adopting a technology but becoming part of a global network of passionate individuals.
As we gather at DrupalCon Portland 2024, the choice is clear – Drupal is the unparalleled solution for web development. Its open-source nature, flexibility, security features, exceptional content management capabilities, mobile responsiveness, and thriving community make it the go-to platform for building robust and scalable websites. Join the Drupal revolution and unlock the full potential of your digital presence!
Register now for DrupalCon Portland 2024!
Introduction
Optimizing email marketing campaigns can be challenging with organizations facing difficulties in:
- Maintaining an engaged list
- Reducing spam complaints
- Increasing email list size
- Achieving measurable ROI
- Integrating email data with other systems
- Leveraging personalization
- Optimizing for mobile

Salesforce Marketing Cloud Engagement solves these challenges with its robust suite of tools and functionalities.
Understanding Salesforce Marketing Cloud Engagement
Salesforce Marketing Cloud Engagement is a marketing automation platform. It helps businesses personalize and automate customer interactions across multiple channels and break departmental silos. This translates to streamlined marketing, personalized interactions, and improved customer engagement.
There are a few key features within Salesforce Marketing Cloud Engagement that help build effective email marketing campaigns.
Email Studio
Email Studio utilizes data to foster meaningful connections and deliver personalized messages to specific audience segments. With Email Studio, users can:
- Categorize and target the audience
- Design captivating emails
- Confidently distribute feature-rich campaigns
For example, an ecommerce business can create email campaigns to attract new leads. The journey can begin with promotional emails consisting of product links. By tracking the clicks, prospects can be segmented based on their interests.
As soon as a prospect clicks on the link, they will receive triggered emails with related products. If the prospects don’t explore any links within a specific timeframe, a set of new triggered emails will be sent consisting of other product segments.

Journey Builder
Journey Builder has an intuitive interface that allows organizations to automate personalized customer journeys. Users can map and design the customer's digital experience, from the first point of contact to the final interaction.
Organizations can use Journey Builder to send the right message at the right time based on customer behaviors, preferences, and sales cycle stages. It provides analytics and reporting tools to monitor performance and optimize customer journeys in real time.
For example, an organization can build customer journeys for new inbound leads or prospects with the goal of personalizing experience. The first step is to segment the leads and begin the newsletter signup to obtain customer information. On the basis of this information, the leads can be labeled as ‘sales ready’ or ‘not sales ready.’
Strategic emails can be sent to further identify the interest of the ‘sales ready’ prospects and engage them in relevant campaigns. For prospects labeled as ‘not sales ready,’ further emails can be sent to nurture them and improve brand awareness.

Analytics
Salesforce Marketing Cloud offers robust reporting and analytics tools to track crucial metrics such as click-through rates, open rates, conversions, and ROI. Marketers can leverage these insights to optimize marketing strategies, improve audience engagement, and drive better outcomes.
For example, a new retail organization wants to promote their business and attract new customers. To accomplish this, they distribute promo codes through email campaigns. Marketing Cloud Analytics can be used to track user engagement.
How To Create An Email Marketing Campaign In SFMCE
Organizations need to follow five steps to create an email marketing campaign within Salesforce Marketing Cloud.
Step 1: Campaign Strategy
Start by creating the strategy for the email marketing campaign.
- Establish Goals: Clearly define the objectives for the campaign, such as driving sales or increasing brand awareness.
- Target Your Audience: Segment the email list based on relevant demographics, interests, or behavior to personalize messaging and increase engagement.
Step 2: Content Creation
Craft compelling content by utilizing a clear, concise writing style that resonates with the audience. Personalize the content with subscriber data where applicable and incorporate a solid call to action (CTA) to guide desired user behavior.
Step 3: Design The Email
The next step involves designing an email that adheres to the brand and industry standards.
- Maintaining Brand Alignment: Utilize visually appealing elements and layouts to reflect the brand identity.
- Test Rendering: Ensure the email formatting is visually appealing.
Step 4: Campaign Execution
Execute the campaign by navigating to the "Campaigns" tab within Salesforce Marketing Cloud. If users have trouble locating it, access the App Launcher (the waffle icon to the left of the navigation bar) and search for campaigns there.

In the Campaigns window, click on the “New” button.

Follow a naming convention for your campaign and fill the “Campaign Name” field.

Mention other campaign details on the Campaign page layout. To finish the setup:
- Check the “Active” checkbox.
- Select a “Type.”
- Choose a “Status.”
- Start and End Dates help target the reporting based on specific time frames.
- Enter the Budgeted Cost in Campaign/Expected Revenue and the Campaign/Expected Response (%).
- Fill in the “Actual Cost in Campaign” once the campaign is concluded.

Step 5: Post-Campaign Optimization
Constantly monitoring the performance of the campaign.
- Analyzing Results And Iterating: The campaign data will help understand what resonated with the customers and possible areas of improvement.
- Refining The Strategy: Based on the campaign learnings, refine the approach for future campaigns.
- Optimize For Mobile: Ensure the email displays seamlessly across various devices, especially smartphones and tablets.
Additional Considerations
Some additional tips to further enhance email marketing campaigns within SFMCE are:
- Schedule The Emails: To maximize open rates, choose the ideal time and day of the target audience. According to Hubspot Blog Research 2023, the best time to send an email is 9:00 AM - 12 PM EST or 12:01 PM - 3 PM EST. The worst is 1 AM - 3 AM EST.
- Monitor And Analyze: Crucial metrics like click-through rates, open rates, and conversions will help gauge campaign performance.

Best Practices For Better Email Marketing Campaign Results With SFMCE
According to a research by Hubspot, the most effective strategies for maximizing email marketing revenue are:
- Audience segmentation (78%)
- Content personalization (72%)
- Email automation campaigns (71%)

1. Ensure Content Personalization
Personalization fuels deeper customer connections and boosts engagement. 86% of consumers are willing to pay more for a personalized customer experience. SFMCE leverages behavioral data and segmentation for personalized experiences, including the seamless integration of dynamic content into emails. Adding relevant multimedia also helps personalize the experiences.

2. Optimize Designs For Mobile
With 53.42% of global internet traffic coming from mobile devices, ensuring that the emails are optimized for mobile viewing is essential. Organizations can use common responsive design techniques to create emails visible on multiple mobile devices and screen sizes. Some of these techniques are:
- Ensure single-column layout
- Use a proper font and maintain content hierarchy
- Have a visually appealing CTA
- Use smaller and more responsive images
- Avoid too many hyperlinks
- Preview the email
SFMCE also provides responsive email templates and preview tools to help optimize the designs for mobile users.

3. Segment Audience
Segmentation is critical for delivering targeted and relevant content. Utilize Salesforce Marketing Cloud's Audience Builder to segment the audience based on demographics, behavior, preferences, and engagement history. Spotify utilizes SFMCE's segmentation capabilities to separate users based on listening history. This practice enhances user engagement and retention, increasing subscription renewals.
4. Automate Trigger Emails
Triggered emails based on behaviors improve engagement and nurture leads. The Journey Builder in Salesforce Marketing Cloud creates automated email workflows triggered by actions such as website visits, form submissions, or abandoned carts. This enables the timely delivery of relevant messages that guide recipients through the customer journey.

5. Perform A/B Tests
Testing and optimization are vital elements of a successful email marketing strategy. Salesforce Marketing Cloud's A/B testing capabilities facilitate experimentation with different subject lines, content variations, calls-to-action, and sender names. Analyzing the results will help detect what resonates best with the users and refine the email campaigns.

6. Analyze Performance Metrics
Regularly monitor and analyze crucial performance metrics to evaluate the effectiveness of the email campaigns. Salesforce Marketing Cloud's analytics tools track metrics such as open rates, click-through rates, conversion rates, and revenue generated.
For example, Puma uses SFMCE metrics to identify trends, patterns, and areas of improvement. The brand also uses these insights to optimize future campaigns for better results.
7. Maintain High Email Deliverability
Ensuring that emails land in recipients' inboxes is essential for successful campaigns. Pay attention to factors that affect email deliverability, such as sender reputation, email authentication, and list hygiene.
Focus on permission-based marketing, regularly cleaning the email list, and adhering to anti-spam regulations. These practices will help maintain a positive sender reputation and maximize deliverability.
8. Adhere To Customer Data Privacy Standards
Customer data security is one of the primary concerns for modern businesses. Market leaders like American Express use SFMCE to implement privacy measures while sending customized emails to their customers. For starters, inform the customers about collected data and how it will be used. Measures like these go a long way toward building customer trust and brand image.
Prateek Jain, Director of DXP Services at Axelerant, and Prateek Bansal, Manager of Management Consulting at Accenture, also talk about the importance of maintaining customer data privacy standards within the banking industry in a recent DXP Deconstructed episode.
[embedded content]
Axelerant’s Salesforce Marketing Cloud Experts Can Help
Want to know more about how you can get better email marketing results? Schedule a call with our salesforce experts to find out.
Pages
About Drupal Sun
Drupal Sun is an Evolving Web project. It allows you to:
- Do full-text search on all the articles in Drupal Planet (thanks to Apache Solr)
- Facet based on tags, author, or feed
- Flip through articles quickly (with j/k or arrow keys) to find what you're interested in
- View the entire article text inline, or in the context of the site where it was created
See the blog post at Evolving Web