
Upgrade Your Drupal Skills
We trained 1,000+ Drupal Developers over the last decade.
See Advanced Courses NAH, I know EnoughGuide: How to integrate JavaScript in Drupal 8-9
Imagine that you have to integrate JavaScript code into your Drupal project… Where do you start? How do you do it? You’re looking for information but you don’t find anything “holistic”, something that goes from 0 to 100 and that puts in context how the relationships between Drupal and JavaScript are structured. Well, this article was made for you (Or for other people in your team that you want to introduce to this topic).
In this guide you will learn basic concepts of JavaScript, the terminology used in Drupal, functions, methods and common mechanics to enrich your projects by make them run with executable code on the client side. And all through a combination of theory and practice. It includes some exercises that I have integrated.
Picture from Unsplash, user Magnus Engø.
Index of sections
1-Introduction
2- JavaScript and Drupal: basic concepts
3- How to include JavaScript code in Drupal
4- Just a little bit more of JavaScript in Drupal
7- JavaScript without JavaScript: #ajax, #states
8- Troubleshooting: Problems and Solutions
9- Links and reading resources
Index of Exercises
Exercise 1: Creating a basic custom module
Exercise 2: Defining our new custom library
Exercise 3: Defining our initial JavaScript file
Exercise 4: Adding libraries to our Drupal custom module
Exercise 5: Passing values to the IIFE format
Exercise 6: Transfering values trough drupalSettings
Exercise 7: Custom Visit Counter with JavaScript
Exercise 8: Changes based in jQuery
Exercise 9: Dialog Window from the global object Drupal
Exercise 10: Image Board from Unsplash using Drupal Behaviors
1- Introduction
Some time ago (around December 2019, but it seems a century has passed ) I started writing what I thought would be a simple guide to integration between JavaScript and Drupal. A couple of months later, in February 2020, I had a tutorial of more than eleven thousand words written in Castillian (Spanish from Spain) that I published in my Medium profile.
What was initially going to be brief has become a kind of reference guide on JavaScript and Drupal and (as far as I know) is now part of the training resources shared in many companies in Spain and other Latin American countries. Here you can reach the original publication in Medium, the so called: JavaScript & Drupal 101 TUTORIAL HANDBOOK TOTAL MAX POWER 2000 (I can swear I had a lot of fun thinking about the title).
Well, the fact is that since the publication, I received three basic types of feedback:
- “Hey, this is wrong, you have to check it”
- “We have people in the company from other countries, do you have it translated into English?”
- “Thank you for not putting it behind the Medium payment wall”
So although my first intention was to move all this content to an open book format like git-book or something like that, I’ve actually grouped the first two together and I’m going to publish a review of the original post translated into English. As always, I hope it can be useful to someone.
In a complementary way, you can download all the code from the exercises grouped as a single Drupal custom module, available here: gitlab.com/davidjguru/javascript_custom_module. This works in Drupal 8 and Drupal 9.
DISCLAIMER: This guide is actually a manual for the integration of JavaScript code in Drupal-based projects, but only in the context of implementing Drupal modules. This is basically a backend issue. This guide does not contain information related to JavaScript frameworks (React, Angular, Vue) or about the use of Drupal headless as decoupled. Neither does it deal with Drupal Theming issues and its approach to them is only tangential. This tutorial is only for people related to the Drupal backend.
There we go!
2- JavaScript and Drupal: basic concepts
If this is your first approach to the intersection between Drupal and JavaScript and it may even be your first approach to Drupal and its world, it’s convenient that you review this section beforehand, in which we are going to share some terms and names that we will use throughout the tutorial.
By this way you will know what we are talking about at any time in the manual and you will be able to follow the cases, examples and exercises more easily.
Drupal: Our technological platform of reference in this context. Something halfway between the framework and the CMS, free software downloadable and installable from here: https://www.drupal.org. In this tutorial we’ll travel over the shoulder of a Drupal, so it is good to know it.
Render Array: It’s a key piece of Drupal to “paint” on screen. They are multidimensional arrays that must meet certain rules using different properties to model the elements to be rendered. The elements we usually draw are described here: drupal.org/api/drupal/elements/9.2.x. Most of the connections between Drupal and JavaScript will be done from Drupal’s render arrays, so is highly recommended to know them and learn its declarative format.
JavaScript: A programming language very diversified so much as to be the basis of many frameworks, libraries and tools in fashion. Today it’s executable both in client and server. In this context we will use the so called “Vanilla JavaScript”, that is, the own handcrafted code outside JS platforms. See a guide from Mozilla: mozilla.org/JavaScript/Guide. In this tutorial, although it is not an advanced JavaScript manual, we will use this language in several sections, so is great that you know it a little bit.
Immediately-invoked Function Expressions(IIFE): Also called “self-executing” function, it’s a specific format to declare JavaScript functions so they are executed as they are declared, as soon as they are defined. See: flaviocopes.com/javascript-iife to understand better this important concept. In this article we tried to integrate JavaScript into Drupal through this format, so it would be optimal if you at least understand the concept.
AJAX: This stands for Asynchronous JavaScript + XML, a combination of technologies for use partial requests (lighter than complete requests) from the client to the server, which results in speed and performance improvements. See more: developer.mozilla.org/Guide/AJAX. Although it is a complex and extensive topic, we will focused in the possibilities of implementing AJAX in Drupal.
DOM: The Document Object Model is the tree structure that represents all the HTML code used in the representation of the web we are visiting. See: developer.mozilla.org/Glossary/DOM. In this guide we are going to make modifications and operations on HTML elements, so we will learn how to make changes on the DOM from Drupal.
jQuery: It’s a mythical library based on JavaScript to facilitate (theoretically) manipulations of the DOM. In Drupal it (still, by now) maintains a very extensive presence, so we better get along with it. See: developer.mozilla.org/Glossary/jQuery. We’re going to execute jQuery code in the Drupal context.
3- How to include JavaScript code in Drupal
We will practice with the inclusion of JavaScript code in our project. To do this, we will create a new custom module and iterate on it providing you with JavaScript based functionality while we discuss the most important concepts in the following sections. In order to doing this, I recommend quickly creating a containerised test environment, using DDEV to deploy a Drupal installation on the fly. If you don’t know DDEV, you can follow my own guide published in Digital Ocean: How To Develop a Drupal 9 Website on Your Local Machine Using Docker and DDEV.
You can also deploy a lightweight version of a Drupal installation just using your PHP local config, with a light server. Follow the steps in the next snippet:
3.1- Setting up the scenario: creating a custom module
To begin with, let’s define the new custom module we will work with. I don’t know what context you have with respect to Drupal, so I’ll write down here a sequence of links that you can update with. You will need a Drupal deploy, maybe XAMP+ environment with web server, database and a Drupal deployed and ready to use, or if you’re using DDEV (as I recommended in the previous section).
Explaining how to create a custom module for Drupal is beyond the scope of this guide, but here are some links to read:
Snippets
Exercise 1: Creating a basic custom module for testing
In case you already have a Drupal site available for testing (including use of Drupal Console), just type this from the console while being inside your project and Drupal Console will take care of creating the new module:
// Using Drupal Console with params.
drupal generate:module \
--module="Custom Module for JavaScript" \
--machine-name="javascript_custom_module" \
--module-path="modules/custom" \
--description="This is a custom generated module for JavaScript." \
--package="Custom" \
--module-file \
--no-interaction
If Drupal Console is not your option, you can use Drush, launching the command:
$ drush generate
$ ddev drush generate
And you’ll get a list of options, including:
 module:
   module-configuration-entity                       Generates configuration entity module
   module-content-entity (content-entity)            Generates content entity module
   module-file                                       Generates a module file
   module-standard (module)                          Generates standard Drupal 8 module
And ask for a custom module creation with params, avoiding all parameters setting through dialogue:
$ drush gen module-standard --directory modules/custom --answers '{"name": "Custom Module for JavaScript", "machine_name": "javascript_custom_module", "description": "Custom Generated Module for JavaScript.", "package": "Custom", "dependencies": "", "install_file": "no", "libraries": "no", "permissions": "no", "event_subscriber": "no", "block_plugin": "no", "controller": "no", "settings_form": "no"}'
See an example here: Drupal 8 || 9 : Creating custom module using Drush generate.
You can also download this basic custom module created for examples from my gitlab repository: gitlab.com/davidjguru/basic_custom_module, or doing git clone from the whole repository for custom modules: gitlab.com/davidjguru/drupal-custom-modules-examples.
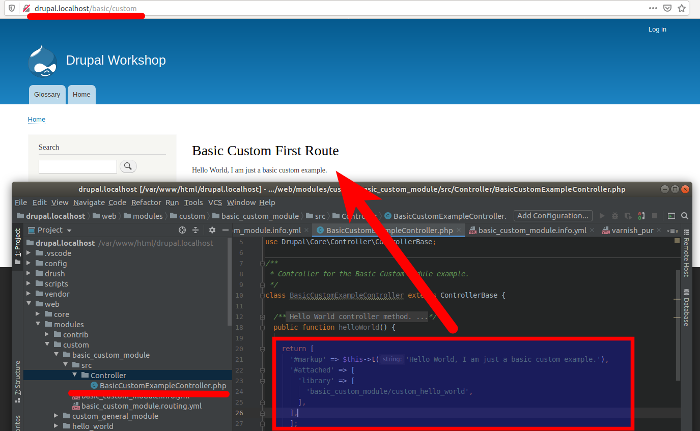
This module is quite simple and basic, only for first setps in Drupal: when enabled, only creates a new path /basic/custom with a Controller that gives you a response creating a render array in Drupal, with a very simple markup message for HTML. With this, we can start to test.
We will now generate some content automatically for our exercises / test scenario. We can rename the custom module if we want, to particularize it a bit more (I’ll use the naming javascript_custom_module to avoid confusion with other test modules. We will install, activate and generate a random comments set within our platform. To do this we’ll use the Drupal Devel Module and its Devel Generate sub-module to create test content, adding new commands and sub-commands to Drush. We’ll use Composer and Drush from inside the console project folder, just by typing:
$ composer require drupal/devel
$ drush en devel devel_generate
$ drush genc 10 5 --types=article
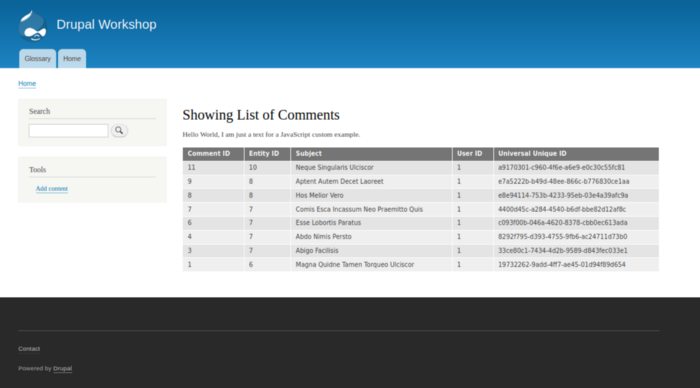
With these instructions above we asked to devel-generate to create ten items, using the type nodes (default in Drupal) with a comments set in each node, between 0 and 5 per node. We now have ten initial nodes to build our initial exercise scenario:

Next, we will reorder what this example Controller originally returned. Until now it was simply a text message, but now we are going to add a table with comments associated with the current user. To do this we are going to perform a database query using the database service, extract the returned values and process them by launching them into the table rendering system. For the query filtered by the current user data through the current_user service .
Let’s see, now the controller class would look like this:
What once enabled the test module (using Drush or Drupal Console -if it works in your Drupal installation-):
$ drush en -y javascript_custom_module
$ drupal moi javascript_custom_module
This will generate the /javascript/custom path through the Controller and it will render on screen the following table:
With this step, we have already prepared the initial scenario and can move on to perform exercises directly with JavaScript.
Next!
3.2- The “library” concept
Working with both CSS and JS from Drupal 8 onwards has become standardised. In previous versions of Drupal you had to use specific functions to add CSS or JS resources. As I explained in this snippet: Drupal 8 || 9 : Altering HTML in headers from hooks, you had to use things like drupal_add_html_head() to add new HTML tags, drupal_add_js() to incorporate JavaScript or the drupal_add_css() function to add more style sheets.
3.2.1- Secuence for creating libraries
From Drupal 8, the sequence of inserting libraries has been standardised, and consists of fulfilling these three steps:
- Create the CSS/JS files.
- Define a library that includes these files.
- Add this library to a typical Drupal render array.
But in this case, we are going to reverse steps 1 and 2: first we will see how to create the library and then we will talk about the JavaScript file itself, which could be a little more complex.
Exercise 2: Defining our new custom library
Let’s see…in our custom module, we’ll include a new file module_name.libraries.yml in order to describe the new dependencies, so in our case study, we’ll create a new file called javascript_custom_module.libraries.yml filled with the next lines:
// Case 1: Basic library file with only JavaScript dependencies.
module_name.library_name:
  js:
    js/hello_world.js: {}

// Example
custom_hello_world:
  js:
    js/hello_world.js: {}
All the libraries will be declared, as a rule of style, in the same .libraries.yml file, where we will describe all the libraries we need in our project, grouped by function or use.
Here you can see several examples of definition of libraries for Drupal with some example models:
As we can see in the examples listed in the previous gist, there are different ways to declare libraries and even to add them externally. About the declaration of libraries, we can add a couple of curiosities that are nice to know:
3.2.2- Loading libraries in head
By default, all libraries will tend to be loaded into the footer: In order to avoid operations over elements in DOM (Document Object Model) that have not yet been loaded, JS files will be included at the end of the DOM. If for some reason you need to load it at the beginning, then you can declare it explicitly using the pair parameter/value “header: true”:
js_library_for_header:
  header: true
  js:
    header.js: {}

js_library_for_footer:
  js:
    footer.js: {}
3.2.3- Libraries as external resources
We are looking at examples of creating our own custom libraries, but it’s also possible to declare in the .libraries.yml file of our custom module the use of an external library that is available via CDN or by an external repository.
It is possible to request to Drupal the use of an external library to incorporate it to our project, as we can see in the example of the use of backbone.js in the Drupal core, created by third parties, incorporated to Drupal and declared coherently with their external data:
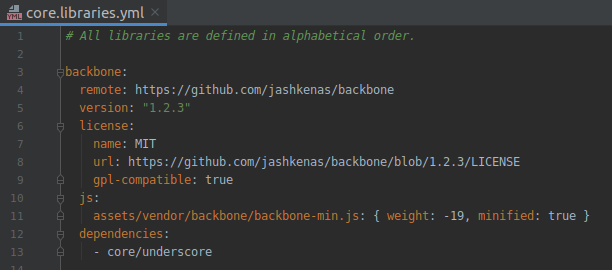
By the way, in the same file core.libraries.yml you’ll can see all the JavaScript resources declared from the core of Drupal. Some of these resources will be used here in this guide. ;-)
In this former example about backbone.js in Core, we’re seeing that finally, the library is used from a local environtment, right? so…It is possible loading a library directly from remote? we’ll see the official documentation from Drupal saying something like this:
“You might want to use JavaScript that is externally on a CDN (Content Delivery Network) to improve page loading speed. This can be done by declaring the library to be “external”. It is also a good idea to include some information about the external library in the definition.”
So we can do something like this:
angular.angularjs:
  remote: https://github.com/angular/angular.js
  version: 1.4.4
  license:
    name: MIT
    url: https://github.com/angular/angular.js/blob/master/LICENSE
    gpl-compatible: true
  js:
    https://ajax.googleapis.com/ajax/libs/angularjs/1.4.4/angular.min.js: { type: external, minified: true }
Quite interesting, right?
3.2.4- Libraries and dependencies
It is possible that within our JavaScript code, in your own .js file, we may need to use another third-party library for our functionality. Well, in that case, we can declare libraries with dependencies following a basic vendor/resource or vendor/library scheme.
Let’s see an example in which we intend to use a hide/show effect. As such animations are available in the jQuery library and it’s integrated in Drupal (we will see it later), then instead of creating those functions we’ll declare the dependency and we will be able to use them:
js_library_hide_show:
  js:
    js/my_custom_javascript_library.js: {}
  dependencies:
    - core/jquery
In addition, there is a set of options that you can use as attributes to customize the use of your new CSS / JavaScript libraries. See: Drupal org Docs: Libraries options and details.
3.3- The JavaScript file
The next step will be to define that JavaScript file that we have declared as a resource within the new previous library.
Exercise 3: Defining our initial JavaScript file
For that, we’ll create a /js folder and will put inside our new file hello-world.js wich contains our new library with a little action, just say hello by Console:
(function () {
  'use strict';

  // Put here your custom JavaScript code.
  console.log ("Hello World");
})();
So the internal structure of our custom module for testing should look like this:
/javascript_custom_module
    /js
        javascript_file_name.js
    /src
        /Controller
            YourCustomExampleController.php
    javascript_custom_module.info.yml
    javascript_custom_module.routing.yml
    javascript_custom_module.libraries.yml
3.4- Adding JavaScript libraries
Now our goal is linking the new library with its JavaScript .js file associated with the context in which it should work, right? Well, for that we are going to make a base case and then we are going to add more probable cases, given that in Drupal it is possible to attach JavaScript libraries in various ways, depending on how we need to use them in our code.
But let’s see first the base case for our case: #attached.
3.4.1- Using the #attached property in Render Arrays
On one hand, we have the eternal Drupal Render Arrays, that is, the arrays loaded with properties, values, parameters and others that we use to send to the Drupal rendering system so it transforms everything and ends up painting HTML renderable in a browser.
On the other hand, we have a property called “#attached” that offers us a set of already defined sub-properties that allow us to attach resources of different nature to any render array we are using (a controller response, a form build, etc):
- Library -> $render_array['#attached’][‘library’]
- drupalSettings (from PHP to JavaScript) -> $render_array['#attached’][‘drupalSettings’]
- Http_Header -> $render_array['#attached’][‘http_header’]
- HTML Link in Head -> $render_array['#attached’][‘html_head_link’]
- HTML Head -> $render_array['#attached’][‘html_head’]
- Feed -> $render_array['#attached’][‘feed’]
- Placeholders -> $render_array['#attached’][‘placeholders’]
- HTML Response Placeholders -> $render_array['#attached’][‘html_response_attachment_placeholders’]
We will come back to some of these cases in following sections, But for more info about the processing of attached resources, You can visit the official documentation in Drupal.org: public function HtmlResponseAttachmentsProcessor.
See some examples at:
Exercise 4: Adding libraries to our Drupal custom module
By now, we just need to go to the PHP class file (The Controller) and modify the render array that is returned at the end, including the #attached property with our new library:
// Path: javascript_custom_module/src/Controller/
// File: CommentsListController.php
// Function: gettingList()

// Before (line 42):
$final_array['welcome_message'] = [
  '#type' => 'item',
  '#markup' => $this->t('Hello World, I am just a text.'),
];

// Now (line 42):
$final_array['welcome_message'] = [
  '#type' => 'item',
  '#markup' => $this->t('Hello World, I am just a text.'),
  '#attached' => [
    'library' => [
      'javascript_custom_module/js_hello_world_console',
    ],
  ],
];

// Form :
$attachments['#attached']['library'][] = 'module/library';
Just after changed it, We will reinstall our custom module, clearing cache:
$ drush pmu javascript_custom_module
$ drush en -y javascript_custom_module
$ drush cr

// Drupal Console (include clearing cache)
$ drupal mou javascript_custom_module
$ drupal moi javascript_custom_module
We can see now from the Console of your browser the result of the execution of our first JavaScript code, just going to the declared route:

We’ve made our first interaction with JavaScript in Drupal! Well, now we are going to continue adding new JS cases, and then we will come back to this same initial case to continue iterating and looking at more and more available functionality.
Following this simple initial exercise, we can check the operation of basic JavaScript methods such as an alert window or a confirmation window through the integration of libraries using the #attached property:
3.4.2- Libraries in a TWIG template
To add libraries to a Twig template within our project, either for a custom template within our own module or in a specific Twig template of the Theme we are using, we will load it through the Twig attach_library() function that allows us to add directly to the template:
{% block salute %}
  {% if salute_list is not empty %}
    {{ attach_library('custom_module_name/library_name') }}

       {{ parent() }}

   {% endif %}
{% endblock salute %}
But the truth is that it can cause problems in the rendering (that it does not arrive in time to load in the rendering cycle of the Render system that is put in motion when “painting” a page) if it is added to the global template html.html.twig . This is a debate that has been going on for some time: https://www.drupal.org/node/2398331#comment-9745117 and is also a subject for discussion with a view to changing the way libraries are loaded in the near future of Drupal: https://www.drupal.org/project/drupal/issues/3050386. So beware of the template you use it on that might not work and pay attention to changes that might come in new versions of Drupal.
3.4.3- Global libraries for a Theme
To declare your library as a global dependency for your Theme or your custom module, just include it in the declarative file of the *.info.yml resource using the libraries property:
# resource.info.yml

libraries:
  - module/library
In any case and as in the previous section, there are discussions about the evolution of this and some measures that are supposed to be taken for future versions: https://www.drupal.org/node/1542344. The advice remains the same: Pay attention to possible changes.
3.4.4- Adding libraries from Hooks
It is also possible to add new custom libraries in our Drupal context, specifically before the time of rendering existing pages, through pre-processing hooks, such as hook_page_attachments(), which still maintains the already seen way of adding resources:
// Form:
$attachments['#attached']['library'][] = 'module/library';
Using a basic scheme for use:
/**
 * Implements hook_page_attachments().
 */

 function custom_page_attachments(array &$attachments) {

    $attachments['#attached']['library'][] = 'module/library';

 }
Another option in hooks is the hook_preprocess_HOOK() function that according to its documentation, makes it easier for modules to preprocess theming variables for various elements. Let’s see a couple of examples:
/**
 * Implements hook_preprocess_HOOK() for menu.
 */
function theme_name_preprocess_menu(&$variables) {

  $variables[‘#attached’][‘library’][] = ‘theme/library’;
}
The execution of this previous hook will make Drupal go to menu.html.twig and perform the addition of the differentiated library. Furthermore, this resource can be used in a generic way (for example, for all pages):
/**
 * Implements hook_preprocess_HOOK() for page.
 */
function custom_theming_preprocess_page(&$variables) {

  $variables['#attached']['library'][] = 'module/library';
}
In this case it is recommended to specify metadata to facilitate the caching of the new change, specifically if the aggregation operation of the new library depends on conditions, for example:
/**
 * Implements hook_preprocess_HOOK() for page with conditions.
 */
function custom_theming_preprocess_page(&$variables) {

  $variables['page']['#cache']['contexts'][] = 'route';
  $route = "entity.node.preview";

  if (\Drupal::routeMatch()->getRouteName() === $route) {
    $variables['#attached']['library'][] = 'module/library';
  }
}
And for more specific resources:
/**
 * Implements hook_preprocess_HOOK() for maintenance_page.
 */
function seven_preprocess_maintenance_page(&$variables) {

  $variables[‘#attached’][‘library’][] = ‘theme/library’;
}
4- Just a little bit more of JavaScript in Drupal
Let’s take a closer look at the rules of use and integration of JavaScript code in a Drupal project.
4.1- Structure and guidelines for IIFE
The first thing that should call our attention is the fact that the structure of the .js extension file that we have introduced in our project through the /js folder has the following structure:
(function () {
  'use strict';

  // Put here your custom JavaScript code.
  console.log ("Hello World");
})();
In Drupal, all our JavaScript code will be integrated within a closure function, as a wrapper of the code based on the IIFE pattern, that is, the “Immediately Invoked Function Expression (IIFE)” model, used as a useful structure for three key issues:
- First, it allows immediate execution (or self-execution).
- Second, it limits the scope of internal variables: does not alter other JavaScript codes present in the project.
- Third, The context execution of the IIFE is created and ends up destroying it automatically: it frees up memory space, and releases it quickly.
How is this achieved? Well I think we can understand the IIFE model in an intuitive way in four steps. Let’s see:
- We can create a function in JavaScript as normal:
function myFunction() {

  // Here your JavaScript code.
}
- This function may or may not have a name (being an anonymous function) but in this case must be assigned to a variable:
// Function with name:
function myFunction(){

  // Here your JavaScript code.

} -> Right

// Anonymous function assigned to a variable:
var myFunction = function() {

  // Here your JavaScript code.

} -> Right

// Anonymous function being not assigned to a variable:
function() {

  // Here your JavaScript code.

} -> JavaScript error
So JavaScript does not allow us to execute the function, because after the keyword “function” it waits for a name that it cannot find.
- This can be avoided by introducing the anonymous function in parentheses (well actually just by putting a sign in front of it would already serve but we adopt this consensus of the parentheses as a style guideline). This makes the JavaScript engine consider it an expression, or Function Expression (instead of Function Statement, with a name):
(function() {

  // Here your JavaScript code.

})
- The function remains in memory but nobody is using it. How do we execute it? Well, we can use the final parenthesis to call its execution:
(function() {

  // Here your JavaScript code.

})()   -> It's only a guideline, since this algo serves:

(function() {

  // Here your JavaScript code.

}())  -> We've passed the invocative parentheses into the expression.
In fact, if we enter parameters in the execution brackets, the function will treat them with absolute normality. We will see an example later on through a small exercise (Ex. 5: Passing values to the IIFE format).
Besides, as it is an anonymous function, it can be used as an “arrow function”:
(() => { // Here your JavaScript code. // })()
The latter are the forms that our JavaScript code can take in Drupal. Remember that whatever the style guideline we choose, we always need to comply with two fundamental guidelines:
- They are built in a compartmentalized way, without “contaminating” any global object, that is, the global execution space (that the variables only live inside their function, like a private code block).
- They are executed immediately, destroyed and cannot be executed again (if a page is reloaded, they are requested again).
4.2- Passing parameters in IIFE
We are going to makechanges on the rendered HTML of our Drupal through our custom module, for which we must first assign a custom selector to the element we want to modify.
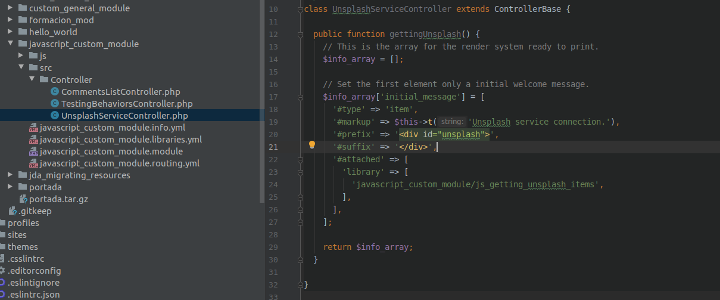
Exercise 5: Passing values to the IIFE format
We start by going back to the controller class file and adding two new Drupal element rendering system properties: #prefix and #suffix which allow an HTML element to be framed within other HTML tags. In this case we want to add our own id to the element.
// Line 42.
$final_array['welcome_message'] = [
'#type' => 'item',
'#markup' => $this->t('Hello World, I am just a text.'),
'#prefix' => '',
'#suffix' => '
',
'#attached' => [
'library' => [
'javascript_custom_module/js_hello_world_console',
],
],
];
Next we create a new .js file (‘iife_salute_example.js’)with a function in IIFE format. To this function we will pass a text string as a greeting for our users (‘Dear User’), and we will declare the input parameter in its definition (‘parameter’).
(function (parameter) {
  'use strict';

  // Get the HTML element by it ID.
  let element = document.getElementById("salute");
  console.log(element);

  // Add to the HTML the new string using the parameter.
  element.innerHTML += "Salute, " + parameter;

  // Creating and adding a line for the HTML element.
  var hr = document.createElement("hr");
  console.log(hr);
  element.prepend(hr);

})('Dear User');
We’ll introduce some changes with pure JavaScript, like adding a text to the message of the HTML element, taking the value of the text string passed by parameter. Then we also put a dividing line over the element, as a separator.
We added the new file to the library resources that we had already defined previously:
js_hello_world_console:
  js:
    js/hello_world_console.js: {}
    js/iife_salute_example.js: {}
And so, if we clean the drush cr cache and reload the /javascript/custom path in the browser, we will be able to see the new changes made using JavaScript:

4.3- Passing values from PHP to JavaScript: drupalSettings
We have seen in the previous section how to pass values to that IIFE within the revision of the structure and operation of this JavaScript code format and now we are going to stop at a very particular construction that is available for us to make connections between our server executable code (PHP) and our client executable code (JavaScript) within Drupal: let’s talk about drupalSettings.
Let’s think about implementing a slightly more particular greeting to the user who visits our url /javascript/custom . We want to extract data about the visitor’s identity in order to give them a more personal greeting. Ok. We can extract this information inside our Controller through the service current_user: api.drupal.org/core.services.yml/current_user/9.0.x, which offers us methods to obtain this information. We want to take this information into the code that runs on the client, so we will transfer it to JavaScript.
We were including the current_user service in the Controller, between lines 24 - 29 of the source code:
 public static function create(ContainerInterface $container) {
    return new static(
      $container->get('current_user'),
      $container->get('database')
    );
  }
So you will can use the service from the Controller using a class property, the so called $this->current_user.
We can transfer it all through drupalSettings, a sub-property available for the property #attached , which is received from the JavaScript side through the drupalSettings object, which will have the values available as new properties. Let’s see the next exercise.
Exercise 6: Transfering values trough drupalSettings
We will create a new JavaScript file for a more particular greeting, called hello_world_advanced.js. On the one hand, we’re extracting the information and adding the new library from the PHP side:
// We're adding the new resources to the same welcome element.
$final_array['welcome_message']['#attached']['library'][] = 'javascript_custom_module/js_hello_world_advanced';

$final_array['welcome_message']['#attached']['drupalSettings']['data']['name'] = $this->current_user->getDisplayName();

$final_array['welcome_message']['#attached']['drupalSettings']['data']['mail'] = $this->current_user->getEmail();
On the other hand, we’re getting the values from the JavaScript side:
(function () {
'use strict';
// Recovering the user name and mail from drupalSettings.
let element = document.getElementById("salute");
let user_name = drupalSettings.data.name;
let user_mail = drupalSettings.data.mail;
// Add to the HTML the new strings.
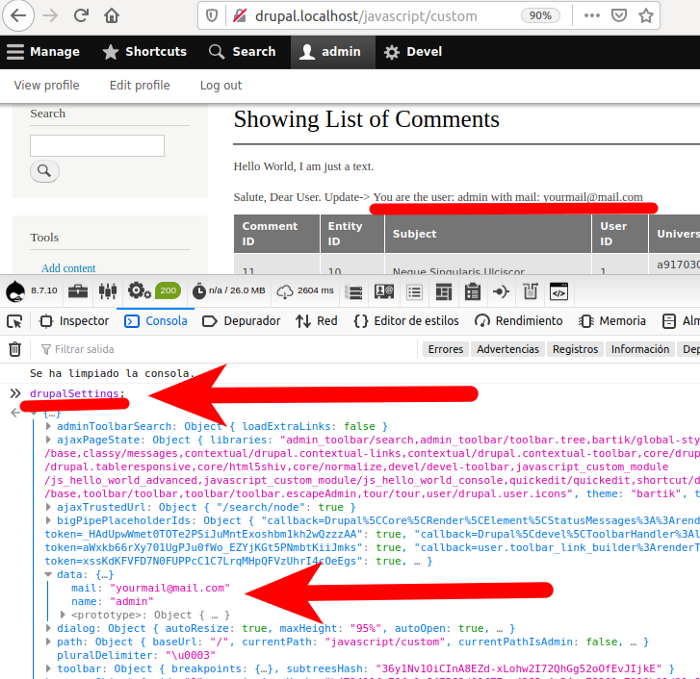
element.innerHTML += "Update-> You are the user: " + user_name +
" with mail: " + user_mail;
})();
Now, adding the library drupalSettings (from the Drupal core) as a new dependency, we can to start connecting variables between PHP and JavaScript. We will change our library definition file in order to define a new custom resource that will use this new dependency:
js_hello_world_advanced:
  js:
    js/hello_world_advanced: {}
  dependencies:
    - core/drupalSettings
So we can see the new values loaded both from the web rendering and from the drupalSettings object itself, through the console (drupalSettings.data, remember):
Ready!
4.4- Changes in rendered HTML
We will use this section to extend functionally our custom module for JavaScript by implementing some simple and interesting features, to continue practicing with JavaScript in the context of Drupal and to standardize its use in our projects.
4.4.1- Counting visits using Web Storage
Let’s see… Do you know the concept of “Web Storage”? Well, in short, it’s a small HTML API available in modern browsers to store information internally through two mechanisms: Session Storage (for information maintained only in the context of the open page session) and Local Storage (to persist information until we explicitly remove it).
Read more about the web storage API at: developer.mozilla.org/Web_Storage_API
Here, for example, you can check the availability and capacity (usually around 5MB) of your web browser for web storage (Local and Session): http://dev-test.nemikor.com/web-storage/support-test/.
Exercise 7: Custom visit counter with JavaScript
In this step we will create a small and persistent visit counter to inform the user of the number of times he or she has loaded our custom /javascript/custom/ route.
First, we ask for the current values:
// Asking for the localStorage parameter value if exists.
let visit_value = localStorage.getItem('visit_number');
console.log("LocalStorage - current value: " + visit_value);

// Same but for the sessionStorage.
let session_value = sessionStorage.getItem('session_number');
console.log("SessionStorage - current value: " + session_value);
Then we check if they are already created and initialized. Just a little intuitive game. If they are null, we create them and load them with an initial value equal to one. If they already exist we increase them and load them again updated. We take advantage of this to display them through the console:
// Testing the localStorage visit value.
if(visit_value === null) {

  // If null we'll create the initial value.
  localStorage.setItem('visit_number', 1);
  console.log("LocalStorage: " +localStorage.getItem('visit_number'));

}else {

  // If not null we'll increment the current value.
  localStorage.setItem('visit_number', ++visit_value);
  console.log("LocalStorage: " + localStorage.getItem('visit_number');
}

// Same for sessionStorage.
if(session_value === null) {

  // If null we'll create the initial value.
  sessionStorage.setItem('session_number', 1);
  console.log("Session: " + sessionStorage.getItem('session_number'));

}else {
  // If not null we'll increment the current value.
  sessionStorage.setItem('session_number', ++session_value);
  console.log("Session: " + sessionStorage.getItem('session_number'));
}
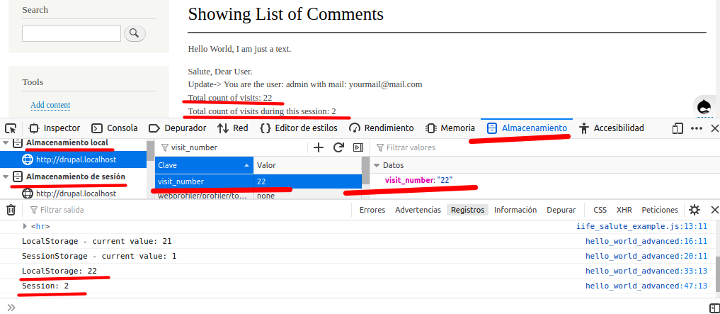
At the end, we take the opportunity to display the counter values in the HTML of the page:
// Add to the HTML the counter value.
element.innerHTML += "
" + "Total visits: " +
                              localStorage.getItem('visit_number');

element.innerHTML += "
" + "Total visits during this session: " +
                           sessionStorage.getItem('session_number');
And when the address is reloaded, it shows the registration values via the Web Storage API:
Did you know about this little storage API? and what other ideas do you have that could be implemented using it?
5- Drupal and the old jQuery
According to its own mission:
“The purpose of jQuery is to make it much easier to use JavaScript on your website."
And so it has been for many years. It is, in short, a JavaScript library created to offer a standardized way (or something like that) to interact with the elements of the Document Object Model (DOM) in the simplest and most direct way possible.
jQuery has -at the time of writing- fourteen years of life since its first published version and extensive use throughout all the websites published on the Internet. Without falling into technological holy wars, we will just assume that it is still present (for now) in the development of Drupal and that several versions and formats of jQuery are offered within the platform. We will see how to use it and how to relate to it in a (relatively) efficient way.
5.1- Fast review of the jQuery keys
As this article is not by itself a jQuery tutorial and I’m afraid that at the end the extension of it will exceed twelve thousand words, you will excuse me for not stopping too much here. jQuery requires another manual of the same (or higher) extension. So let’s give some context through some basic keys and we’ll go on. Pay attention.
Remember:
In jQuery, $ is an alias for jQuery.
Usually, jQuery starts when the document is fully loaded, through the instruction:
$(document).ready(function(){ // }.jQuery offers thousands of ways to interact with HTML elements, from selectors through the element id (#id), its CSS class (.class), HTM tag names (“div”), or attribute values (name = value). The list and its options is endless and it is convenient to have it somewhat tested: https://api.jquery.com/category/selectors.
With the management of its selectors, you will be able to make changes at several levels in your HTML: CSS styles, add/alter/remove elements, add visual effects, make callbacks and Ajax requests. For all this you will use jQuery (perhaps).
And don’t forget to consider jQuery’s recommendations for good use. See this set of guidelines, quite old but interesting: http://lab.abhinayrathore.com/jquery-standards.
5.2- Availability of jQuery in our Drupal version
From Drupal 8 onwards, was changed the system for loading libraries and resources, causing nothing (or almost nothing) to be loaded by default.This, among other things, implies that jQuery is not included in every page unless you request it as a dependency for your resource (a library dependency for your module or theme, declared as we have already seen).
At this moment, all the libraries related to jQuery are declared in advance but they will only be preloaded if you need them. These libraries can be located in the /core/core.libraries.yml file:
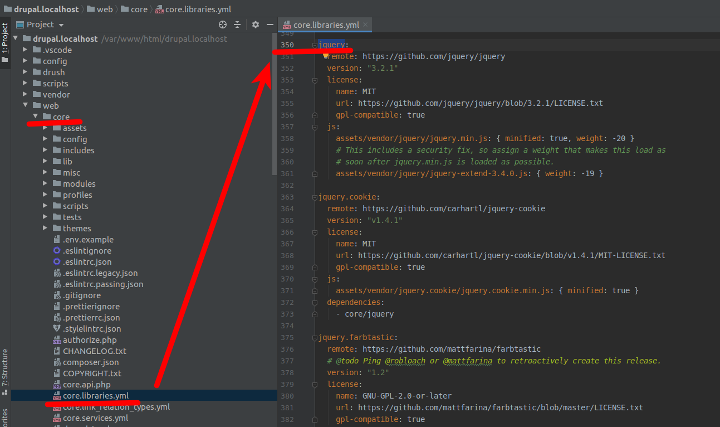
Where you can see from line 350 of the file the list of jQuery libraries associated to Drupal’s core. As you can see, there are many jQuery libraries declared, some of them to be explicitly requested as dependencies in custom resources (modules or themes) and others for internal consumption, since sometimes, Drupal uses underneath jQuery plugins to build elements like buttons, navigation tabs and other resources.
Here is a graph prepared in 2015 by Théodore Biadala, @nod_ about the extensive use Drupal makes of jQuery (a little outdated, is from 2015): http://read.theodoreb.net/viz-drupal-use-of-jquery.
5.3- Using a different version of jQuery
Let’s suppose that for some specific needs of the project, we want to use a different version of jQuery than the ones supported within our version of Drupal, what to do? (asked the wise man). Well, we can add it as a resource to our project without problems through the guidelines we already know:
jquery-custom:
  remote: https://github.com/jquery/jquery
  version: "2.2.4"
  license:
    name: MIT
    url: https://github.com/jquery/jquery/blob/2.2.4/LICENSE.txt
    gpl-compatible: true
  js:
    js/jquery-2.2.4.min.js: { minified: true, weight: -20 }
And then we can overwrite the dependency from its declaration in the file my_custom_resource.info.yml:
libraries-override:
  # Replace the entire library.
  core/jquery: my_custom_resource/jquery-custom
Exercise 8: Changes based in jQuery
We will perform a couple of exercises using jQuery in our custom module.
- Loading text Lorem Ipsum via AJAX
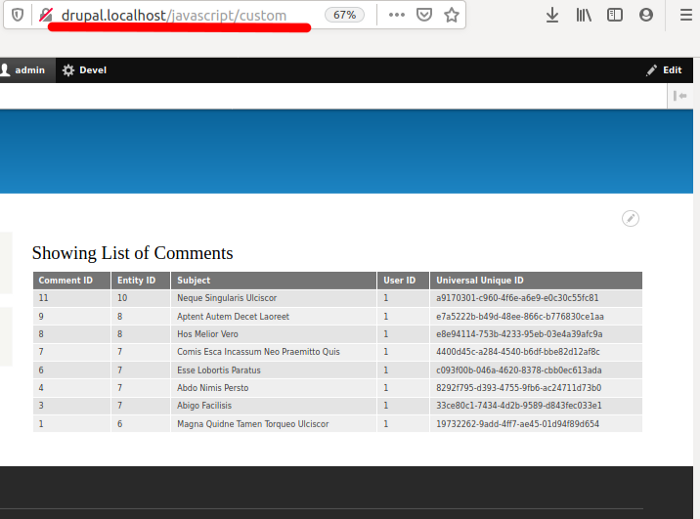
After the previous exercises with JavaScript, if we close all the windows we have now, we will stay in our /javascript/custom route alone with our table of results showing comments associated with the current user, which was:
We will provide an introductory text to the page through the consumption of an external API that will provide us with Lorem Ipsum paragraphs. We will declare the new dependency in the usual *.libraries.yml file:
js_playing_with_jquery:
  js:
    js/playing_with_jquery: {}
  dependencies:
    - core/jquery
In this case we will try to load the new library through a hook of type hook_page_attachments() inside the file javascript_custom_module.module:
/**
 * Implements hook_page_attachments().
 */
function javascript_custom_module_page_attachments(array &$attachments) {

  // Getting the current route name.
  $route_name = \Drupal::routeMatch()->getRouteName();

  // Load the library only if match with the selected page by route.
  if (strcmp($route_name, 'javascript_custom.hello') == 0) {
    $attachments['#attached']['library'][] = 'javascript_custom_module/js_playing_with_jquery';
  }
}
And in the folder js/ we will create the new file playing_with_jquery.js , in which we will dump all our mandanga.
Let’s start by adding some introductory text to the page. in order to do this we’ll make a request to the web baconipsum through its API, for which we will use the jQuery function $.getJSON() that handles three parameters: a URL address, some data to build the request and a callback function in case the request is successful. This itself is a wrapper provided by jQuery to handle as a HTTP GET verb request in a JSON format: api.jquery/getJSON.
Let’s see what we can do: First we will add a new HTML container for the texts (
() into the newly created container.
(function ($) {
'use strict';
$(document).ready(function(){
console.log("The Playing with jQuery script has been loaded");
$('#block-bartik-page-title').append("");
// Calling AJAX.
$.getJSON('https://baconipsum.com/api/?callback=?',
{ 'type':'meat-and-filler', 'start-with-lorem':'1', 'paras':'4' },
function(baconTexts) {
if (baconTexts && baconTexts.length > 0)
{
$("#bacon-text").html('');
for (var i = 0; i < baconTexts.length; i++)
$("#bacon-text").append('' + baconTexts[i] + '
');
$("#bacon-text").show();
}
});
});
})(jQuery);
But let’s give it some movement thanks to the bizarr errrr…dynamic functions provided by jQuery. We are going to rethink a little this initial script to make a progressive loading of the Bacon Ipsum welcome paragraphs.
First of all, we will put a button. We’ve already stained the rendered page too much and we’re going to leave the view clean before playing with bacon:
// Creating the new elements just a div and a button.
$('#block-bartik-page-title').append("");

$('#block-bartik-page-title').append("");
Next, we will add a click event to that button so that when it is pressed, it will start processing bacon:
// Adding a click event to the former button.
$('#getting-bacon').click(function () {

  // Processing bacon.

});
In case we already have bacon loaded, we take care of cleaning the div:
// Hidding the block for the next load.
  $("#bacon-text").hide();
And we go ahead to process out bacon requests:
// Getting values in JSON format.
  $.getJSON('https://baconipsum.com/api/?callback=?',
    {'type': 'meat-and-filler', 'start-with-lorem': '1', 'paras': '4'},
    function (baconTexts) {

    // We're in the callback function for success in JSON request.
      if (baconTexts && baconTexts.length > 0) {

        $("#bacon-text").html('');

        // Loop into the received items.
        for (var i = 0; i < baconTexts.length; i++) {

          // Creating the naming keys.
          var bacon_id = "bacontext_" + i;
          var new_bacon = "" + baconTexts[i] + "";

          // Add the new element to the div mother.
          $("#bacon-text").append(new_bacon);
        }
      }
    });
">
To make the subject a bit more dynamic, we added one of jQuery’s less poisono…emm…more discreet animations with a confirmation message and the .slideDown() function from jQuery, which vertically scrolls the content from top to bottom:
// Show the div mother show in a progressive way.
$("#bacon-text").slideDown(7000, function(){
  console.log("New bacon has been loaded");
});
And when you reload everything, you see the completeexecution of all the JavaScript on the page:
Here you have the code formatted as a gist:
6- Drupal Behaviors
In this guide, we already know how to integrate JavaScript in our modules and projects, how to create interactions, passing parameters between PHP (server) and JavaScript (client), integrating jQuery in our dependencies and as a final step to prepare the last step that should integrate all the above, we must talk about the concept of “Drupal Behaviors”.
What is a Behavior? It’s the organized way that Drupal offers us to add and index behaviors based on JavaScript, through the extension of an own hook_behavior object that is part of another global Drupal JavaScript object.
6.1- Anatomy of a Behavior
We will review the basic functional structure of the Behavior itself, as this format becomes the essential form of Drupal’s JavaScript integration and it is in our interest to know its parts first. Let’s see.
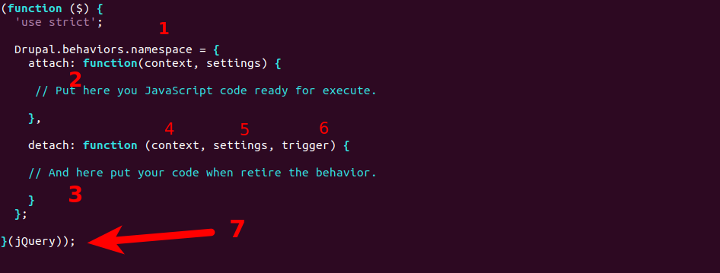
Let’s have a look.
namespace: A Drupal behavior has to have a specific and unique name in order to be located, identified, executed and removed. It will become part of the Behaviors object and will be indexed there. In this case it is simply named “namespace”.
attach: This is the function to be executed as soon as the Behavior is loaded. For the executions of Behaviors, it will be gone through the indexed behaviors and for each one will be called its function"attach”, each one doing what it has to do.
detach: As when adding, a function is provided to be executed when the behaviour is removed from the behaviour log.
context: It’s a variable where the piece of the page that is being transformed is loaded. In an initial loading of the page, it will be the complete DOM, in AJAX operations it will be the corresponding HTML piece. This variable helps us to tune up more with our operations, so we must have clear how to handle it.
settings: This variable we’re seeing in the screenshot is used to transfer values from the PHP code to JavaScript and make them available in the form we saw earlier from our code. To do this we must declare the
core/drupalSettingsas a dependency of our JavaScript library.trigger: The trigger variable that is passed to the function associated to detach represents the condition for the deactivation of the behavior, where some causes are admitted:
- unload: This is the default reason, it means that the context element has been removed from the DOM.
- serialize: For forms with AJAX, where this variable is used to send the form itself as context.
- move: The element has been moved from its position in the DOM from its initial location.
- jQuery: In this case, this point just represents the passage of parameters to the IIFE, usually (jQuery, Drupal) as integrated dependencies available for our code.
6.2- The global object “Drupal”
As stated in the official Drupal documentation, Drupal.behaviors is an object that is by itself part of the global JavaScript object “Drupal”, created for the entire running Drupal instance. This was a concept already used and exploited in previous versions of Drupal, with some aspects remaining over time.
The main one: that the modules that want to implement JavaScript must do so by adding logic to the Drupal.behaviors Object. Let’s see how, and let’s know the basis of Behaviors: the global object “Drupal”.
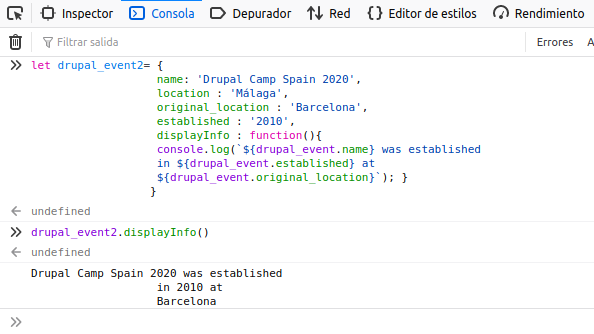
If you know the concept of “Object” in JavaScript, you will know that it’s an advanced way of handling data in JavaScript, and basically, it consists of a disordered collection of related information: primitive data types, values in properties, methods… everything designed under a basic structure of key pairs: value.
// Basic example for a JavaScript Object.
    let drupal_event= {
    name: 'Drupal Camp Spain 2020',
    location: 'Málaga',
    original_location: 'Barcelona',
    established: '2010',
    displayInfo: function(){
         console.log(`${drupal_event.name} was established in
                      ${drupal_event.established} at
                      ${drupal_event.original_location}`);
     }
 }

 // Shows feedback by Console.
 drupal_event.displayInfo();
This object is perfectly executable in the JavaScript console of your browser, and will work as expected:
Read more about objects and properties in JavaScript: geeksforgeeks.org/objects-in-javascript/.
Objects in JavaScript can be browsed, modified, deleted and above all (for the reasons we are dealing with now), extended. This is exactly what will happen with our new friend, the global object “Drupal”, an existing resource -always- in any Drupal site installed from the drupal.js library present in the /core/misc/ path:
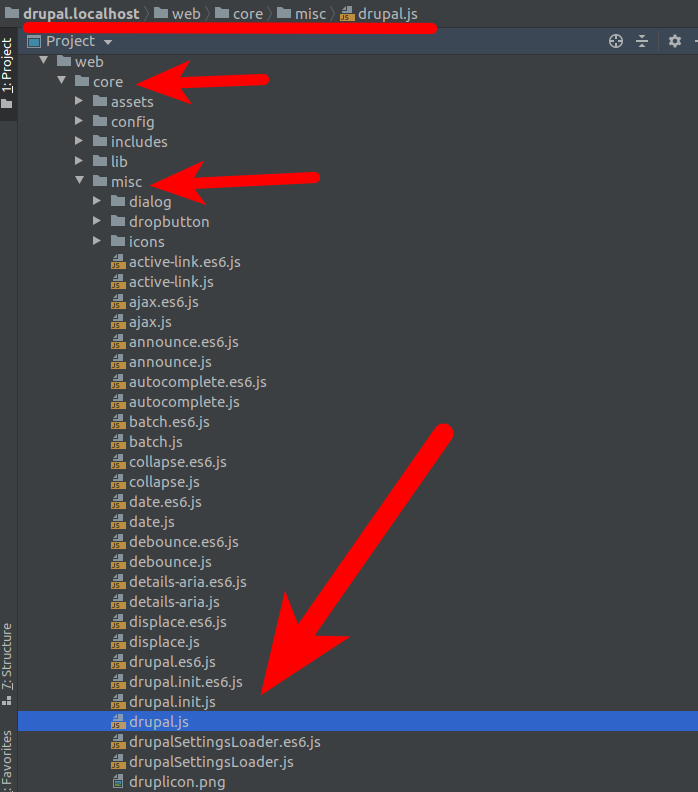
Here in the previous image we see the file (a fundamental script in Drupal), which serves to provide centrally various JavaScript APIs in Drupal and to provide a common namespace to group all the extensions that will be added to the global object. In fact, if you call the global Drupal object, you will be able to see the base content it brings:
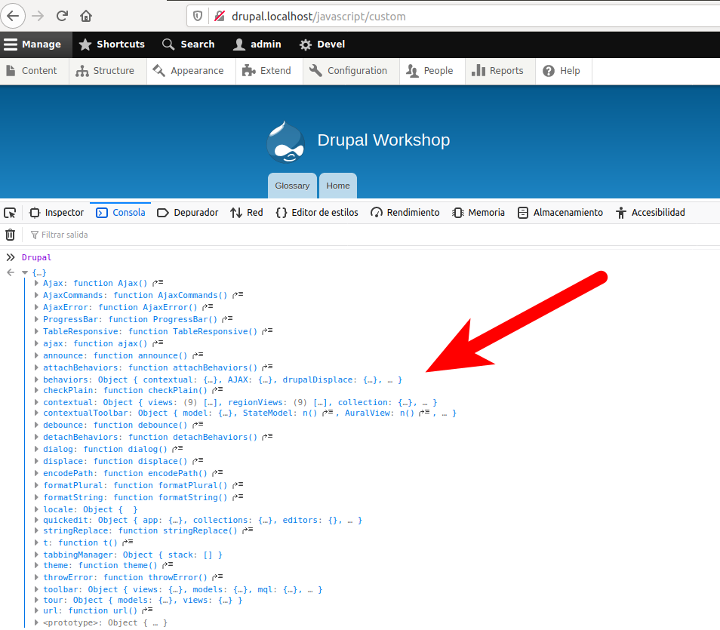
Of all the previous list, perhaps it is Drupal.behaviors and its related methods (attachBehaviors, detachBehaviors) that are most important to us now, although we should point out some interesting utilities:
Well, we’ve already seen a little piece of theory to gain context…it’s time to practice a little. Let’s extend what we already know how to do with a new exercise:
Exercise 9: Dialog window from the global object “Drupal”
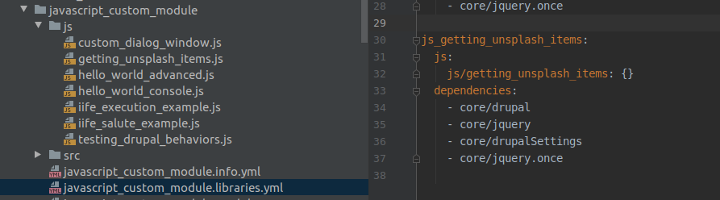
We will take the Drupal dialog API as a reference to build a window into our project through our custom module. To begin with, we are going to register a new library in our custom javascript_custom_module module, inside the javascript_custom_module_libraries.yml file, which will now look like this:
js_hello_world_console:
  js:
    js/iife_execution_example.js: {}
    js/hello_world_console.js: {}
    js/iife_salute_example.js: {}

js_hello_world_advanced:
  js:
    js/hello_world_advanced: {}
  dependencies:
    - core/drupalSettings

js_custom_dialog_window:
  js:
    js/custom_dialog_window: {}
  dependencies:
    - core/drupal
    - core/jquery
    - core/drupalSettings
Next we load the new library as #attached in our render array returned by the Controller, from line 55 in the file CommentsListController.php :
$final_array['welcome_message']['#attached']['library'][] = 'javascript_custom_module/js_custom_dialog_window';
And we’ll build a very basic modal window, based on pure JavaScript. This dialogue will only have a simple message and a button to interact, in which we will include a style change on the element containing the message.
Let’s see the new file custom_dialog_window.js :
function () {
  'use strict';

  // Put here your custom JavaScript code.

  // First creating and initialising the new element.
  let new_tag = document.createElement("P");
  new_tag.setAttribute("id", "my_p");
  new_tag.innerHTML = "Hello World from a custom Dialog Window.";

  // Then we'll creating a new modal window.
  Drupal.dialog(new_tag, {
    title: 'Custom Dialog Window',
    buttons: [{
      text: 'Change colour',
      click: function() {
        let change_colour = document.getElementById("my_p");
        change_colour.style.backgroundColor = "red";
      }
    }]
  }).showModal();

})();
You can review all the JavaScript associated with the global object “Drupal” thanks to the great documentation Théodore Biadala (@nod_) published years ago about the Drupal JavaScript API:
http://read.theodoreb.net/drupal-jsapi/index.html
6.3- Behaviors in Drupal
In a previous section, we already saw how to run jQuery in our code. We also know that it is important to check if the document (DOM) has already been fully loaded before starting to perform actions. Basically:
(function ($) {
  'use strict';
  $(document).ready(function() {
   // Put here your jQuery code.
  });
})(jQuery)
But let’s think carefully about this execution: it will be performed when the DOM has been loaded completely (at an initial moment), but it will not make adjustments after a partial loading of the DOM (for example, after an AJAX execution that modifies only a portion of the DOM). We need another idea. See the next example:
(function ($, Drupal ) {
  'use strict';

  // Put here your custom JavaScript code.
  Drupal.behaviors.unsplash_connector = {
    attach: function (context, settings) {
          console.log("Loaded Unsplash Behavior");

    },

    detach: function (context, settings, trigger) {
    // JavaScript code.
    }
  }


})(jQuery, Drupal);
This code, when executed, will make several print calls in Console (in this case, up to three times):
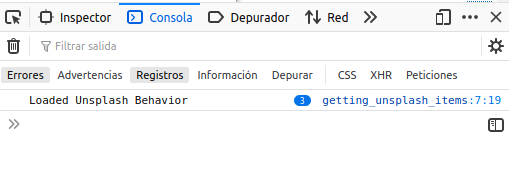
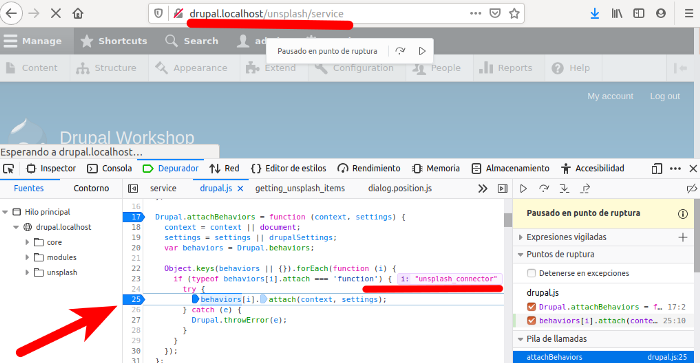
Why is this? Well, as we can see using breakpoints in the JavaScript debugging console of our phavorite browser, the loading of behaviors by the global Drupal object is done several times during the loading process of a single link: in this case there is a “full” loading of the DOM and several “partial” reloads through AJAX. In each case, a processing of behaviors is done through the method:
Drupal.attachBehaviors (line 17, library drupal.js)
Which loads a function that runs through all the behaviours and executes them according to their context and parameters:
The next step is to put some control on the execution of the instruction, passing it from an active mode (that writes in the console just when loading) to a reactive mode (that writes only when an interaction takes place):
(function ($, Drupal ) {
  'use strict';

  // Put here your custom JavaScript code.
  Drupal.behaviors.unsplash_connector = {
    attach: function (context, settings) {
      $('#unsplash_section', context).click(function() {
        console.log("Loaded Unsplash Behavior");
      });

    },
  }


})(jQuery, Drupal);
So now we have placed over the ID selector of our welcome message a click control event, which when clicked loads a message into the console:

With this small example above, we have seen how to add a small event-based (click) functionality. Let’s go on to do something more interesting.
Exercise 10: Image Board from Unsplash using Drupal.behavior
We will implement a functionality that operates by consuming an external API through Drupal Behavior.
We are going to practice with a slightly more advanced (and more beautiful) idea: we will connect to the public API for applications of an online image stock service from a new Drupal Behavior and from there we will make image requests that we’ll show then from a custom image board in our Drupal.
What do we need? Well for this recipe we will need the following ingredients:

A new JavaScript library within our custom module with its own .js file to store this Behavior:
A new route set declared in the routing file, a new controller class and a method that generates a render array as response:
To facilitate the following integrations, we are going to add to the render array a couple of properties (#prefix, #suffix) to add a new
Now with these ingredients, we’ll start. First we create the skeleton of our Behavior and define what we only want to be loaded once (and not reloaded with AJAX):
(function ($, Drupal) {

  'use strict';
  Drupal.behaviors.getting_unsplash_items = {
    attach: function(context, settings) {
      $(context).find("#unsplash").once('unsplashtest').each(function() {

        // All our new functionality.
        });
      }
 };
})(jQuery, Drupal);
Remember: the term we provide to jQuery.once() is totally random and non-repeatable, just to trace internally that the action already happened.
First part: We create a welcome message and two buttons: one to start an image search process and another one to clean the image board generated from the search and the results.
// Adding the buttons through jQuery.
$("#unsplash", context).append("" );
$("#unsplash", context).append("" );
// Adding an event listener to the new buttons using jQuery.
$('#load_button').click(function() {
// In case of click we will clean the former message.
$("#message", context).remove();
// In case of click we will call to the prompt window.
processingKeywords();
});
// Adding a second event listener to the clean button.
$('#clean_button').click(function() {
// In case of click we will clean the written former message.
$("#message", context).remove();
// And we will remove the entire image board too.
$("#image-board").remove();
});
As we can see in one of the previous calls, the image search process from the introduction of a keyword begins to be delegated to functions, started by the processingKeywords() function and we launch a prompt to capture the keyword and make sure to check if empty terms are being accepted:
function processingKeywords(){
let message = '';
let option = prompt("Please write a keyword for search: ", "boat");
if(option == null || option == ""){
// Null option without response.
message = "Sorry but the keyword is empty.";
// Render in screen the message from the prompt.
$("#unsplash", context).append("" + message + "
");
}else {
// Valid answer launches request.
message = "Ok, we're searching..." + option;
// Render in screen the message from the prompt.
$("#unsplash", context).append("" + message + "
");
// Launching external request with some delay with arrow format.
setTimeout(() => {
gettingImages(option);
}, 4000);
}
}
And we call the function responsible for managing the requests, gettingImages(), with the keyword as a parameter. We will use async / await to avoid problems of uninitialized variables in case the service was delayed. We also give a little delay to the call of the next function.
async function gettingImages(keyword){

// Loading basic values Access Key and End Point.
const unsplash_key = 'YOUR APP KEY';
const end_point = 'https://api.unsplash.com/search/photos';

// Building the petition.
let response = await fetch(end_point + '?query=' + keyword + '&client_id=' + unsplash_key);

// Processing the results.
let json_response = await response.json();

// Getting an array with URLs to images.
let images_list = await json_response.results;

// Calling the createImages method.
creatingImages(images_list);

}
At last we’ll invoke the function that will take the image address list and we will build the corresponding HTML tags:
function creatingImages(images_list) {

 // If a former image board exists we will delete it.
  $("#image-board", context).remove();

 // Creating a new image board as frame for the images.
 $("#unsplash", context).append("");

  // We will add some CSS classes for styling the image board.
  $("#image-board").addClass("images-frame");

  // Now we will set the received images inside the new board.
  for(let i = 0; i < images_list.length; i++){
    const image = document.createElement('img');
    image.src = images_list[i].urls.thumb;
    document.getElementById('image-board').appendChild(image);
  }

  // When finished we will put a border for the image board.
  $(".images-frame").css({'background-color': '#babb8f', 'border': '5px solid #1E1E1E'});
}
Note: If you are looking for information about the use of jQuery.once(), remember the transition in its use from Drupal 7 to Drupal 8 and 9 for the passage of functions as a parameter ->
// Example of use in Drupal 7
$(context).find(".element").once("random-key", function () {});

// Example of use in Drupal 8 || 9
$(context).find(".element").once("random-key").each(function () {});
Read more about jQuery.once():
And so, if we go in our test Drupal on the path:
http://drupal.localhost/unsplash/service
We will already have available the new image board obtained from the Unsplash API and built from a Drupal Behavior:
Here you have available the complete code of the Behavior that we have just implemented:
7- JavaScript without JavaScript: #ajax, #states
It was necessary, at least, to make a review on these knowledge areas where JavaScript is of indirect handling and execution. It is there but it is not seen. The subject is so extensive and can reach a level that would require more articles about the topic, so I will limit myself to make a review of some keys and launch the “to be continued…” for later (or maybe this article would never see the light).
7.1- (Brief) Introduction to AJAX in Drupal
The Ajax API in Drupal contains such an extensive set of classes, events, resources and possibilities that you can make several articles of the extension of it just about using Ajax. Due to the limitations regarding the extension of this tutorial, we will focus on some basic keys, leaving for later the possibility of preparing an article on more advanced issues.
Here you can check it out the AJAX API in Drupal.
We can use, at a basic level, Ajax for three well known formulas:
In links: using the class ‘use-ajax’ in a link, we can give you Ajax treatment.
In form elements: We can add Ajax events to our form elements by using the #ajax property within a render array definition.
In form buttons: adding the class ‘use-ajax-submit’ in the element declaration, we will make a call with Ajax.
Let’s see one of its main uses in form elements. This is an example of AJAX actions to be performed from the change of option selected in a drop-down list, specifically one that allows to select a region, so we are using AJAX like a trigger. In this case we’re adding the #ajax property to an element in order to change its options, so we can load some related properties and after that, we’ll create a new callback function:
// Offers a select for Regions.
$form['main_region'] = [
'#type' => 'select',
'#title' => $this->t('Select Region'),
'#description' => $this->t('This will be your selected region for contact.'),
'#options' => $terms_options_2,
'#weight' => '8',
'#prefix' => '',
'#suffix' => '
',
 '#ajax' => [
    'event' => 'change',
    'method' => 'html',
    'callback' => '::loadRelatedOfficesCallback',
    'wrapper' => 'contact_form_office',
    'progress' => [
    'type' => 'throbber',
    'message' => $this->t('loading related offices'),
    ],
      ],
];
In this case I’m building a form using the Drupal Form API and I need some operations over a select element. Due to this, I’m adding a very specific block focused to AJAX:
'#ajax' => [
'event' => 'change',
'method' => 'html',
'callback' => '::loadRelatedOfficesCallback',
'wrapper' => 'contact_form_office',
'progress' => [
'type' => 'throbber',
'message' => $this->t('loading related offices'),
],
],
Here I’m specifying a event (change), a method for the event (html), a callback, marking a wrapper (the div for the element that will be changed from this one) and at last some indicators for the AJAX processing: an icon of “loading” and a message for the user.
What is happening in the callback? well, First we ask for the triggered element, by using $form_state->getTriggeringElement(). So you can get the item. Other importante step is get the css selector marked in the triggered element, by using $triggeringElement["#ajax"]["wrapper"].
/**
 * Callback function ready to get offices renewing the HTML component.
 */
public function loadRelatedOfficesCallback(array &$element, FormStateInterface $form_state){

  // Gets the initial values from the triggered element.
  $triggeringElement = $form_state->getTriggeringElement();

  // Gets more info or computed values.
  [...]

  // Gets the css selector to modify when callback ends.
  $wrapper_id = $triggeringElement["#ajax"]["wrapper"];

  // Executes changes and alterations.
  [...]

// Creates a new AjaxResponse and adds a jQuery Command for replace the item.
$response = new AjaxResponse();
$response->addCommand(new ReplaceCommand('#' . $wrapper_id, $changed_value));

return $response;
}
From the former callback, only two lines are interesting: the creation of a new AjaxResponse, using the related class: api.drupal.org/class/AjaxResponse and the load of a new command for AJAX, using the action commands defined in the AJAX API of Drupal: drupal.org/ajax-api/core-ajax-callback-commands.
These AJAX commands will add the required jQuery internally and will prepare the action without us having to add the necessary JavaScript code directly.
7.2- Rendering elements with #states property
The #states property is available for use within Drupal’s render arrays and assigned to a form element, it allows you to add certain conditions to the behavior of that element, enabling changes dynamically.
Actually, the #states property ends up being managed from the JavaScript library drupal.states available for loading as a dependency in the form core/drupal.states, which points to the path where the library /core/misc/states.js is located inside Drupal, although it’s not necessary to make an explicit load of it since the rendering system that manages the Render Arrays checks the existence of the property and if it is present, it directly assigns the JavaScript library.
The use of this property allows the creation of elements within a form that can alter their status -show, hide, disable, enable, etc.- based on conditions both of the element itself and of another element different from the form (that when one is clicked another is hidden, for example) and using jQuery syntax when declaring the selectors.
The mechanics is that we will declare actions from our side and Drupal from its side will provide all the Javascript/JQuery needed to make those declared actions happen on the fly. Everything starts with the use of #states as a property when declaring the element of the form, and from there Drupal is in charge of adding the necessary JavaScript to change elements through the drupal_process_states function which is deprecated from Drupal 8.8 and becomes part of the FormHelper class (although it maintains the same functionality).
// States that you can apply with remote conditions (origin):
empty, filled, checked, unchecked, expanded, collapsed, value.

// States that you can apply over an element (target):
enabled, disabled, required, optional, visible, invisible, checked, unchecked, expanded, collapsed.
The basic structure of a state is that of a multidimensional array with the following form:
[
  STATE1 => CONDITIONS_ARRAY1,
  STATE2 => CONDITIONS_ARRAY2,
  ...
]
Where an array of conditions, in turn, is another array that stores the conditions foreseen for the change of state of that element, through the scheme of use of conditions in #states:
'#states' => [
  'STATE' => [
    JQUERY_SELECTOR => REMOTE_CONDITIONS,
    JQUERY_SELECTOR => REMOTE_CONDITIONS,
    JQUERY_SELECTOR => REMOTE_CONDITIONS,
    JQUERY_SELECTOR => REMOTE_CONDITIONS,
    ...
  ],
)],
I the next block code we will see an example of using #states. In the context of a Form created with the Drupal Form API, we make a textfield called “Name”, reacting to the state change of a previous checkbox option. If the previous checkbox is clicked, then we make our field invisible:
$form['name'] = [
     '#type' => 'textfield',
     '#title' => t('Name:'),
     '#weight' => 1,
     '#states' => [
       'invisible' => [
         ':input[name="newcheck"]' => ['checked' =>TRUE],
          ],
        ],
      ];
8- Troubleshooting: Problems and solutions
Now in this section we are going to compile some frequent errors related to the use of JavaScript in its different modalities (vanilla, Behaviors, AJAX) and its solutions.
8.1- Slow execution due to wrong use of ‘context’
In our behaviors we must send -always- the context of execution of this. It is very important in terms of performance, since it facilitates the localization of HTML selectors.
This can be seen with another simple example, so we can observe the importance of handling the variable “context”: as we have seen in previous sections, in this value is always stored the object or part of it that has just changed (at the beginning in the first load the complete DOM, then in successive AJAX calls will be each piece of HTML modified). Not controlling this, can make that in each execution of a behavior, a selector is searched by all the document instead of its concrete zone, what can slow down the execution of the website.
Thus, a defined behavior such as this:
(function ($) {
'use strict';
Drupal.behaviors.usingcontext = {
attach: function(context, settings) {
$("#unsplash").append('Hello world
');
}
};
}(jQuery));
This code will generate the next response:
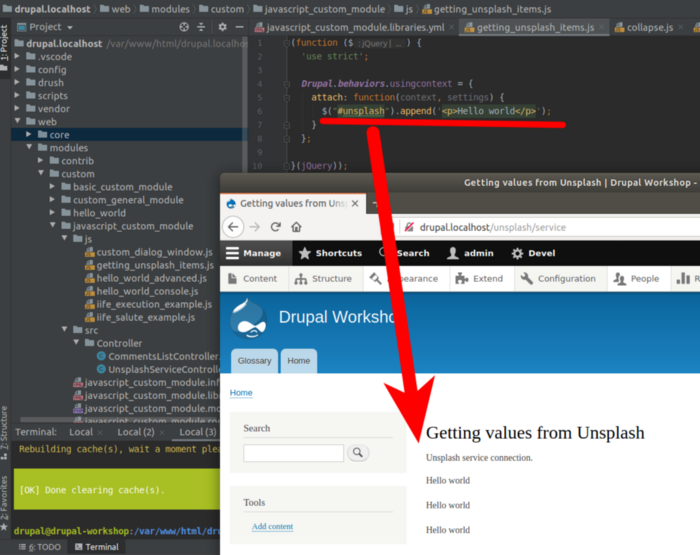
Three executions (one for each load: 1 total DOM + 2 partial AJAX). In fact, it will have a similar behavior to this one (since it will go looking for the selector throughout the document):
(function ($) {
'use strict';
Drupal.behaviors.usingcontext = {
attach: function(context, settings) {
$(document).find("#unsplash").append('Hello world
');
}
};
}(jQuery));
However, if we facilitate jQuery’s work in the best possible way, we will achieve a more efficient behavior:
(function ($) {
'use strict';
Drupal.behaviors.usingcontext = {
attach: function(context, settings) {
$(context).find('#unsplash').append('Hello world
');
}
};
}(jQuery));
This version only runs the .append() once, because:
- The selector is located the first time, where context = full DOM.
- The selector is not located again, where context = HTML AJAX piece.
And within our options we have available the use of jQuery.once() as we saw in previous sections, which has a similar operation through a random selector that we add so that it can do the internal load tracking:
(function ($) {
'use strict';
Drupal.behaviors.usingcontext = {
attach: function(context, settings) {
$('#unsplash').once('cacafuti').append('Hello world
');
}
};
}(jQuery));
If we also combine the use of jQuery.once() with our own segmentation through the “context” variable, then we obtain a more optimized execution:
(function ($) {
'use strict';Drupal.behaviors.usingcontext = {
attach: function(context, settings) {
$(context).once().find('#unsplash').append('Hello
');
}
};
Or we can use:
$('#unsplash', context).append('Hello world
');
I think the important thing is that we have to learn for managing the context variable to ease the JavaScript workload ;-). Here you have a set of rendering tests about Drupal Behaviors so you can see how it works on screen:
8.2- Loading JavaScript out of context
Another case that we have seen with some frequency when inheriting a legacy project (or a new project but without respecting the proper guidelines), is the case of loads of JavaScript libraries destined only to a specific page throughout the entire website (this happens more than we think).
Someone went through the project, received the task, googled it, solved the task as well as they could, and then the next person arrived… so, when you open the browser console, everything is a sea of warnings and red errors alerting you to JavaScript loads that cannot be done, dependencies that cannot be solved, or selectors that do not locate the elements they should. It’s time to locate the imports of our resources: what are the custom JavaScript libraries used in the project, where are they being registered and how are they being added.
This is where your ability to use your working IDE’s search engines in order to locate behaviors through the console comes into play, looking for:
- Which ones are being created.
- Which ones are being executed at that moment.

You will discover some libraries that have been added to the Theme in general and that should really only be added by #attached to only one specific page, for example.
8.3- Error: illegal choice in dynamic select
This is a typical error in custom forms created with the Drupal Form API when using AJAX, very common in scenarios where we want to create dynamic selects: we have an initial select and based on the choice made in this, we modify the options of the second select through a Callback.
It’s a classic error and very specific if you are making these fields as required fields in your form. The form validation function (even if you are overwriting your own) is re-checking the status of the form values and detecting inconsistencies. Just when we think everything is ok, we load the page, start testing and receive the following message by browser:
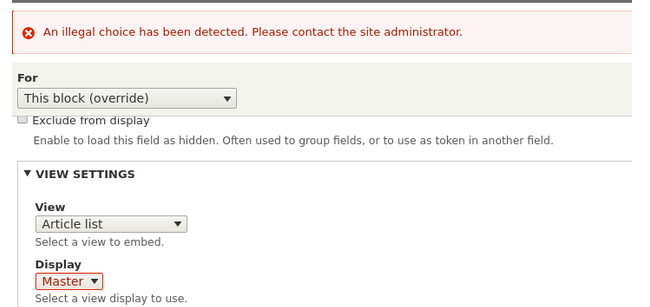
Ok, What’s going on? Basically, and in a very short way: Drupal is taking care of protecting your installation by preventing a form element from being completely replaced by a new one or directly added to the form definition outside the main function public function buildForm(array $form, FormStateInterface $form_state) in your form definition in order to avoid attacks and injections. Due to this, you have to change the implementation. Let’s see.
Think about in what I’m doing in this piece of code from a callback function:
/**
* Callback function ready to get offices renewing the HTML component.
*/
public function loadRelatedOfficesCallback(array &$element, FormStateInterface $form_state){
// Gets the initial values from the triggered element.
$triggeringElement = $form_state->getTriggeringElement();
// Gets the value from the triggered element.
$value = $triggeringElement['#value'];
// Gets taxonomy terms children by its parent using tid.
$offices = $this->getOfficesbyRegion($value);
// Gets the css selector to modify when callback ends.
$wrapper_id = $triggeringElement["#ajax"]["wrapper"];
// Builds a new updated version of the form component.
$element = [
'#type' => 'select',
'#name' => 'main_office',
'#title' => $this->t('Select Office'),
'#description' => $this->t('This will be your selected office.'),
'#options' => $offices,
'#weight' => '3',
'#prefix' => '',
'#sufix' => '
',
];
// Asks to the render service in order to convert the component in HTML pure.
$renderer = \Drupal::service('renderer');
$renderedField = $renderer->render($element);
// Creates a new AjaxResponse and adds a jQuery Command for replace the item.
$response = new AjaxResponse();
$response->addCommand(new ReplaceCommand('#' . $wrapper_id, $renderedField));
return $response;
}
Ok, but the former block doesn’t like to Drupal. It’s illegal when we’re 1) creating a new element. 2) Ask to the render servie to transform the element in HTML and 3) Loading the new element in an existing wrapper using AJAX Commands. This is problematic and It’s an approach that we should avoid.
What can we do? We can think about two options: one more secure than other. Let’s see.
Mark the element to be replaced as validate using the property
#validated' => TRUE, avoiding that Drupal reviewed this and let your change pass. Less secure.Change the focus: do not perform the replacement of the entire element on HTML, but dynamically modify the $options value array through Callback. More secure and recommended.
See this related proposal: Suppress validation of required fields on AJAX calls in Drupal 9.x
9- Links and Reading resources
In this section you will find links to guides, relevant information and related reading resources.
9.1- JavaScript fundamentals
9.2- Functions in JavaScript and the IIFE format
9.3- JavaScript and Drupal
9.4- jQuery
9.5- Snippets
9.6- Others
10- :wq!
If you have managed to reach the end of this guide linearly, congratulations! Thanks for your patience and I really hope it has been useful to you.
This guide has been published without -direct- profit, but my personal interest is that it spreads and helps my communication. If it has been useful to you, share it using the “share” of this site, putting a simple tweet. It will be important for me. Thank you.
Recommended song
About Drupal Sun
Drupal Sun is an Evolving Web project. It allows you to:
- Do full-text search on all the articles in Drupal Planet (thanks to Apache Solr)
- Facet based on tags, author, or feed
- Flip through articles quickly (with j/k or arrow keys) to find what you're interested in
- View the entire article text inline, or in the context of the site where it was created
See the blog post at Evolving Web