
Upgrade Your Drupal Skills
We trained 1,000+ Drupal Developers over the last decade.
See Advanced Courses NAH, I know EnoughIn this article, I’ll show you how to build a system to keep track of your company assets using Drupal. This system allows you to easily create and manage an equipment list with resources such as laptops, phones, monitors, or desks that are assigned to employees. It’s ideal for remote or hybrid companies, where control over issued equipment is crucial. Read the blog post or watch an episode of the “Nowoczesny Drupal” series (the video is in Polish).
Why implement a system for the equipment list?
Companies, especially those that use hybrid or remote work or have multiple offices, need to manage business assets. When employees are assigned different equipment, over time, it can be difficult to keep track of who has what devices, what has been returned, and what needs to be replaced. With a Drupal-based system, we can easily monitor each employee's inventory and identify which equipment is unassigned and can be reused.
It is also worth mentioning that this system can be built as a standalone Drupal installation, or such functionality can be added to an existing system, such as part of a company's intranet system.
Let's now move on to a step-by-step explanation of how to build such a system using Drupal as an example.
Creating data types in Drupal
We'll start by creating the data types that will further be necessary to create the views of equipment records.
Equipment types and parameters
To begin with, you need to create the types of data that will be stored in the system. Drupal makes it easy to define different types of equipment, such as laptops, phones, or monitors. We can also assign appropriate parameters, such as RAM or screen size.
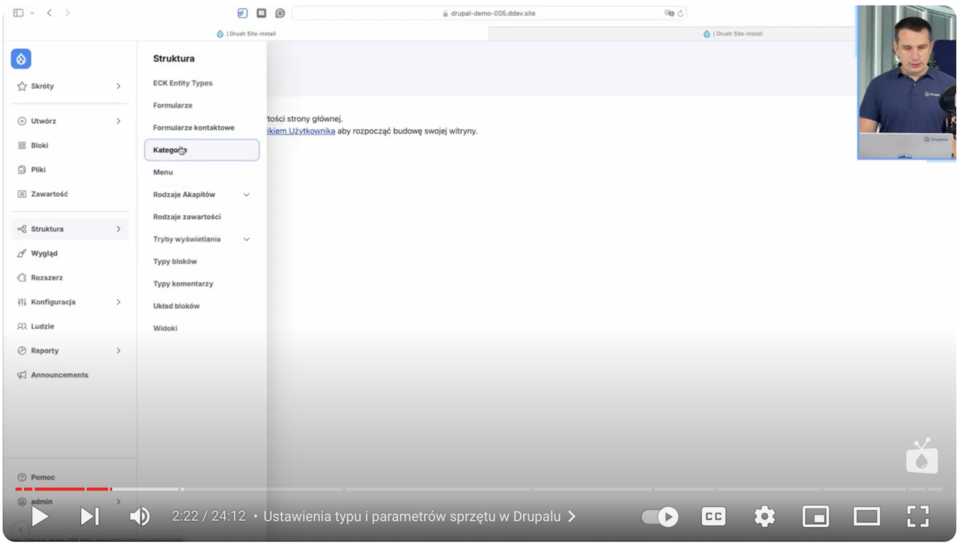
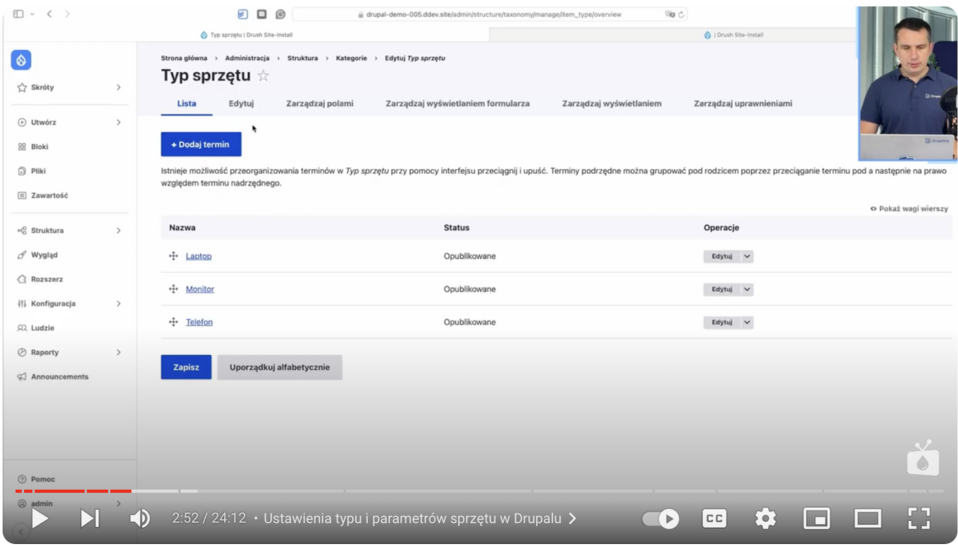
The creation of data types is done through the "Structure" tab in the Drupal admin panel. We create the equipment type as a taxonomy and the equipment parameters as further taxonomy terms that can be assigned to equipment.
Examples of equipment types:
- Laptop
- Phone
- Monitor
The second thing we’re going to specify are the parameters of the equipment. Examples of the parameters we use are:
- RAM
- Monitor size
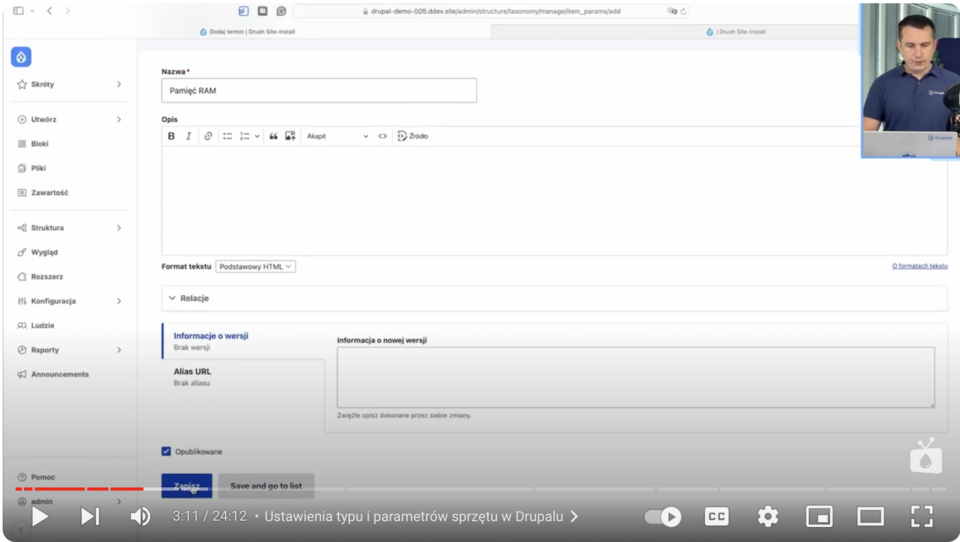
The next step will be to add an item that will determine the above parameters, such as the size of the monitor (13 inches and 16 inches) or the size of the RAM (16 GB and 32 GB). To do this, we expand our list by adding more partitions.
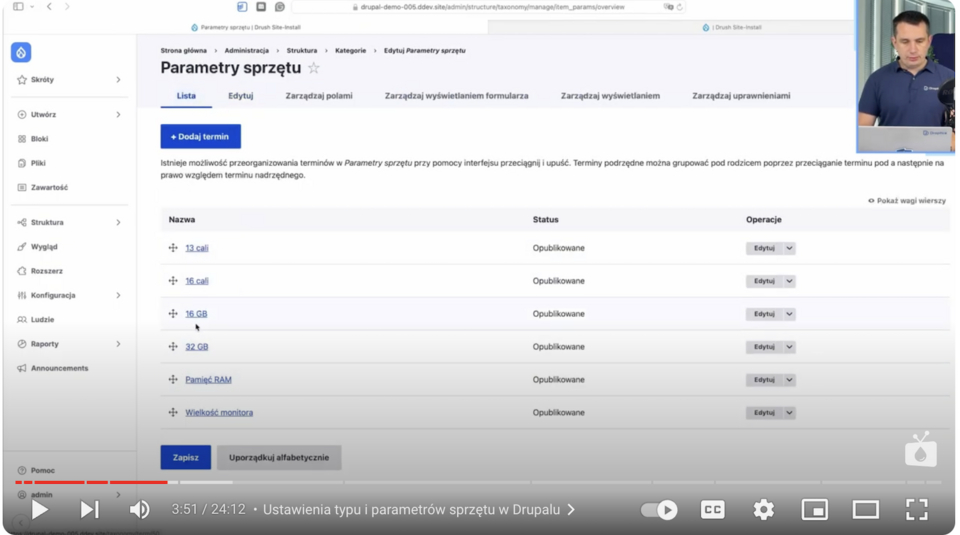
Next, we sort our items so that the appropriate parameters are under the appropriate data categories.
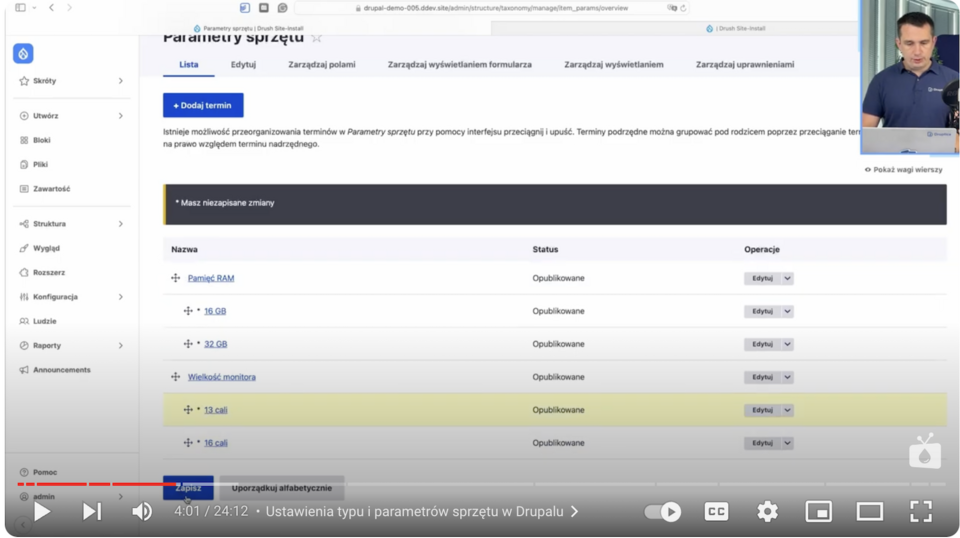
This allows you to accurately describe each piece of equipment and organize all the information.
Creating equipment entities
The next step is to create an entity that will store all the information about the equipment. In Drupal, we create a new content type - "Equipment".
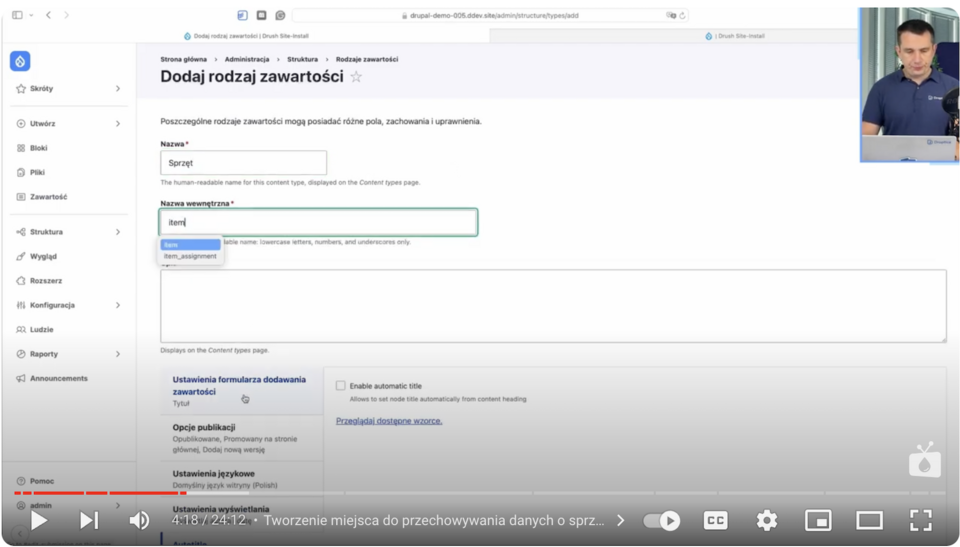
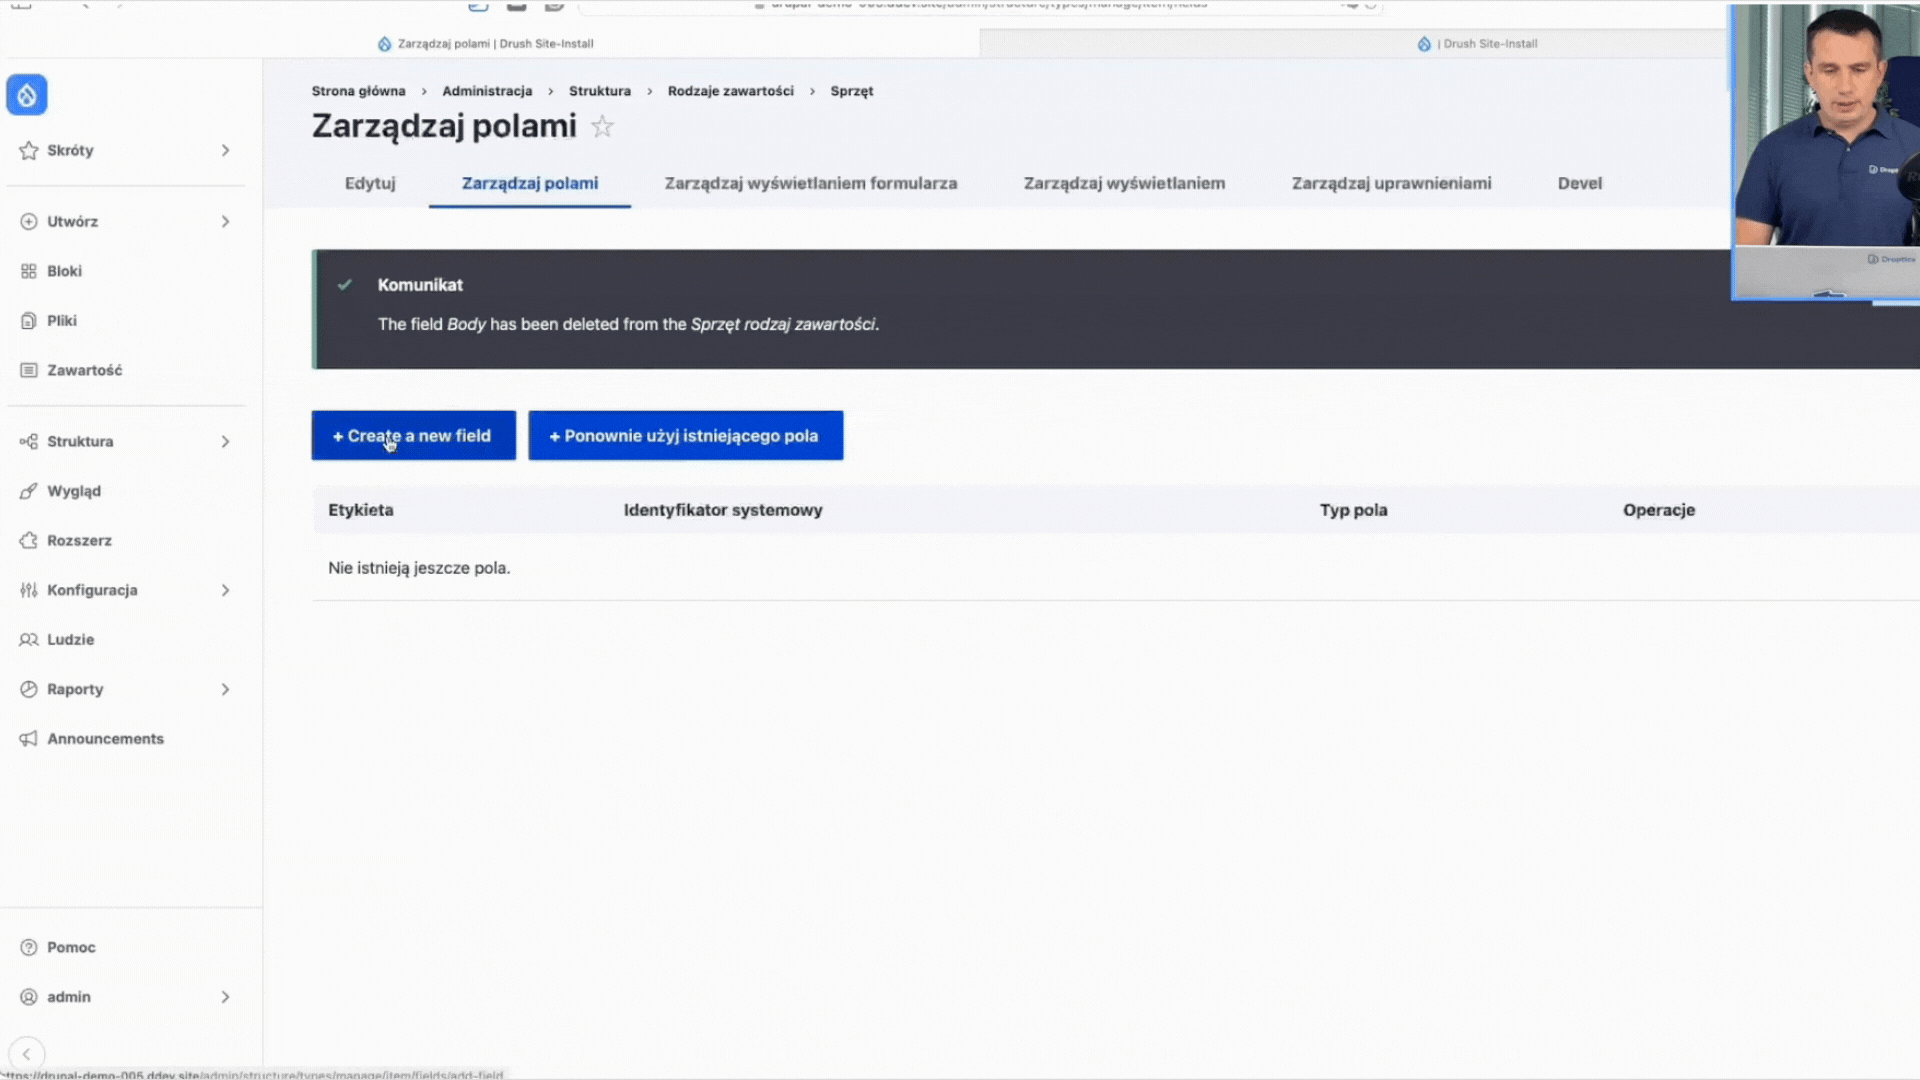
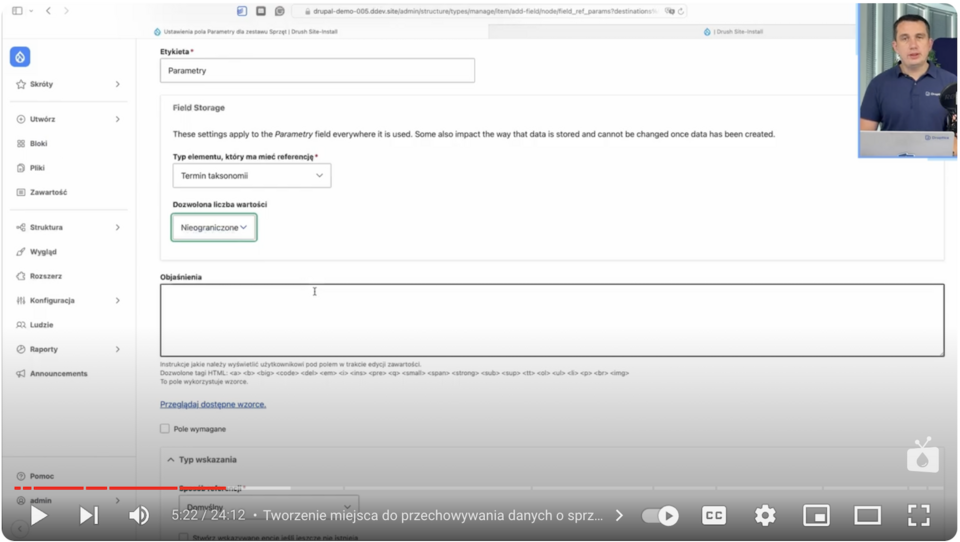
Then, in the "Manage fields" section, we click "Create a new field" and select the type of field we want to add. For parameters, we refer to the things we added earlier, that is, we add a "Reference" field to the equipment type and its parameters.
It’s important to change the allowed number of values in the parameter reference to "unlimited". This will allow you to add more than one parameter (e.g., RAM, screen size) to a given hardware.
Similarly, we’ll create a "User" field.
We can add several fields to this entity, such as:
- Equipment name - text field
- Type of equipment (laptop, monitor, phone) - reference field
- Parameters (RAM, screen size) - reference field
- Assigned user - reference field
- Serial number - numeric field
- Purchase date - a field with a date
- Purchase price - numeric field + suffix
- Invoice (possibility to attach PDF file or photo) - file upload type field
These fields can be added as needed as text, numeric, file upload, and date fields, as seen with the specific examples above. You can also use suffixes (e.g., adding PLN in the field with price) and several other additional specifications.
Here you can immediately see how many types of fields there are to use in Drupal for different data structures or types of content, and how quickly they’re built. Each of these fields can be customized to meet the specific needs of the company, making the system more flexible.
After creating such structures, we see a form with data to be filled in.
Create views to manage equipment and business assets
To make the form display aesthetically pleasing, we need to improve it by creating views.
Categorization of information
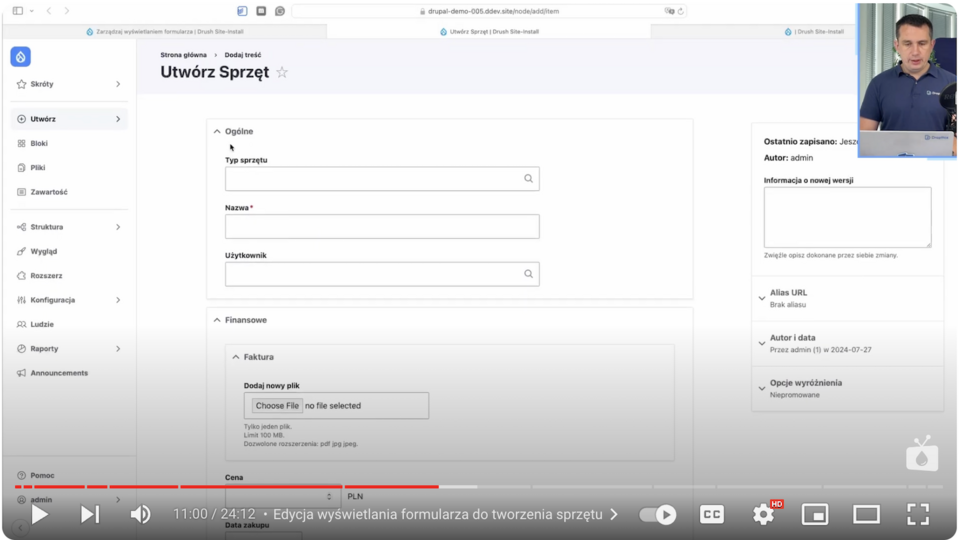
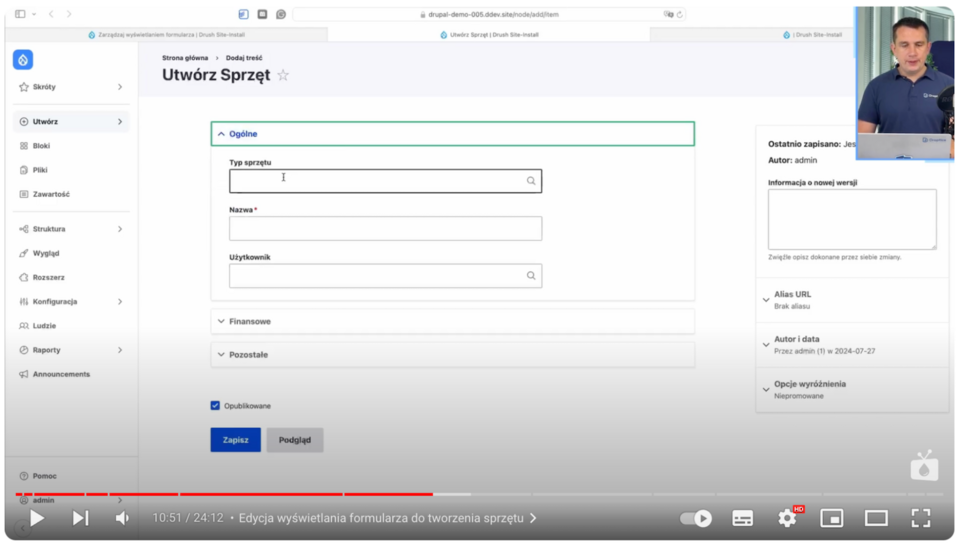
Our form has several types of data that we can group. We’ll create three groups of equipment data:
- General (name, type of equipment, user)
- Financial (price, invoice, date of purchase)
- Other (parameters, serial number)
Once saved, we’ve categorized data, making the form more readable. You can also customize these fields according to the needs we have in the company.
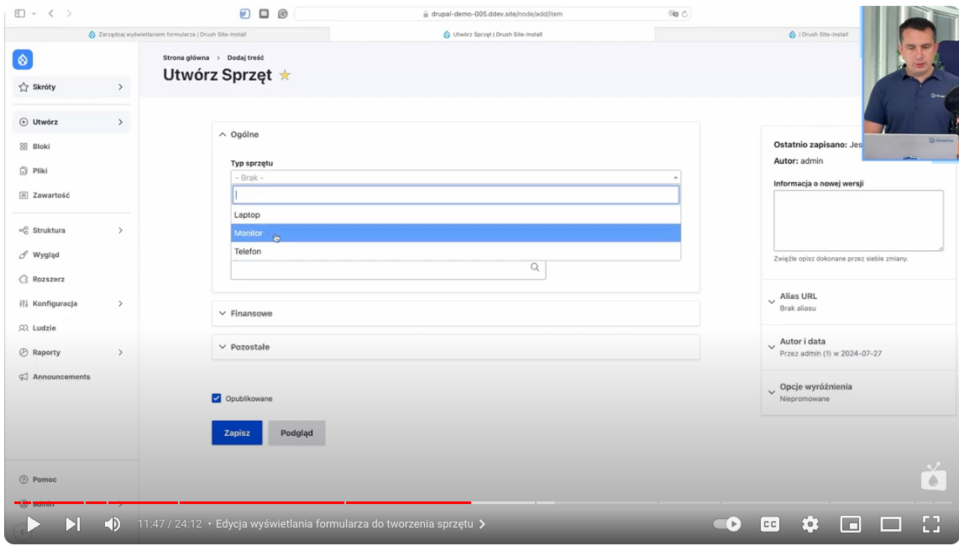
Now, we’ll make one more modification - we’ll change the field for selecting the type of equipment to select2, which will allow us to choose the types of equipment our company has listed earlier.

This gives us an interesting drop-down list that will allow us to easily select types of equipment, not only by clicking but also by typing by name, which is useful, especially when there are a lot of them.
Another modification will be to change the field in "Parameters." We’ll replace the autocomplete with a field of type Hierarchical select.

This will give us the ability to select the type of parameter with a value assigned to it accordingly.
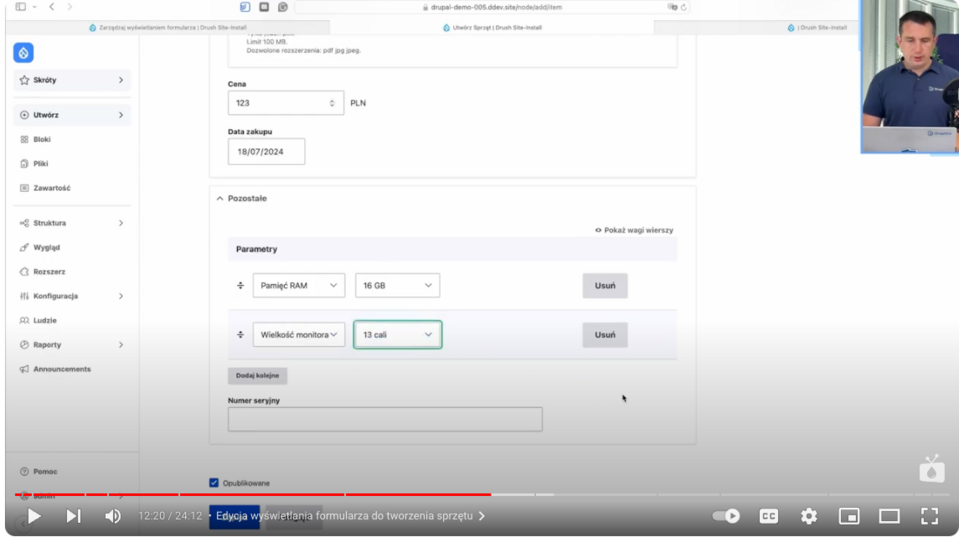
You can see here that you can modify these widgets freely, even after creating them, gaining a convenient interface for managing hardware data.
After filling in the fields and saving the data, the view of each equipment will contain the following columns:
- Equipment ID
- Name
- Type of equipment
- Parameters
- Purchase price
- Edit option
- Assigned user
This gives the person managing the list of equipment a complete overview of available resources and can easily add new company assets or edit existing data if necessary.
Views of business assets
Now, we’ll work on equipment views.
We’ll go to "Structures" and then click "Views." We’ll add a name, which is "Equipment." We’ll change the content to "Equipment," go to "Page Settings" and click "Create Page." We add a title, path, number of elements to display, and save. Now in the "Format" section, we change the display of elements to "Table."
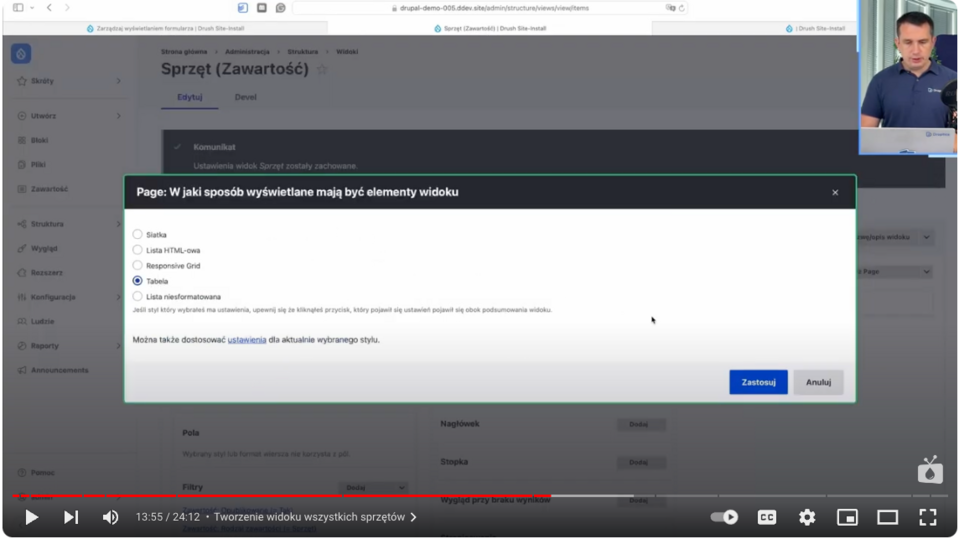
In it, we’ll add some fields, such as ID, equipment type, parameters, price, and link to edit. I leave the rest of the options as default, but of course, you can edit it as you like.
The next step is to set the order of the data in the table, we want to have the ID and equipment type at the beginning and the edit option at the end. In this step, we also add a link to add new equipment (as a header) and full sorting. We get such a user-friendly view:
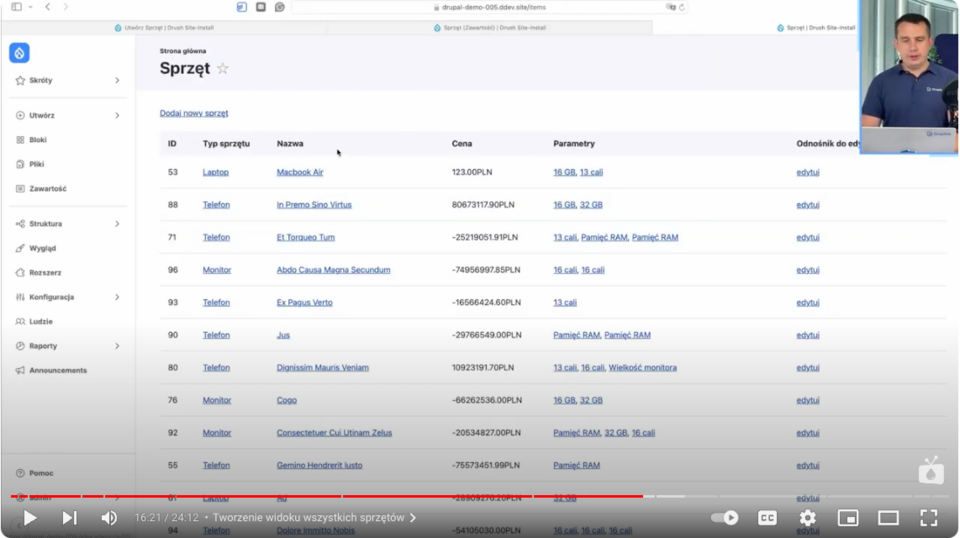
As we can see, Drupal allows advanced personalization of equipment addition forms, making it much easier for users and data entry becomes more clear and organized.
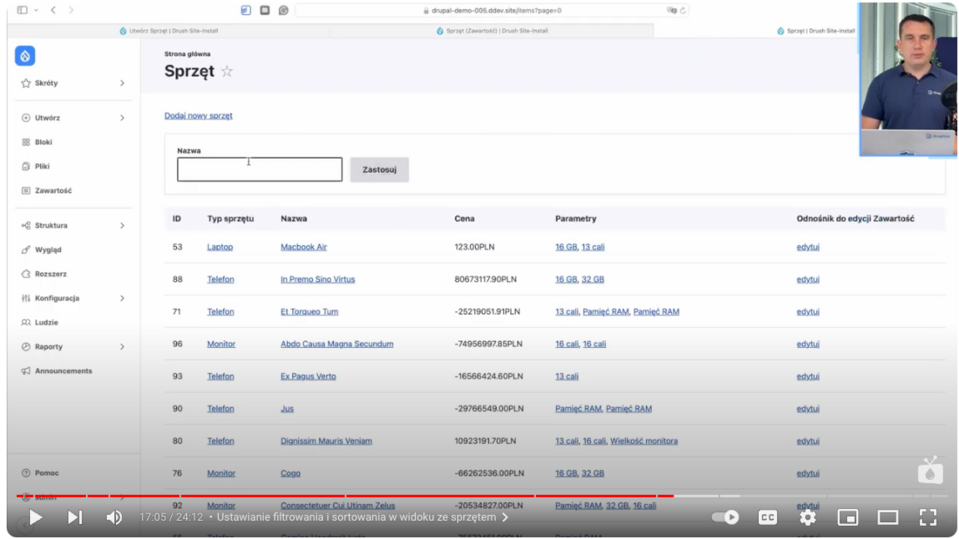
Filtering and sorting data of the equipment list
We’ll now add a data filtering option. To do this, we’ll go to the filtering configuration option and add criteria - “Filter by name.”
Next, we’ll look at adding the ability to sort the data by specific criteria, e.g., by price, ID, and name. This can be done in the display method settings:
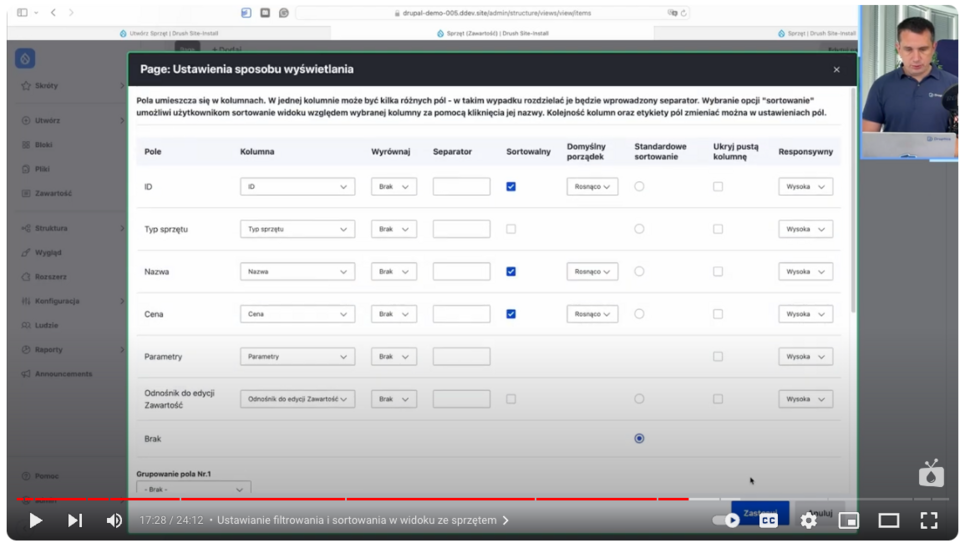
As a result, table headings have become clickable, making it possible to sort them ascending or descending:
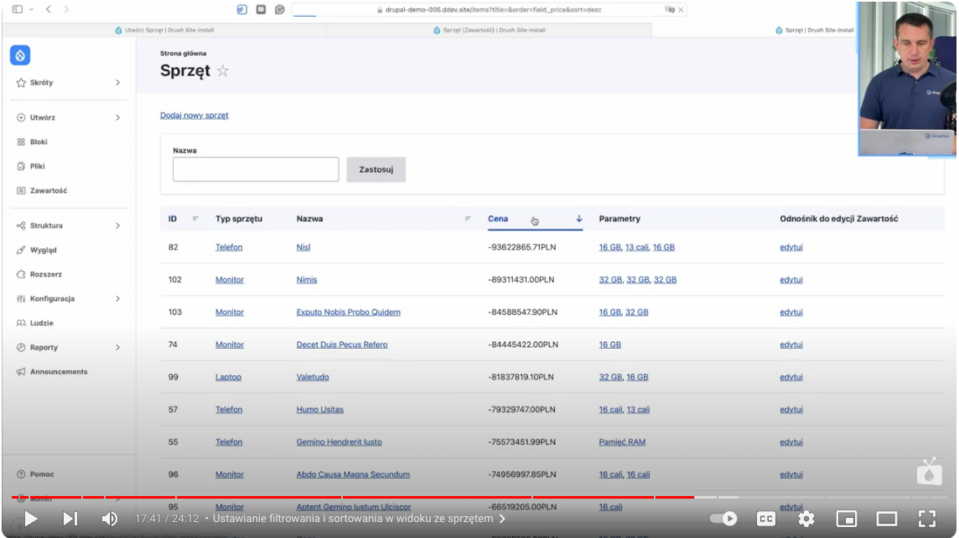
This allows the user to easily search for equipment by name, price, or other parameters. Introducing the possibility of sorting columns (e.g., by price or purchase date) significantly improves the convenience of using the system.
Create advanced views of the equipment list
Drupal allows you to further develop the system by creating more advanced views, such as:
- Equipment not assigned to the user - the view allows you to identify business assets available for release.
- Equipment without invoices - a list of equipment that lacks attached invoices, which can help you organize your documentation.
- Equipment with the parameters we specify.
To do this, copy the current view and rename it, for example, to “unassigned equipment.” Then, we add a filter to the "user" field and set it as empty. This gives us an easy view of the equipment, which is in the company and not assigned to anyone.
So we have two views:
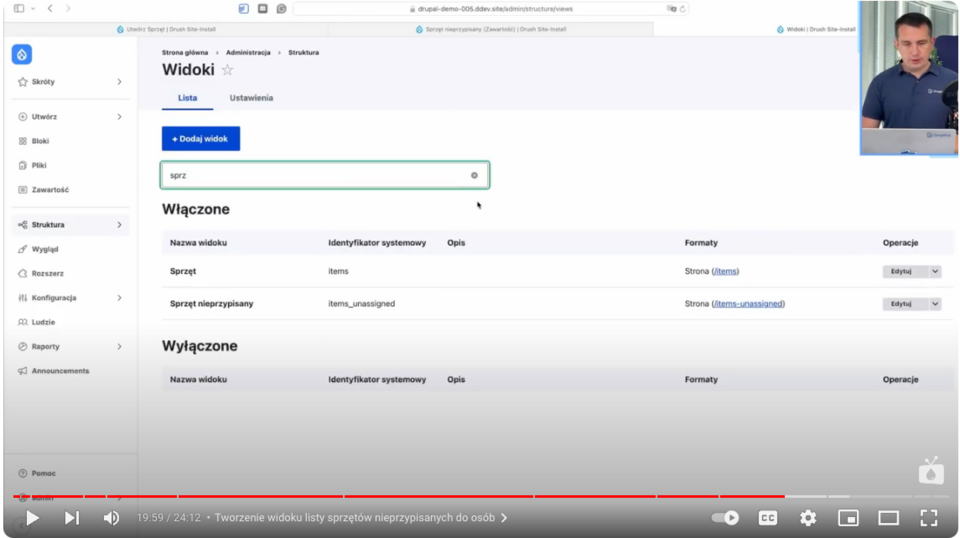
Thanks to Drupal's flexibility, it can be cloned at will, changing settings and creating further views, such as equipment without invoices or with specific parameters to suit the needs of the company or individual departments, such as IT administration or accounting.
Equipment list with company assets - summary
Setting up a company's equipment inventory system on Drupal is a task that can be done relatively quickly and without a lot of expense. Drupal offers tremendous possibilities for tailoring the data structure and functionality of the system to the specific needs of the organization. With simple tools such as content types, views, and advanced forms, we can build a system that streamlines the management of resources in a company.
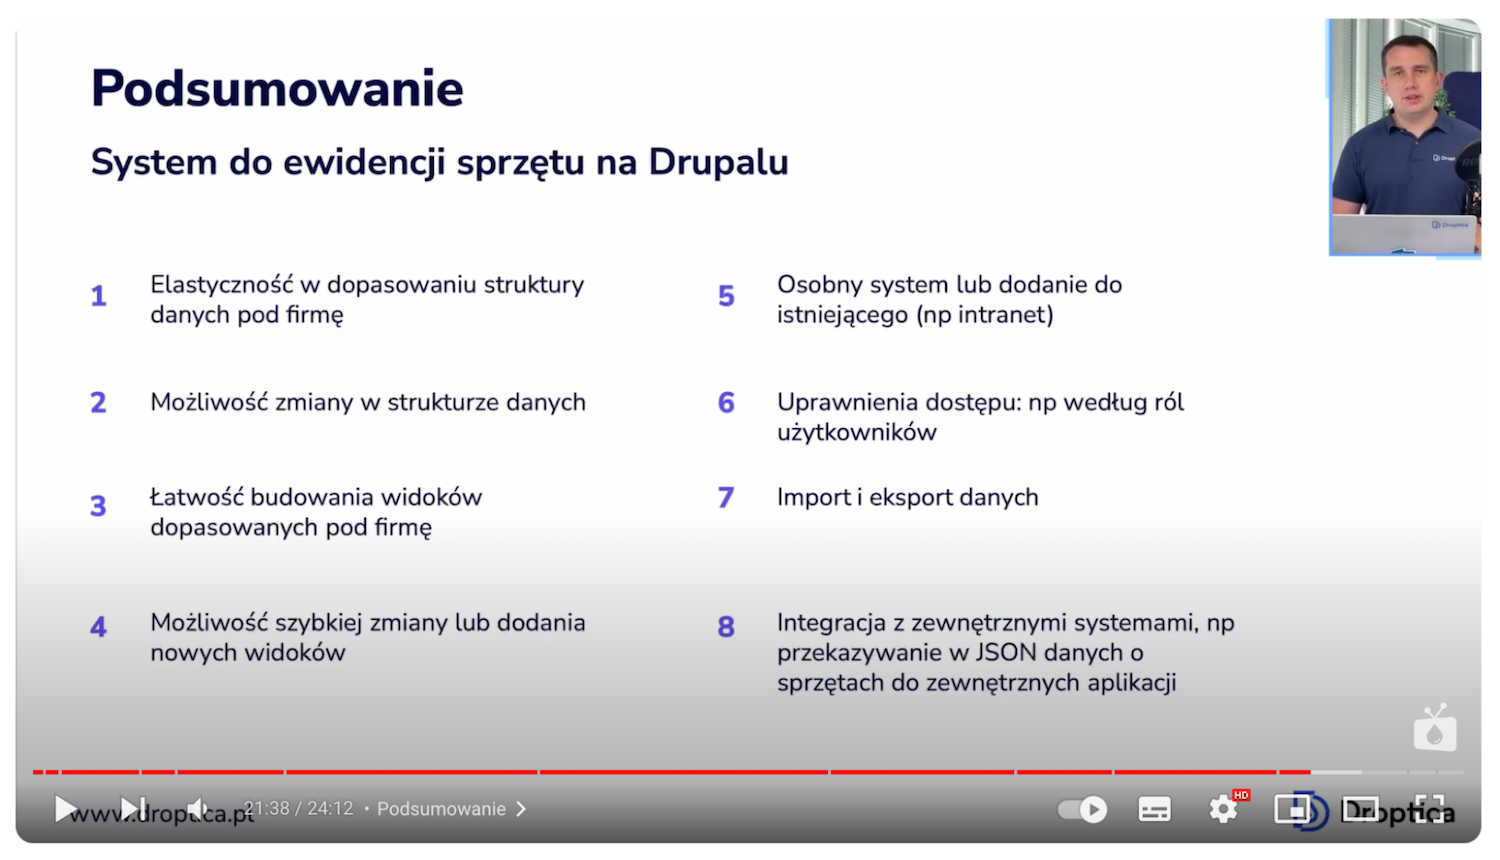
Eventually, such a system can also be integrated with other applications, exposing data in JSON format or importing it from CSV files. All this makes Drupal an excellent choice for companies that want to keep effective records of equipment.
If you're wondering if Drupal is the right technology for your business, it's a good idea to schedule a free consultation, to discuss possible solutions.
In this blog post, I'll share how you can easily and quickly create charts in Drupal using Twig's Charts and Charts modules. This guide will be especially useful for publishers, but also for anyone who would like to have a similar feature in their CMS. I invite you to read the article or watch an episode of the Nowoczesny Drupal series (the video is in Polish), where each activity is shown step-by-step.
Installation of Charts and Charts Twig modules
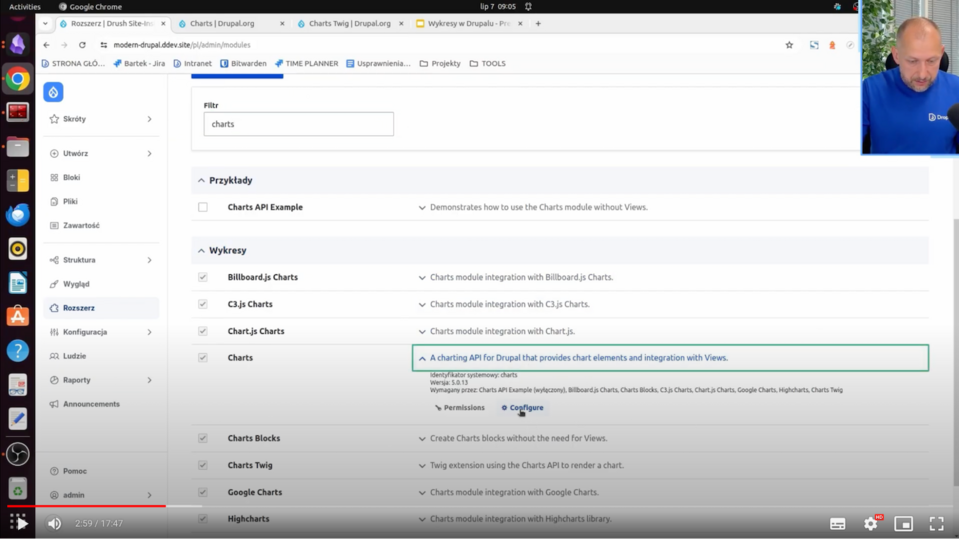
To create charts in Drupal, we only need one module. We don't need to install any additional libraries to display these charts. All we need is the Charts module. It can be further extended with the Charts Twig module.
Installation is simple and no different from other Drupal modules. You simply need to download the Charts or Charts Twig module, if you want to use Twig for our charts and install it on our website.
As we download the module to the Modules Contrib directory, it will appear in the list of all modules.
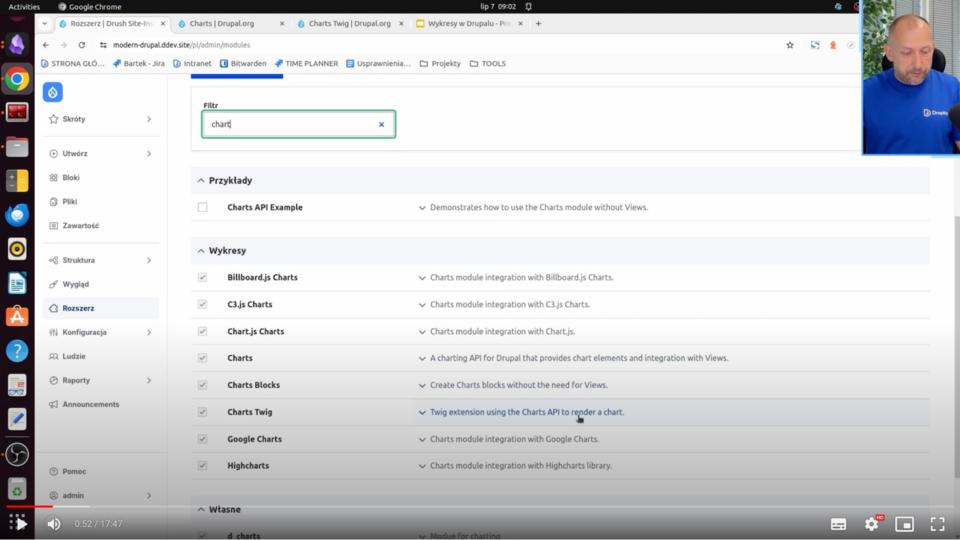
And here, as you can see, I already have Charts modules and other submodules installed, which add libraries for us to display given charts. Popular libraries such as HighCharts, Chart.js, and Google Charts are also available.
In the remainder of this article, I’ll show the configuration of the charts in question and, most importantly, how such charts are created.
Four methods of displaying charts with the Charts module
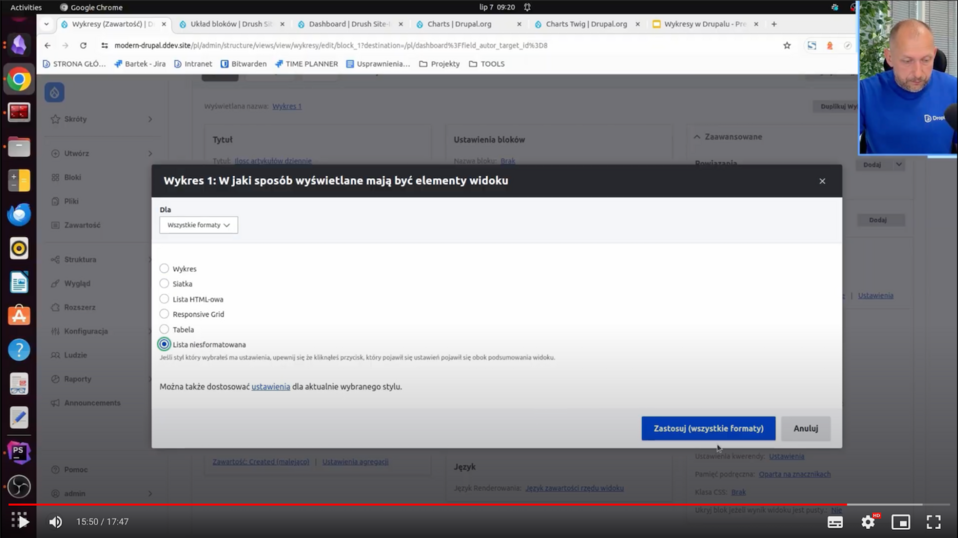
With the Charts module and Charts Twig, we can show charts in four ways.
The first and most popular way is to generate such a chart using the Views module.
The second way is to insert a block specially created for this purpose with the Charts module. There, you manually add the data you want to be on the X-axis or the Y-axis. As a result, this chart appears.
The third way is to add a field to an entity, such as content type. This field will also have the ability to manually insert the data you want to appear on the chart axes. We can also upload this data from a CSV file using the upload option.
The fourth way, which is provided by the Charts Twig module, is to generate a chart using the PHP code, Twig. We can, in some preprocess, get the data, for example, from some API, put it into Twig, and display it on the chart.
Of these four ways, in Views, that is, the Views module, and in Charts Twig (that is, PHP, data from some API) we can show the data dynamically, and with a block or field - the data is presented statically, manually is provided. And once they are provided, they "sit" there.
Configuring the Charts module in Drupal
What does the configuration of the Charts module look like? It’s uncomplicated. We go to the Extend tab. If we don't know what link to use to configure a particular module, in this case, we choose Charts, and here is such a Configure button.
And here, you can set either default or advanced values for all newly created charts.
Let's say I want it to be HighCharts and that the graphs are always linear. It’s worth noting that these are not rigid settings. Each of the ways of displaying charts, i.e. the above-mentioned Views, Block, Field, or Charts Twig, can change these settings, of course.
How to create a chart in the Charts module?
I’ll now show four ways to add a chart in Drupal.
Method 1. Create a chart with stock prices using Views
I prepared myself a content type - Stock Price. It doesn't have a reflection on actual stock prices, but the idea is to see how the stock price changes over time in this case, and show it on a chart.
What does this content type look like? The structure of the content type is Stock Price. Go to the Manage Fields section.
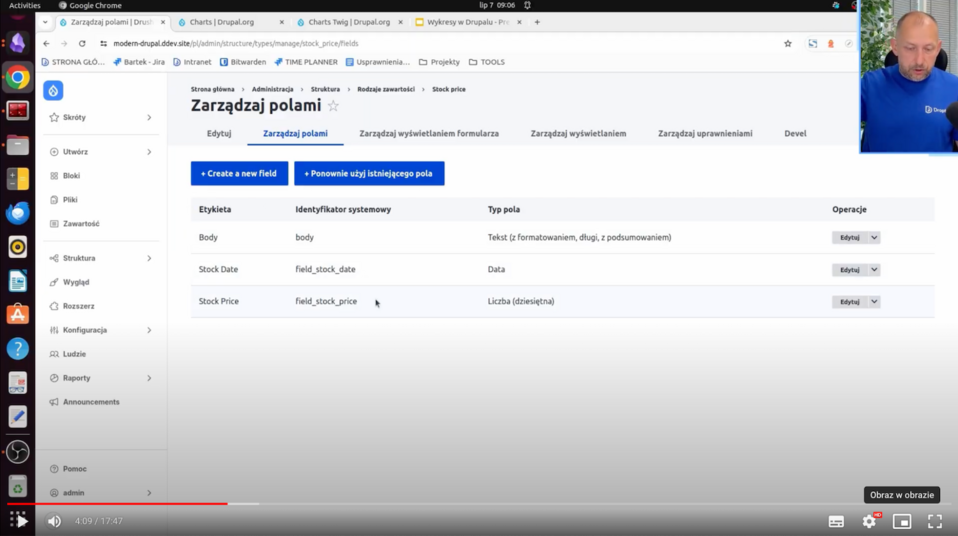
Here we have Stock Date - the date will show up on the X-axis, and Stock Price - the change in this price will show up on the Y-axis. All this will create such a cool graph of the price over time. How to do it most simply? Just by using the view.
Structure -> Views -> Add new view
I am adding a new view. I’ll call it Stock Price. It’ll create some pages with the Stock Price address. I save and change the settings for myself so that, for example, it shows me fields. For now, it’ll add a standard Title.
I’ll want to display the price and the date, which means I'm adding these two fields that are just in this type of content.
And at this point, all the contents showed me. I need to add a filter - Content type. I choose Stock price and click Apply. All the stock prices appeared to me here. I don't want the title, because I don't want it on the chart, so I just deleted this field. And with that, I have all the data I need, i.e. the date and the price.
I'll still set it by date. In the sorting criterion, I'll add Stock Date, select Sort Descending, and click Apply. The other filter, i.e. the date of addition, I’ll remove, I don't need it in this case. I will save this data.
I see that there is a date from the latest to the earliest, together with the price of the shares in question.
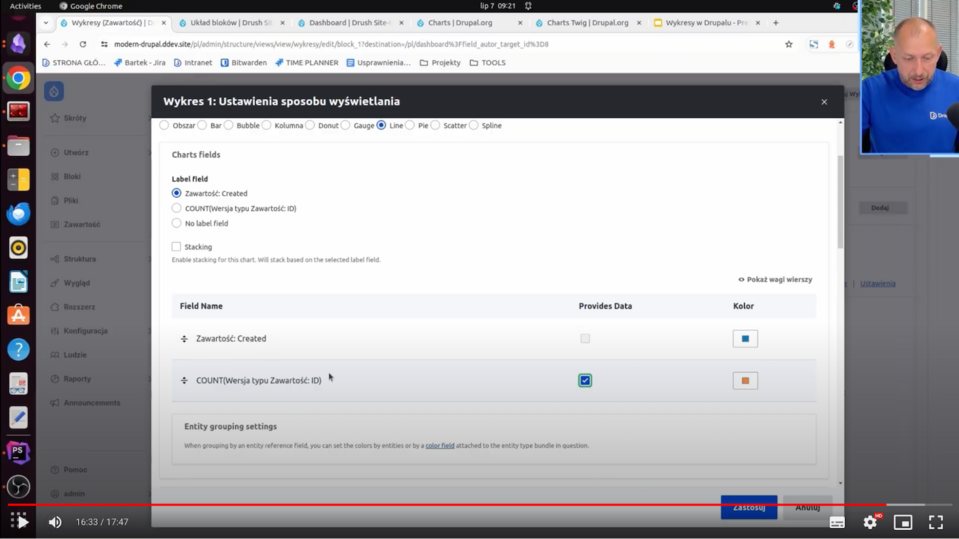
And now how to display it on a graph? Very simply. I change the format from Unformatted List to Chart, give Apply, and then I have all the settings visible above in the general settings, i.e., Highcharts, Line, etc.
I set which field should provide the data - Stock Price. Next, I have settings related to the X, and Y axes and labels. I leave as is standard, apply and a chart shows the date and price of this stock. You can also see how it changes over time - there is a downward trend.
What do the other charts look like? You can test it in the settings. You can still choose a Bar, for example, which is a bar chart.

It's less visible when it comes to stocks, but you can experiment with different types of charts. In the case of Charts.js, the line is a little thicker. You can generate such a chart very quickly.
Method 2. Display the chart in Drupal using the block
The second way you can display charts is with Block. How to do it? In a very simple way. You need to create the appropriate block.
Structure -> Block layout
In this section, for example, we need to select something like Charts block in the Place block content.
This is the type of block that is provided just by the Charts module. Just do Place block and further we find the same settings, that is, the data type of charts (let's say linear), and manually we can enter what is on the X axis and what is on the Y axis.
I enter data 5, 3, 8, 4, 13 so that it is ascending. I’ll also restrict myself to a given block so that it appears to me only on the main page, I save and it is in the content. I move it to the very top - the block displays correctly. You can see the X-axis and the Y-axis together with the values - ascending, which is the way we wanted it.
Method 3. Generate Drupal charts using Fields
The third way is to create a field, for example, in the content type.
How to do it? Very simple. First, we need to have a content type for which we want to add the field. I’ll add it to some existing content types. It will be an article.
Structure -> Content Types -> Article
I go into the Manage Fields operation and I need to add a new field that will display this chart for me. I click Create new field, select the chart, then click Continue. I have to name myself this chart - field_charts - and I save the settings. With that, this field is already added and all I have to do now is add an article.
Create -> Article
We already have the Chart field.
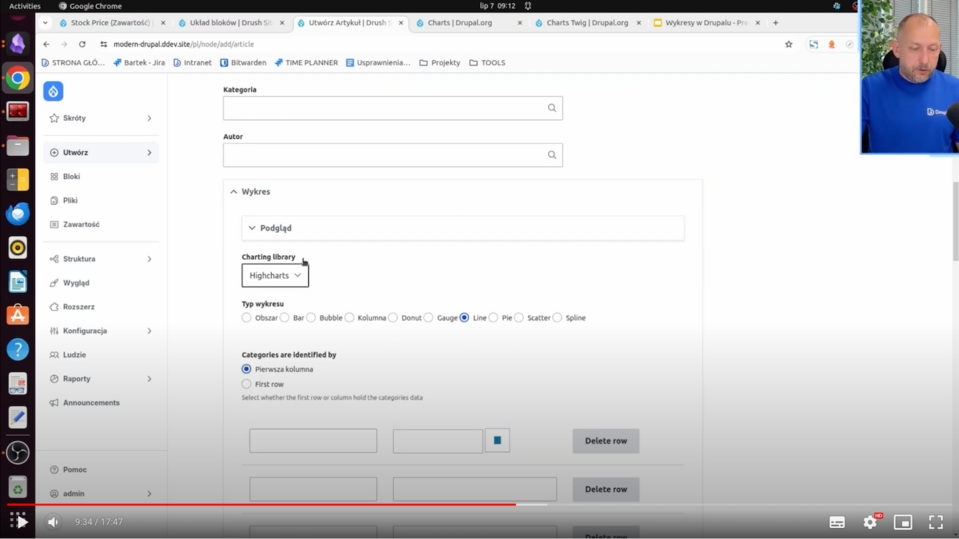
In the same way, as it was in the case of blocks, we also choose the type of a given chart and manually insert data. Here (as in the block) there is also an option to import a CSV file precisely with the data based on which a given chart will be displayed.
Method 4. Create a chart in Drupal with Charts Twig
The fourth way to display a chart is to using Charts Twig. For this, we need to have the Charts Twig module installed. I already have it.
I also already have a custom module created that will display the block for me. I’ll load Charts Twig in it with dynamically added data that will appear on this chart.
I will now move on to PhpStorm, where I created a custom DCharts module. You can generate such a module with Drush or add it manually. This is a very simple module that creates for me only a block.
Here there is a class for the block and build, which is a method that determines how the block should be built. She here just gives the information that all the content is in the Twig file - sample_chart and still passes custom data, date, and x-axis. There are sample data "10, 20, 30" from the Y-axis and labels that will be on the X-axis.
What does it look like from the Charts Twig side? It's very simple. I set the Title, I set the series, that is the variable that will be loaded into this Charts function.
The Charts function is available in Twig only after installing the Charts Twig module.
The date variable is one of the most important ones because it determines the very dynamic data that can be loaded from PHP. She comes from SampleChartBlock. Here, it is hardcoded "10, 20, 30,” but you can see that there is an option to load this data dynamically using some API, for example. Download the data from the API and display it here.
In Sample-chart.html.twig there is already a firing of this function itself. You can see the name of this chart, its type, series, and the data on the X-axis and title.
In fact, this is enough. With this, there is already a block available that will display this data to us.
To display this block, then, of course, you need to go to the block layout page and place the block in the content somewhere. It’s called SampleCharts. This is the same name that was used in PhpStorm in the name of this block.
I click Place block. There is no configuration here because the data comes from PHP. I save the configuration. The chart will probably appear everywhere now because I didn't give any restrictions.
There is SampleCharts - this is the block title. The Chart Title is the data that comes just from Twig. On the X-axis we have the "A, B, C" data, and on the Y-axis we have the data I put in there, which is "10, 20, and 30."
Additional examples of charts
I will also present some charts that are reflected in real life, e.g., on pages for publishers.
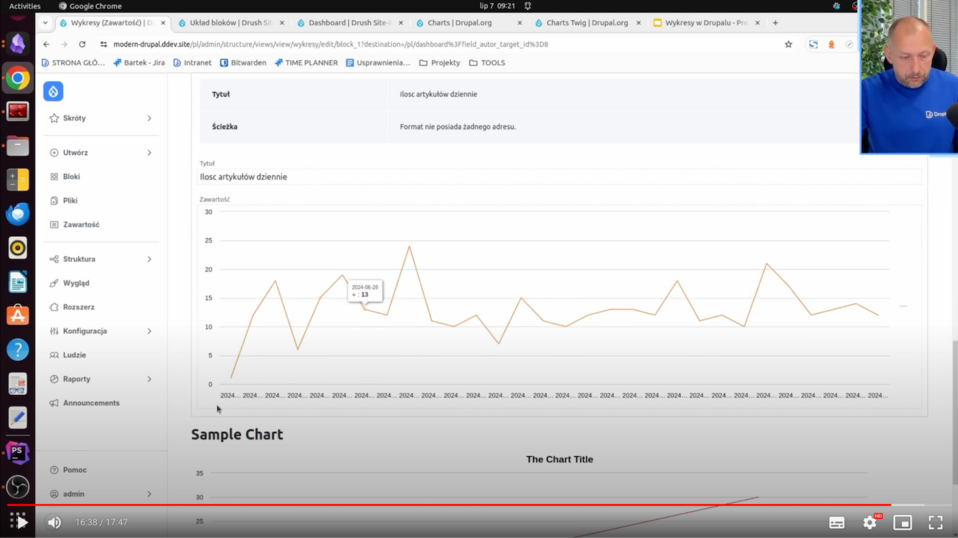
I have already prepared such views that present:
- The number of articles added per day,
- The number of articles added per day by category,
- The number of articles added per day by author.
These charts reflect reality for publishers and editors who want to know how progress is going in creating content by given authors or in given categories.
You can also see exactly how and what is being added. For example, by category - you can see that June 24 was a strong shot when it comes to articles on Drupal:
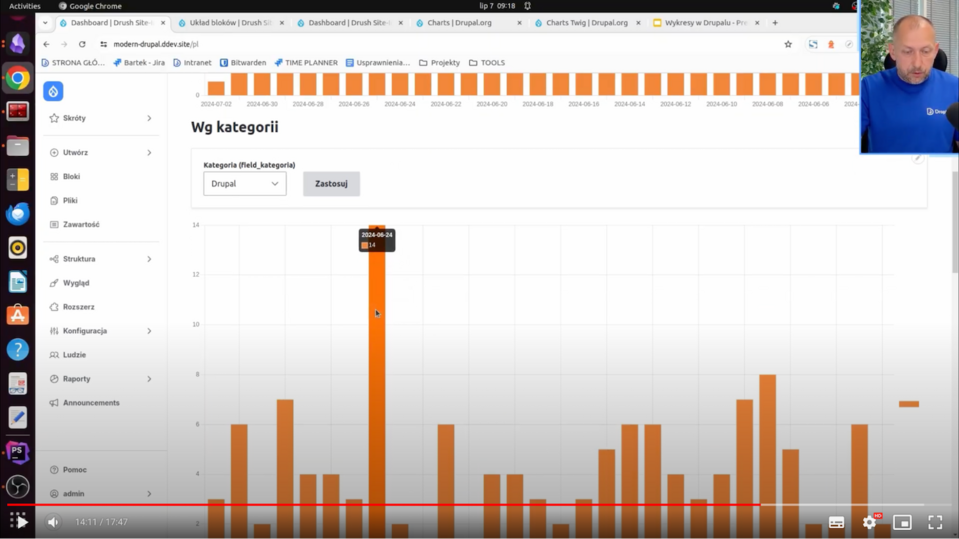
Of course, you can also change this category for yourself, for example, to Safety, and then you can see how the articles were distributed just in this category.
The charts displayed by the author work on a similar principle. We can see which authors and what kind of occupancy they have when it comes to creating and publishing articles.
What do these views look like? They are a little more complicated than this stock price view. I'll show it using the first chart as an example.
On the X-axis is, of course, the date of creation of a given article, i.e., there is Created content. The second value, on the other hand, counts the number of articles on a given day. In this case, the Content: ID field is used, but you can also use the Content: title field because here, it's just that this is the field that is used for the count.
In this case, the Count function, or count, is still used, and next to it is the Aggregation Settings. The aggregation type has the translation Number, but this is simply a Count.
Aggregation functions are available when the Aggregate switch is enabled.
This way, we can count the quantities of given content. They just show up on the graph.
What would it look like without the chart? I choose Unformatted List.
Then you simply see the numbers that count up for a given article - on July 2, there was one article, on July 1 - twelve, and so on. This counting is possible when aggregation is enabled. I will now go back to the older settings with the chart.
Here you can see which data you want to display on the Y-axis - this is the ID-count, which is the number of these articles.
And here you can see how this type of chart has changed:
It’s so less friendly but also has some reflection of the data.
The other charts, namely the number of articles by category and the number of articles written by a particular author, are done in virtually the same way. With this, you can see how we can just clearly show the different data that can be applied to real websites.
Drupal Charts with modules - summary
Thanks to this article, you now know all four possible ways to add a chart to your website on Drupal - using the Views module, block, field in entity, and Charts Twig module. If you need assistance with setting up charts or any other type of technical work, we have a CMS development service for publishers, and we can help you.

Upgrading from Drupal 7 to the latest version opens up a range of benefits, allowing you to leverage a modern CMS. By enhancing areas like content structure, SEO, and security during migration, you can maximize the impact of your investment.
But, without Drupal expertise, deciding what to change and improve can be overwhelming during the migration process.
Our free checklist, built on Droptica’s experience with clients, helps you explore common migration improvements and decide which ones fit your needs.
Migration Options
During your Drupal 7 to 10/11 migration, there are three primary strategies to choose from. Your decision will shape the timeline, budget, and overall migration success. Here’s a look at the options:
1. Migrate Without Changes
This is the quickest and simplest approach, where you upgrade to Drupal 10/11 without changes. It’s ideal if you’re focused on compatibility and keeping the site operational. However, it may bypass opportunities for SEO, security, or content improvements.
Recommendation: Choose this option if you’re on a tight budget, need a quick upgrade, and are planning to address improvements later.
2. Migrate with Small Changes and Improve Later
This option involves upgrading while making essential adjustments to enhance performance, fix urgent issues, or implement minor improvements. For example, you could address outdated content types, enhance SEO configurations, or clean up old fields.
Recommendation: If you’re looking for immediate improvements while staying within budget, this approach strikes a good balance. You can tackle more complex updates later, spreading out costs and efforts.
3. Migrate and Overhaul All Aspects at Once
This option offers a full-scale transformation, tackling everything from redesigning the user experience to fixing issues like content structure, user permissions, SEO, and security.
Recommendation: This is the best route for businesses aiming to modernize their site to align with updated buyer personas and current audience expectations. If you have the budget and want a comprehensive solution, this approach ensures long-term success, though it requires more investment upfront.
How We Created This Document
We built this guide by analyzing our last 10 Drupal migration projects, which ranged from small (200 hours) to large (thousands of hours). Simple migrations focused on quick fixes, while larger ones involved redesigns, performance improvements, and content restructuring.
By combining insights from these projects, we’ve created a document that highlights key improvements to consider during migration. No matter the size of your project, this guide will help you make informed decisions and focus on impactful changes.
Scope of the Document
This document provides a comprehensive guide to the key areas you should consider when migrating from Drupal 7 to Drupal 10/11. It covers essential aspects of the migration process, helping you identify potential improvements in various areas of your website. The document includes recommendations for:
- Content Structure: Optimizing nodes, taxonomy, and other data types.
- User Management: Enhancing user profiles, roles, and permissions.
- Design and Theme: Updating the look and feel of your website, including frontend and framework choices.
- SEO Optimization: Improving your website’s search engine visibility with better structure, URL management, and content optimization.
- Security Enhancements: Implementing security best practices, such as two-factor authentication and role-based access control.
- Performance Optimization: Speeding up your site by optimizing media, caching, and database queries.
- Editorial Workflow: Improving content creation and publishing processes through better workflows and automation.
- Integrations and APIs: Connecting your website to third-party tools, such as CRMs and marketing platforms.
- Hosting and CI/CD Automation: Streamlining deployments, backups, and updates for more efficient website management.
This guide offers practical insights based on real-world experience, helping you decide which areas to prioritize for your migration. Whether you’re looking for a basic update or a full site overhaul, this document will help you navigate the complexities of the migration process.
How to Use This Document
This document is available in Google Docs format, making it easy to copy and use as a checklist during your migration process. Simply go through each section, and if certain recommendations don’t apply to your project, feel free to remove them. For any features or improvements you want to implement, just describe them in the corresponding table cells.
Once you've finalized your version of the document, you can share it with your Drupal development company. To make the estimation process even smoother, we recommend providing it alongside the text file generated by the tool described in the blog post Curious about Drupal 7 to 11 migration costs? Collect all the info for estimation in 5 minutes.
If you'd like to send the document to us at Droptica, you can reach out using our contact form, and we’ll provide you with a tailored estimation for your migration from Drupal 7 to the newest version.
Where to Get This Document
You can download the Drupal 7 to 10/11 Migration: Features and Enhancements to Consider document for free on our Drupal 7 to Drupal 11 Migration Services page.
Summary
Migrating from Drupal 7 to Drupal 10/11 is a chance to update your system and improve your site's performance, security, and user experience. Whether you opt for a simple migration or a complete overhaul, our Drupal 7 to 10/11 Migration: Features and Enhancements to Consider document will guide your decisions.
Use it as a checklist to evaluate your current setup, plan improvements, and collaborate with your development team. You can download the document for free, and if you need help, Droptica is available to provide expert advice and a tailored migration plan.
Migrating from Drupal 7 to the latest version, like Drupal 11, might seem like a big challenge, but it doesn’t have to be. One of the most common obstacles is figuring out how much it will cost. You want to know the price, but you don’t want to give full access to your site just to get an estimate. The good news? You can collect all the necessary information for an accurate project estimate in just 5 minutes.
The problem: Estimating Drupal 7 to 11 migration costs
When you're planning a migration from Drupal 7 to Drupal 11, understanding the cost is essential. Many companies ask for full access to your site to make this estimate, but understandably, you may be hesitant to provide that to multiple companies. Without knowing what’s involved, it can feel overwhelming to start the process.
The solution: Collect info for an estimate in 5 minutes
To make things easier, we at Droptica have developed a simple tool that allows you to gather all the necessary data without having to give full access to your site. In just 5 minutes, you can generate a file with all the important details needed for a migration estimate. This file can then be sent to any Drupal development company, allowing them to provide an accurate cost estimate based on your website’s setup.
How to use the migration tool: Step-by-step
Here’s how you can quickly gather the necessary data for a migration estimate using our tool:
- Log in to your Drupal 7 site as an administrator.
- Ensure the PHP Filter module is enabled. You can check this by visiting /admin/modules. You'll need to have the right permissions to see this page.
- Navigate to /node/add/page. If you don’t have a page content type, you can create a new content type that allows PHP input.
- Change the "Text format" of the body field to "PHP Code."
- Paste the contents from the following link into the body field: snippet.php.
- Save the node. Once saved, a text file will automatically download to your computer. This file contains all the necessary analysis of your Drupal 7 website.
- Send the text file to the development company of your choice for an estimate. With this file, they can give you a preliminary estimate based on your website's structure and setup.
This method doesn't actually migrate your website, but it gathers all the data the development team needs to provide a reliable estimate for your migration.
[embedded content]
Alternative: Using DDEV for local sites
If you have your Drupal 7 site running locally with DDEV, you can also collect the necessary information without using your live site. Just run the following command:
Copy code
ddev drush php-eval 'eval("?>" . file_get_contents("https://raw.githubusercontent.com/droptica/drupal_7_migration_to_latest/refs/heads/main/droptica-drupal-7-audit.php"));'This will execute the same script and allow you to collect the data for estimation.
Using the Devel module
If you have the Devel module enabled on your Drupal 7 site, you can also run the script by navigating to /devel/phpand pasting the contents of snippet.php. This is another easy way to gather the necessary information for your migration estimate. In this case remember to remove PHP opening tag “
Conclusion: Get an estimate without sharing full access
Gathering data for your Drupal 7 to 11 migration doesn't have to be complicated. With our tool, you can quickly collect all the essential information in just 5 minutes, allowing any Drupal development company to provide a preliminary estimate. While this initial estimation will give you a good idea of the cost range, most migrations will require a second iteration, including more in-depth analysis. At this stage, you may need to provide a full copy of your site for a more detailed evaluation.
However, after this first round of estimates, you can easily shortlist companies based on their cost range, saving time and avoiding the need to grant full access upfront.
If you’re looking for an estimate from Droptica, simply send us the file generated by the tool. We've successfully handled numerous Drupal 7 migrations and have additional tools that speed up the process, ensuring your migration to Drupal 11 is efficient and cost-effective.
Read more about our Drupal 7 migration services https://www.droptica.com/services/drupal-7-migration/
When creating websites on Drupal, as developers, we should try to make our job easier. Managing modules, users, generating code – all these processes can be automated and performed with single commands. In this article, we'll take a look at the tools available and discuss them, giving specific examples of use.
1. Drupal Console
Drupal Console is a powerful Command Line Interface. It's used to generate boilerplate code and maintain and debug Drupal. The latest version of this tool is v1.9.8, released on 28 November 2021.
To add Drupal Console to our project, all we need to do is use one command:
composer require drupal/console:~1.0 \
--prefer-dist \
--optimize-autoloader
After that, we can use various commands provided by Drupal Console. We provide some examples below.
Module generation:
drupal generate:module  \
  --module="modulename"  \
  --machine-name="modulename"  \
  --module-path="/modules/custom"  \
  --description="My Awesome Module"  \
  --core="8.x"  \
  --package="Custom"  \
  --module-file  \
  --composer  \
  --test  \
  --twigtemplate
Entity generation:
drupal generate:entity:content  \
  --module="modulename"  \
  --entity-class="DefaultEntity"  \
  --entity-name="default_entity"  \
  --base-path="/admin/structure"  \
  --label="Default entity"  \
  --is-translatable  \
  --revisionable
  --has-forms
Service generation:
drupal generate:service  \
  --module="modulename"  \
  --name="modulename.default"  \
  --class="DefaultService"  \
  --interface  \
  --interface-name="InterfaceName"  \
  --path-service="/modules/custom/modulename/src/"
User creation:
drupal user:create  username password  \
  --roles='authenticated'  \
  --email="[email protected]"  \
  --status="1"
As we can see, Drupal Console gives us a lot of possibilities. Another interesting option that this Command Line Interface (CLI) provides us with is running a local PHP server to test our website.
$ drupal serverThis command will launch a local server on port 8088 for us.
2. Examples for Developers
The Examples for Developers project is one great collection of examples of how we can write our own modules in Drupal. We have 33 different modules at our disposal, from simple blocks, through various types of forms, to controllers with REST API support. We'll probably find everything we need. This module will allow us to learn new things and work faster.
3. Devel
The Devel module includes additional functions and help pages for developers and administrators. It provides us with blocks and toolbars for quick access and developer information. We can use it to “simulate” another user. It's a very helpful functionality, especially when we need to test roles and permissions in Drupal. Devel provides us with features that help us with debugging. And the icing on the cake – we can use it to generate test content.
To install this module, we use Composer.
composer require --dev drupal/devel4. Weight
Sometimes, it happens in our project that we use modules that use the same hooks. By default, Drupal doesn't allow to choose the order of module execution. However, we can work around this limitation in three ways.
Method 1 – setting the Drupal module weight during its installation
In the install file of our module, we can add HOOK_install and use it to set the module weight.
Drupal 9 provides a built-in feature to deal with this issue:
function your_module_name_install() {
  module_set_weight('[your_module_name]', [your_preferred_weight]);
}
It's a little more complicated in Drupal 7, because we have to change this field in the database by ourselves:
function your_module_name_install() {
  db_update('system')
    ->fields(array('weight' => your_preferred_weight))
    ->condition('name', '[your_module_name]', '=')
    ->execute();
}
Method 2 – Changing the weight in core.extension.yml
If we use configurations in our project, we can change the weight of our module in the core.extension.yml file after exporting them. The weight is shown as a number after the module name. The larger the weight, the earlier the methods in the module will be executed.
Method 3 – using Modules weight
The Modules weight Drupal module will add an easy-to-use configuration of module weights. When we go to the configuration page (/admin/config/system/modules-weight/configuration), we'll see this:
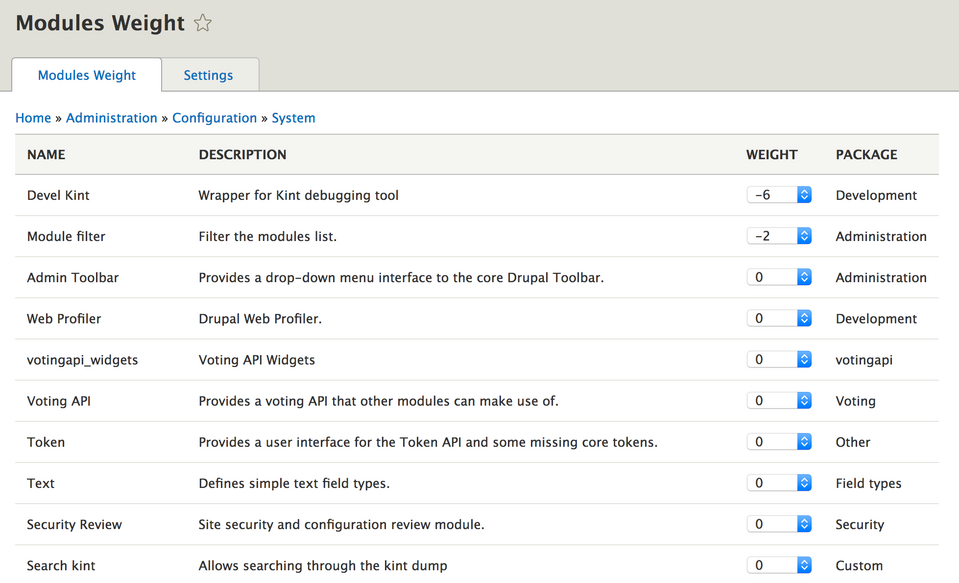
Here we can easily set the weights of our modules.
5. Settings.php and services.yml
We can find these two files in the sites folder of our Drupal installation. With just a few lines, we can make developing software a lot easier. It's a good idea to create a settings.dev.php file and put all the changes in it. During development, we can include it in the main settings.php file and remove it when we upload our website to the server.
An even more convenient option is to use an environment variable such as ENV and set it to "dev". Next, we check in settings.php if there's a settings.$env.php file. If so, we include it.
.
$env = getenv("D_ENV");

if (file_exists($app_root . '/' . $site_path . '/settings.' . $env . '.php')) {
  include $app_root . '/' . $site_path . '/settings.' . $env . '.php';
}
We can keep all our support changes for development in the settings.dev.php file.
What exactly can we do there?
1. Enable error display in addition to the message that our website has encountered a problem.
$config['system.logging']['error_level'] = 'verbose';2. Disable CSS and JS aggregation – something we often forget when editing JS styles or scripts.
$config['system.performance']['css']['preprocess'] = FALSE;
$config['system.performance']['js']['preprocess'] = FALSE;
3. Disable render cache:
$settings['cache']['bins']['render'] = 'cache.backend.null';4. Include the development.services.yml file.
$settings['container_yamls'][] = $app_root . '/' . $site_path . '/development.services.yml';The content of the latter file may look like the one we show below.
parameters:
  twig.config:
    debug: true
    auto_reload: null
    cache: false
services:
  cache.backend.null:
    class: Drupal\Core\Cache\NullBackendFactory
We enable Twig debugging. These are helpful comments in the HTML structure that'll make it easier for us to find a template file or create hooks. In addition, we disable cache. Also, we add the cache.backend.null service, which we used earlier to disable the render cache.
6. Lando
It's a tool that facilitates the local development of our website. It allows us to run literally anything and is based on Docker. We have CLI at our disposal, which allows us to easily manage our installations. To set up a Drupal installation locally, all we need is a few commands.
First, we create a Drupal project using Composer.
composer create-project drupal/recommended-project lando-demoThen, we go to the created directory and run the command:
lando init- Choose drupal9 as the recipe,
- name your webroot web,
- and then name your project.
After this process, a .lando.yml file will be created. We'll find there a lot of different information, such as the name of our project, what services we use (initially, these will include appserver and database), addresses of our application, PHP version, or access data for our database.
Next, we run the command
lando startNow we can go to the address given in .lando.yml and finish the Drupal installation.
7. Drush
A tool that every Drupal developer should know. Drush has been with us since Drupal 4.7 and is still developed. As of writing this, the latest version is 11.0.8, and it was released on 9 April 2022. Drush allows us to manage our website by importing and exporting configurations, updating the database, or cleaning the cache. Newer versions of this tool also allow us to generate code. Let's go over some useful commands:
Cache cleaning
drush crConfiguration importing
drush cimConfiguration exporting
drush cexCreating a one-time login link
drush uliModule enabling
drush en module_nameModule disabling and removing
drush pmu module_nameDatabase updating
drush updbWatchdog checking (dblog module)
drush wsWhen it comes to code generation, we have a lot of options to choose from. We recommend using the command
drush generateand finding the option that interests us the most.
Drupal development tools - summary
We went through some interesting tools that we can use when working with Drupal. As we can see, Drupal development can be quite quick and pleasant when we know the tools that make the job easier. It's good to take some time to explore these solutions. This investment will pay for itself quickly!
About Drupal Sun
Drupal Sun is an Evolving Web project. It allows you to:
- Do full-text search on all the articles in Drupal Planet (thanks to Apache Solr)
- Facet based on tags, author, or feed
- Flip through articles quickly (with j/k or arrow keys) to find what you're interested in
- View the entire article text inline, or in the context of the site where it was created
See the blog post at Evolving Web